
Authsignal’s session APIs can be used to manage an authenticated session for a user.

Configuration

Enabling the JWKS URL

To use Authsignal session APIs, you must first enable a JWKS URL in the Authsignal Portal under Settings -> API keys.


Enabling a JWKS URL
Once enabled, a link to the JWKS URL for your tenant will be displayed.
Enabling a JWKS URL

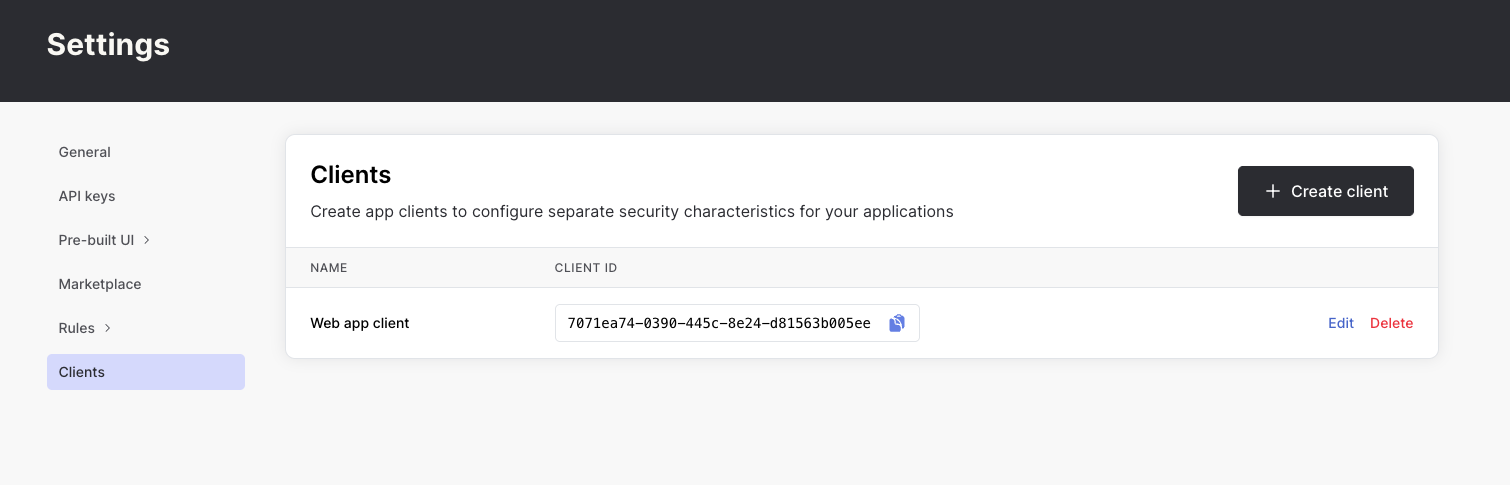
Creating app clients

Next, create an app client in the Authsignal Portal under Settings -> App clients.
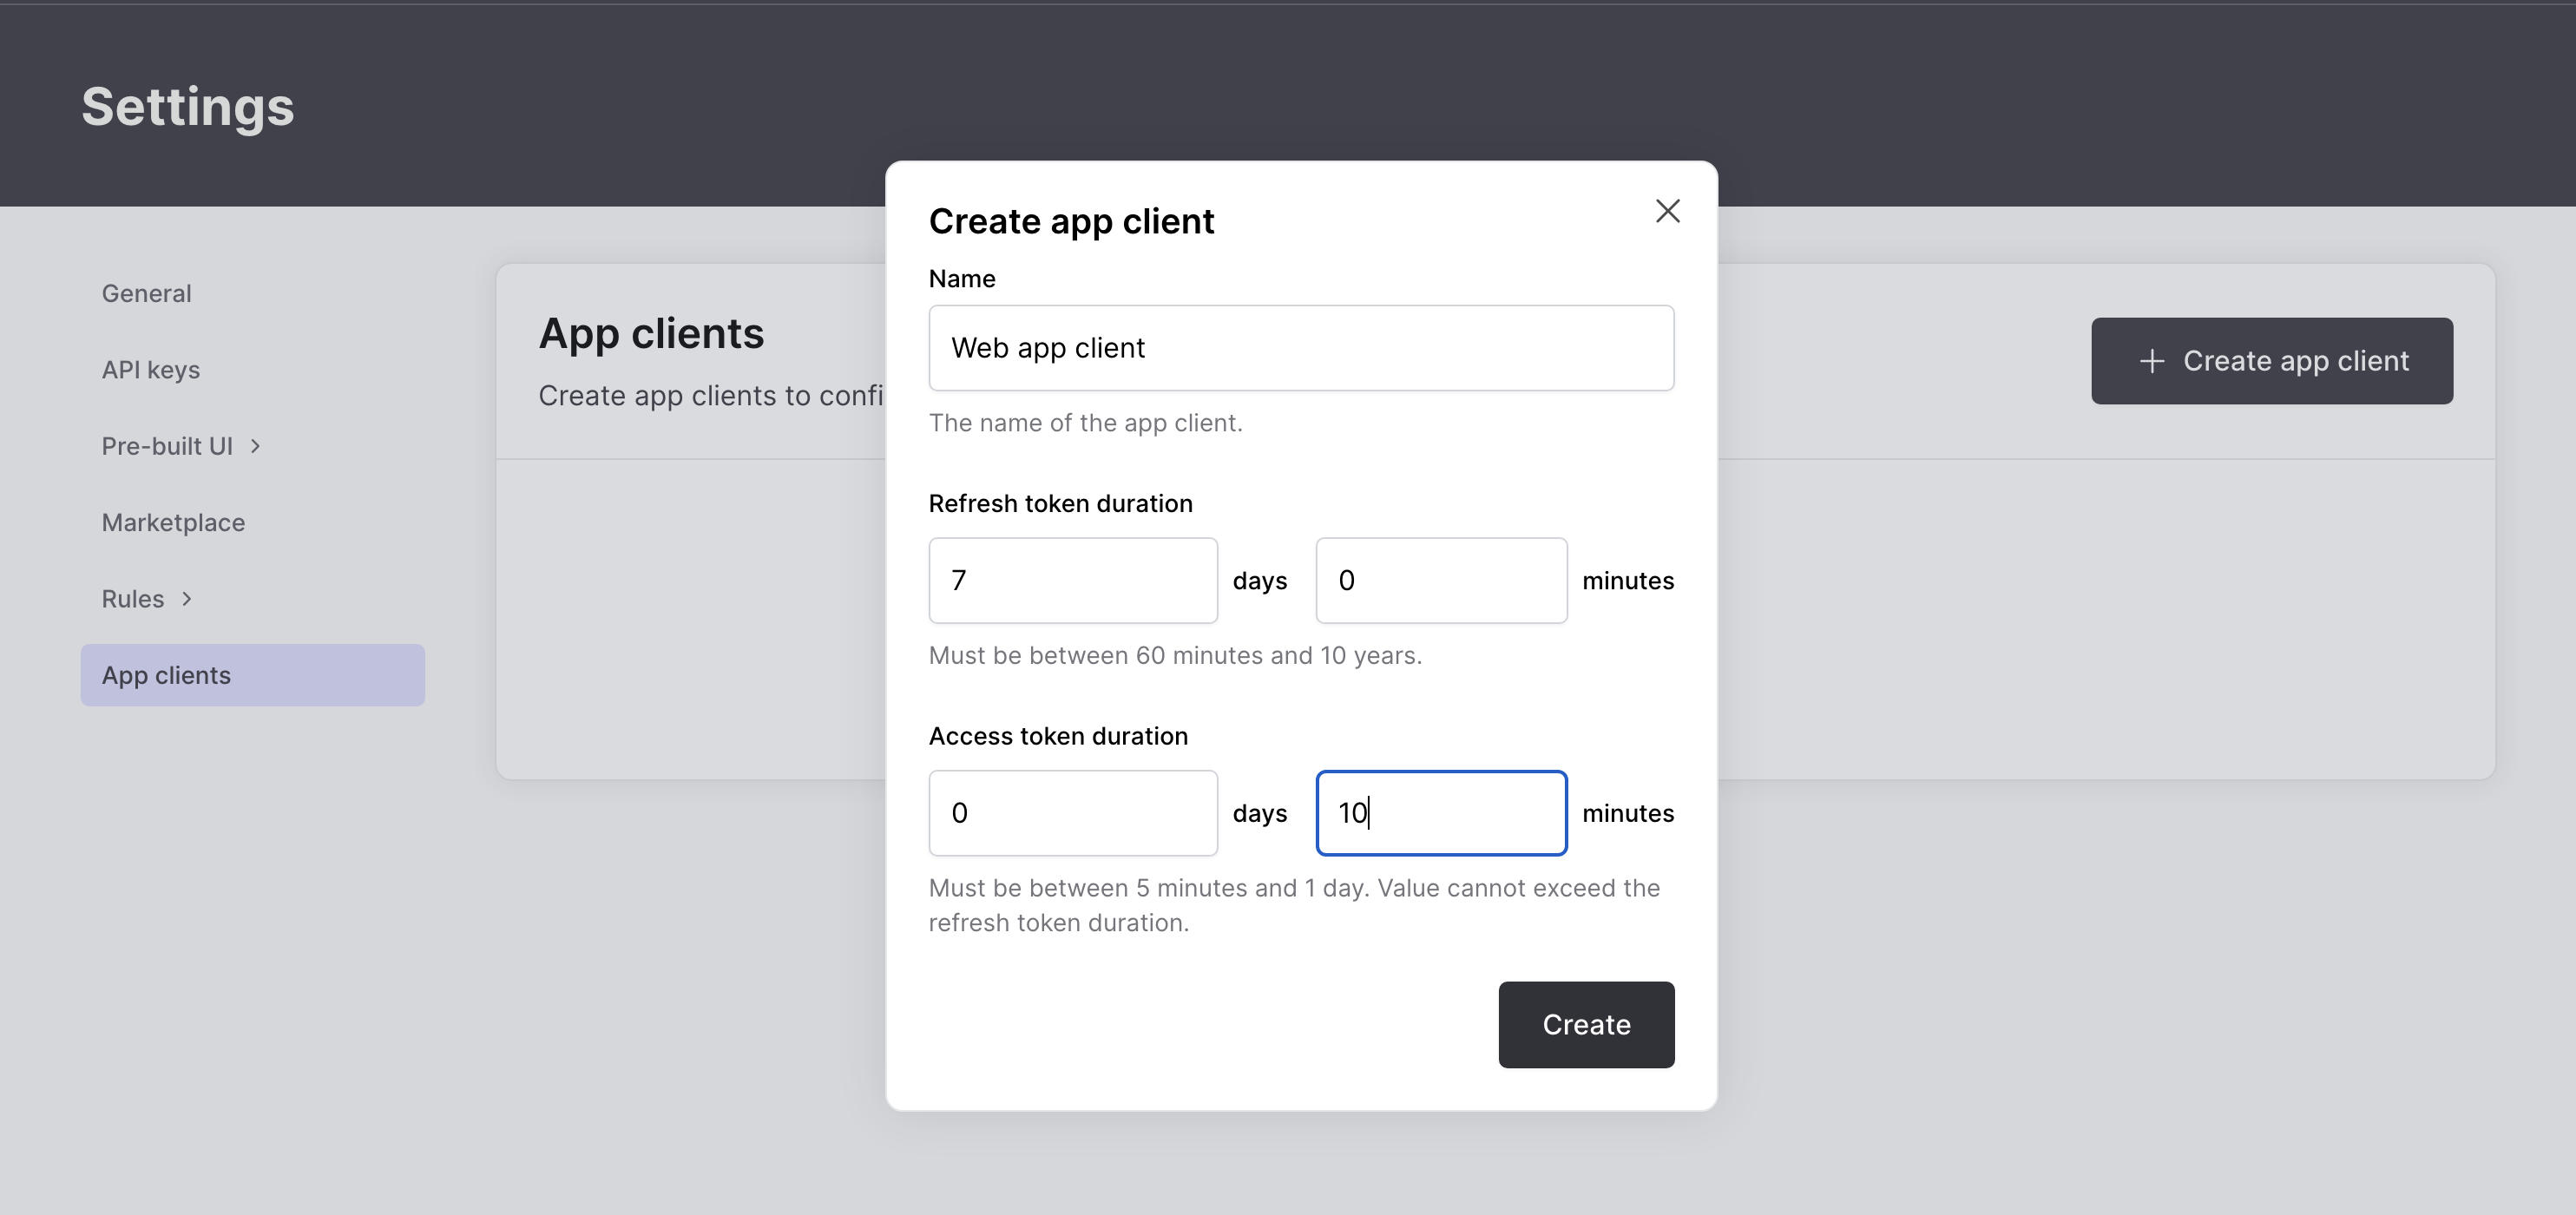
Creating an app client
For each client you create, you can configure a separate access token and refresh token duration. The client ID will be set as the access token’s aud claim.
App client list

Creating sessions

In order to create an authenticated session, you must first obtain an Authsignal client token either by using a Client SDK or the pre-built UI.

OTP auth (email, SMS, TOTP)

For an OTP authentication method such as Email OTP you can follow the integration steps below to create a session. 1. Backend - Track action In your app’s backend, use an Authsignal Server SDK to track an action and obtain an initial client token.
const request = {
  userId: "dc58c6dc-a1fd-4a4f-8e2f-846636dd4833",
  action: "signIn",
  attributes: {
    email: "jane.smith@authsignal.com",
  },
};

const response = await authsignal.track(request);

const token = response.token;
var request = new TrackRequest(
    UserId: "dc58c6dc-a1fd-4a4f-8e2f-846636dd4833",
    Action: "signIn",
    Attributes: new TrackAttributes(
        Email: "jane.smith@authsignal.com",
    )
);

var response = await authsignal.Track(request);

var token = response.token;
TrackRequest request = new TrackRequest();
request.userId = "dc58c6dc-a1fd-4a4f-8e2f-846636dd4833";
request.action = "signIn";
request.attributes = new TrackAttributes();
request.attributes.email = "jane@authsignal.co";

TrackResponse response = authsignal.track(request).get();

String token = response.token;
response = Authsignal.track({
  user_id: "dc58c6dc-a1fd-4a4f-8e2f-846636dd4833",
  action: "signIn",
  attributes: {
    email: "jane.smith@authsignal.com",
  }
})

token = response.token
response = authsignal.track(
    user_id="dc58c6dc-a1fd-4a4f-8e2f-846636dd4833",
    action="signIn",
    attributes={
        "email": "jane.smith@authsignal.com",
    }
)

token = response.token
$response = Authsignal::track([
    'userId' => "dc58c6dc-a1fd-4a4f-8e2f-846636dd4833",
    'action' => "signIn",
    'attributes' => [
        'email' => "jane.smith@authsignal.com",
    ]
]);

$token = response.token
response, err := client.Track(
    TrackRequest{
        UserId: "dc58c6dc-a1fd-4a4f-8e2f-846636dd4833",
        Action: "signIn",
        Attributes: &TrackAttributes{
            Email: "jane.smith@authsignal.com",
        },
    },
)

token := response.token
2. Frontend - Use a Client SDK In your web or mobile app, call setToken with the client token obtained in step 1, then use the relevant SDK methods to progress the user through a challenge and obtain a new client token.
// Set token from the track response
authsignal.setToken("eyJhbGciOiJ...");

// Send the user an email OTP code
// You can call this multiple times via a 'resend' button
await authsignal.email.challenge();

// Verify the inputted code matches the original code
const response = await authsignal.email.verify({ code: "123456" });

// Obtain a new token
const token = response.token;
// Set token from the track response
authsignal.setToken("eyJhbGciOiJ...")

// Send the user an email OTP code
// You can call this multiple times via a 'resend' button
await authsignal.email.challenge()

// Verify the inputted code matches the original code
let response = await authsignal.email.verify(code: "123456")

// Obtain a new token
let token = response.token
// Set token from the track response
authsignal.setToken("eyJhbGciOiJ...")

// Send the user an email OTP code
// You can call this multiple times via a 'resend' button
authsignal.email.challenge()

// Verify the inputted code matches the original code
val response = authsignal.email.verify(code = "123456")

// Obtain a new token
val token = response.token
// Set token from the track response
await authsignal.setToken("eyJhbGciOiJ...");

// Send the user an email OTP code
// You can call this multiple times via a 'resend' button
await authsignal.email.challenge();

// Verify the inputted code matches the original code
const response = await authsignal.email.verify({ code: "123456" });

// Obtain a new token
const token = response.token;
// Set token from the track response
await authsignal.setToken("eyJhbGciOiJ...");

// Send the user an email OTP code
// You can call this multiple times via a 'resend' button
await authsignal.email.challenge();

// Verify the inputted code matches the original code
final response = await authsignal.email.verify(code: "123456");

// Obtain a new token
final token = response.token;
3. Backend - Create session Pass the client token obtained in step 2 to your backend and exchange it for an access token and refresh token.
const request = {
  token: "eyJhbGciOiJ...",
  clientId: "46e10ac5-cb9c-458f-ad86-0f698f67b365",
};

const response = await authsignal.createSession(request);

const accessToken = response.accessToken;
const refreshToken = response.refreshToken;
var request = new CreateSessionRequest(
    Token: "eyJhbGciOiJ...",
    ClientId: "46e10ac5-cb9c-458f-ad86-0f698f67b365"
);

var response = await authsignal.CreateSession(request);

var accessToken = response.AccessToken;
var refreshToken = response.RefreshToken;
CreateSessionRequest request = new CreateSessionRequest();
request.token = "eyJhbGciOiJ...";
request.clientId = "46e10ac5-cb9c-458f-ad86-0f698f67b365";

CreateSessionResponse response = authsignal.createSession(request).get();

String accessToken = response.accessToken;
String refreshToken = response.refreshToken;
response = Authsignal.create_session(
    token: "eyJhbGciOiJ...",
    client_id: "46e10ac5-cb9c-458f-ad86-0f698f67b365",
)

access_token = response[:access_token]
refresh_token = response[:refresh_token]
response, err := client.CreateSession(
    CreateSessionRequest{
        Token: "eyJhbGciOiJ...",
        ClientId: "46e10ac5-cb9c-458f-ad86-0f698f67b365",
    },
)


accessToken := response.AccessToken
refreshToken := response.RefreshToken

Passkeys

When using a device-bound authentication method like passkeys, only two steps are required to create a session. 1. Frontend - Use a Client SDK Use our web SDK to present a passkey sign-in prompt in the browser, or use one of our mobile SDKs to present the native passkey UI in an iOS or Android app.
const response = await authsignal.passkey.signIn({
  action: "signInWithPasskey",
});

if (response.data?.token) {
  // Send token to your backend for validation
  const token = response.data.token;
} else {
  console.error("Passkey sign-in failed:", response.error);
}
const response = await authsignal.passkey.signIn({
  action: "signInWithPasskey",
});

if (response.data?.token) {
  // Send token to your backend for validation
  const token = response.data.token;
} else {
  Alert.alert("Error", "Passkey sign-in failed");
}
final response = await authsignal.passkey.signIn(action: "signInWithPasskey");

if (response.data?.token != null) {
  // Send token to your backend for validation
  final token = response.data.token;
} else {
  print("Passkey sign-in failed: ${response.error}");
}
let response = await authsignal.passkey.signIn(action: "signInWithPasskey")

if let token = response.data?.token {
    // Send token to your backend for validation
} else {
    print("Passkey sign-in failed: \(response.error ?? "Unknown error")")
}
val response = authsignal.passkey.signIn(action = "signInWithPasskey")

if (response.data?.token != null) {
    // Send token to your backend for validation
    val token = response.data.token
} else {
    Log.e("Passkey", "Sign-in failed: ${response.error}")
}
2. Backend - Create session Pass the token obtained in step 1 to your backend and exchange it for an access token and refresh token.
const request = {
  token: "eyJhbGciOiJ...",
  clientId: "46e10ac5-cb9c-458f-ad86-0f698f67b365",
};

const response = await authsignal.createSession(request);

const accessToken = response.accessToken;
const refreshToken = response.refreshToken;
var request = new CreateSessionRequest(
    Token: "eyJhbGciOiJ...",
    ClientId: "46e10ac5-cb9c-458f-ad86-0f698f67b365"
);

var response = await authsignal.CreateSession(request);

var accessToken = response.AccessToken;
var refreshToken = response.RefreshToken;
CreateSessionRequest request = new CreateSessionRequest();
request.token = "eyJhbGciOiJ...";
request.clientId = "46e10ac5-cb9c-458f-ad86-0f698f67b365";

CreateSessionResponse response = authsignal.createSession(request).get();

String accessToken = response.accessToken;
String refreshToken = response.refreshToken;
response = Authsignal.create_session(
    token: "eyJhbGciOiJ...",
    client_id: "46e10ac5-cb9c-458f-ad86-0f698f67b365",
)

access_token = response[:access_token]
refresh_token = response[:refresh_token]
response, err := client.CreateSession(
    CreateSessionRequest{
        Token: "eyJhbGciOiJ...",
        ClientId: "46e10ac5-cb9c-458f-ad86-0f698f67b365",
    },
)


accessToken := response.AccessToken
refreshToken := response.RefreshToken

Validating sessions

Using the JWKS URL

Access tokens are signed using an RS256 algorithm. A JWKS endpoint for your tenant’s keys is available at the following location:
${env:AUTHSIGNAL_URL}/client/public/${env:AUTHSIGNAL_TENANT}/.well-known/jwks
  • The AUTHSIGNAL_URL value is the URL for your tenant’s region.
  • The AUTHSIGNAL_TENANT value is your tenant ID.

Using the SDK

You can also use the Authsignal Server SDK to validate an access token.
const request = {
  accessToken: "eyJhbGciOiJ...",
  clientIds: ["46e10ac5-cb9c-458f-ad86-0f698f67b365"],
};

const response = await authsignal.validateSession(request);

const userId = response.user.userId;
const email = response.user.email;
var request = new ValidateSessionRequest(
    AccessToken: "eyJhbGciOiJ...",
    ClientIds: ["46e10ac5-cb9c-458f-ad86-0f698f67b365"]
);

var response = await authsignal.ValidateSession(request);

var userId = response.User.UserId;
var email = response.User.Email;
ValidateSessionRequest request = new ValidateSessionRequest();
request.accessToken = "eyJhbGciOiJ...";
request.clientIds = clientIds = new String[] { "46e10ac5-cb9c-458f-ad86-0f698f67b365" };

ValidateSessionResponse response = authsignal.validateSession(request).get();

String userId = response.user.userId;
String email = response.user.email;
response = Authsignal.validate_session(
    access_token: "eyJhbGciOiJ...",
    client_ids: ["46e10ac5-cb9c-458f-ad86-0f698f67b365"],
)

user_id = response[:user][:user_id]
email = response[:user][:email]
response, err := client.ValidateSession(
    ValidateSessionRequest{
        AccessToken: "eyJhbGciOiJ...",
        ClientIds: []string{"46e10ac5-cb9c-458f-ad86-0f698f67b365"}
    },
)


userId := response.User.UserId
email := response.User.Email
In addition to verifying the access token’s signature, the Authsignal SDK’s validateSession method will also check that the token has not been revoked.

Refreshing sessions

A refresh token can be exchanged for a new access token and refresh token.
const request = {
  refreshToken: "3f72a26e6834b4da...",
};

const response = await authsignal.refreshSession(request);

const accessToken = response.accessToken;
const refreshToken = response.refreshToken;
var request = new RefreshSessionRequest(
    RefreshToken: "3f72a26e6834b4da...",
);

var response = await authsignal.RefreshSession(request);

var accessToken = response.AccessToken;
var refreshToken = response.RefreshToken;
RefreshSessionRequest request = new RefreshSessionRequest();
request.refreshToken = "3f72a26e6834b4da...";

RefreshSessionResponse response = authsignal.refreshSession(request).get();

String accessToken = response.accessToken;
String refreshToken = response.refreshToken;
response = Authsignal.refresh_session(
    refresh_token: "3f72a26e6834b4da...",
)

access_token = response[:access_token]
refresh_token = response[:refresh_token]
response, err := client.RefreshSession(
    RefreshSessionRequest{
        RefreshToken: "3f72a26e6834b4da...",
    },
)


accessToken := response.AccessToken
refreshToken := response.RefreshToken
Refresh tokens are single-use and should be replaced with the new refresh token returned in the response.

Revoking sessions

An individual access token can be revoked so that the validateSession method will no longer accept it.
const request = {
  accessToken: "eyJhbGciOiJ...",
};

await authsignal.revokeSession(request);
var request = new RevokeSessionRequest(
    AccessToken: "eyJhbGciOiJ..."
);

await authsignal.RevokeSession(request);
RevokeSessionRequest request = new RevokeSessionRequest();
request.accessToken = "eyJhbGciOiJ...";

authsignal.revokeSession(request).get();
response = Authsignal.revoke_session(
    access_token: "eyJhbGciOiJ...",
)
err := client.RevokeSession(
    RevokeSessionRequest{
        AccessToken: "eyJhbGciOiJ...",
    },
)


In addition, you can revoke all currently active tokens for a user.
const request = {
  userId: "dc58c6dc-a1fd-4a4f-8e2f-846636dd4833",
};

await authsignal.revokeUserSessions(request);
var request = new RevokeUserSessionsRequest(
    UserId: "dc58c6dc-a1fd-4a4f-8e2f-846636dd4833"
);

await authsignal.RevokeUserSessions(request);
RevokeUserSessionsRequest request = new RevokeUserSessionsRequest();
request.userId = "dc58c6dc-a1fd-4a4f-8e2f-846636dd4833";

authsignal.revokeUserSessions(request).get();
response = Authsignal.revoke_user_sessions(
    user_id: "dc58c6dc-a1fd-4a4f-8e2f-846636dd4833",
)
err := client.RevokeUserSessions(
    RevokeSessionRequest{
        UserId: "dc58c6dc-a1fd-4a4f-8e2f-846636dd4833",
    },
)


Next steps