This guide shows how to add a passkey sign-in option to NextAuth using Authsignal. We have used email magic link for demo purposes, but the same flow can be used for other authentication methods.

Example Repository

Authsignal Passkeys with NextAuth in a Next.js Pages Router app.

Create a new Next.js application

npm create next-app@latest

Users will need to create an account and sign in before they can create a passkey. To set up NextAuth with email magic link sign in, follow the NextAuth Email Provider Docs.

Install Authsignal SDKs

Install the Authsignal web and node SDKs:

npm install @authsignal/browser @authsignal/node

We recommend disabling 1Password browser extensions during development as they can intercept error messages from Authsignal’s SDKs.

Add Authsignal secret key, tenant ID, and region API host

Get the secret key, tenant ID, and region API host to your from Authsignal Portal and add them to your .env.local file.

.env.local
NEXT_PUBLIC_AUTHSIGNAL_TENANT_ID=YOUR_TENANT_ID
AUTHSIGNAL_TENANT_SECRET_KEY=YOUR_TENANT_SECRET_KEY
NEXT_PUBLIC_AUTHSIGNAL_API_HOST=YOUR_REGION_API_HOST

Creating a passkey

1

Backend - Track an action

Create a protected endpoint that tracks an action using Authsignal’s Node Server SDK. In our example, we’ve created an endpoint called enroll-passkey that checks the session token before tracking an action. Pass the token returned by the track call to your frontend.

pages/api/auth/enroll-passkey.ts
import { Authsignal } from "@authsignal/node";
import { NextApiRequest, NextApiResponse } from "next";
import { getToken } from "next-auth/jwt";

const authsignal = new Authsignal({
  apiSecretKey: process.env.AUTHSIGNAL_TENANT_SECRET_KEY!,
  apiUrl: process.env.NEXT_PUBLIC_AUTHSIGNAL_API_HOST!,
});

export default async function enrollPasskey(
  req: NextApiRequest,
  res: NextApiResponse
) {
  const sessionToken = await getToken({ req });

  if (!sessionToken || !sessionToken.sub) {
    return res.status(401).json("Unauthenticated");
  }

  const { token } = await authsignal.track({
    userId: sessionToken.sub,
    action: "enroll-passkey",
    attributes: {
      scope: "add:authenticators",
    },
  });

  res.status(200).json(token);
}
2

Frontend - Initiate the passkey enrollment flow

In your app’s frontend, call the signUp function using Authsignal’s Web SDK, passing the token returned in step 1.

pages/index.tsx
const authsignal = useAuthsignal();
// Get a short lived token by tracking an action
const enrollPasskey = async () => {

// Get a short lived token by tracking an action
const enrollPasskeyResponse = await fetch(
  "/api/auth/enroll-passkey"
);

const token = await enrollPasskeyResponse.json();

// Initiate the passkey enrollment flow
const username = session.user.email;

const resultToken = await authsignal.passkey.signUp({
   token,
   username,
});
};
3

Backend - Validate the result

Create a protected endpoint that validates the result token from step 2.

Pass the result token returned from Authsignal’s passkey.signUp in step 2 to your backend, validating the result of the enrollment server-side. In our example, we’ve created an API route called callback that checks the NextAuth session token, then validates the result token passed in from step 2.

pages/api/auth/callback.ts
import { Authsignal } from "@authsignal/node";
import { NextApiRequest, NextApiResponse } from "next";
import { getToken } from "next-auth/jwt";

const authsignal = new Authsignal({
  apiSecretKey: process.env.AUTHSIGNAL_TENANT_SECRET_KEY!,
  apiUrl: process.env.NEXT_PUBLIC_AUTHSIGNAL_API_HOST!,
});

 export default async function callback(req: NextApiRequest, res: NextApiResponse) {
 const sessionToken = await getToken({ req })

 if (!sessionToken) {
   return res.status(401).json('Unauthenticated');
 }

 const { token } = req.query;

 if (!token || Array.isArray(token)) {
   res.status(400).json("Invalid token");
   return;
 }

 const data = await authsignal.validateChallenge({ token });

 res.status(200).json(data);
};
4

Frontend - Handle result

Notify the user of the success or failure of the passkey addition.

pages/index.tsx
 const { success } = await callbackResponse.json();

if (success) {
  alert("Successfully added passkey");
} else {
  alert("Failed to add passkey");
}

The full frontend enrollment logic is shown below:

pages/index.tsx
import { useRouter } from "next/router";
import { useSession, signOut } from "next-auth/react";
import { useEffect } from "react";

import { useAuthsignal } from "../utils/authsignal";

export default function Index() {
  const { data: session, status } = useSession();

  const router = useRouter();

  const authsignal = useAuthsignal();

  useEffect(() => {
    if (status === "unauthenticated") {
      router.push("/signin");
    }
  }, [status, router]);

  const enrollPasskey = async () => {
    if (!session?.user?.email || !session.user) {
      throw new Error("No user in session");
    }

    // Get a short lived token by tracking an action
    const enrollPasskeyResponse = await fetch(
      "/api/auth/enroll-passkey"
    );

    const token = await enrollPasskeyResponse.json();

    // Initiate the passkey enroll flow
    const username = session.user.email;

    const resultToken = await authsignal.passkey.signUp({
      token,
      username,
    });

    // Check that the enrollment was successful
    const callbackResponse = await fetch(
      `/api/auth/callback/?token=${resultToken}`
    );

    const { success } = await callbackResponse.json();

    if (success) {
      alert("Successfully added passkey");
    } else {
      alert("Failed to add passkey");
    }
  };

  if (status === "loading") {
    return <div>Loading...</div>;
  }

  return (
    <div className="container">
      <h3>Welcome, {session?.user?.email}</h3>
      <p>You now have a NextAuth session.</p>
      <button onClick={() => signOut({ callbackUrl: "/signin" })}>
        Sign out
      </button>
      <button onClick={enrollPasskey}>Create passkey</button>
    </div>
  );
}

You can remove passkeys along with other authenticators in the Authsignal Portal. You will also need to remove it from your device, e.g. in chrome://settings/passkeys.

Signing in with a passkey

Now that the user has enrolled a passkey, the next time they sign in we would like to give them the option to use their passkey instead of email magic link.

1

Frontend - Enable passkey autofill

First, we need to ensure that the input field has the value 
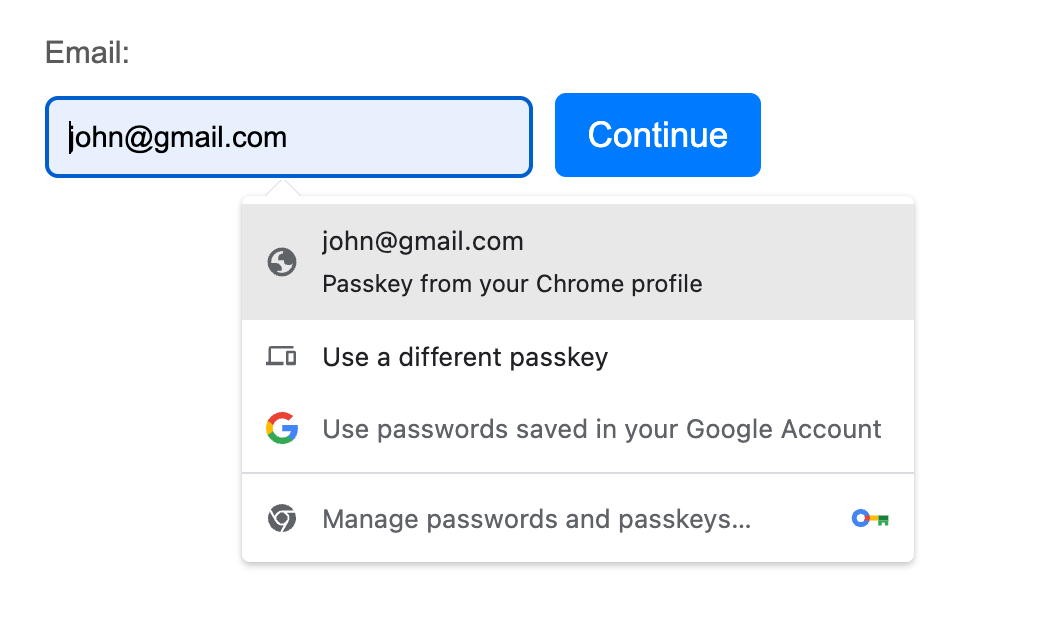
username webauthn in the autocomplete attribute.

The webauthn value in the autocomplete attribute is required for autofill to work.

webauthn can be combined with other typical autocomplete values, including username and current-password, but must appear at the end to consistently trigger conditional UI across browsers.

pages/signin.tsx
<input
   type="email"
   id="email"
   onChange={(input) => setEmail(input.target.value)}
   autoComplete="username webauthn"
/>

Then we call authsignal.passkey.signIn when the page loads. This will initialize the input field for passkey autofill, which means if a user has enrolled a passkey then they should be able to select it when focusing the text field. On success, this will return a token that we will validate on the backend.

pages/signin.tsx
const signInToken = await authsignal.passkey.signIn({
  autofill: true,
});

We pass this token to NextAuth’s signIn method, specifying that we want to use the credentials provider. This uses the token to validate the result of the challenge server-side and logs in the user. We’ve set redirect: false so that we can handle errors manually, on the current page.

pages/signin.tsx
import { signIn } from "next-auth/react";

const result = await signIn("credentials", {
  signInToken,
  redirect: false,
});

The full sign in logic code is shown below:

pages/signin.tsx
useEffect(() => {
    const handlePasskeySignIn = async () => {
      try {
        // Initialize the input for passkey autofill
        const response = await authsignal.passkey.signIn({
          autofill: true,
        });
        
        // Extract token from response.data.token
        let signInToken = null;
        
        if (response && response.data && response.data.token) {
          signInToken = response.data.token;
        }
        

        // Run NextAuth's sign in flow. This will run if the user selects one of their passkeys from the Webauthn dropdown.
        if (signInToken && typeof signInToken === 'string') {
          const result = await signIn("credentials", {
            signInToken,
            redirect: false,
          });

          if (result?.error) {
            alert("Failed to sign in with passkey");
          } else {
            router.push("/");
          }
        } else {
          alert("Failed to sign in with passkey: Invalid token format");
        }
      } catch (err: any) {
        if (err.name === "AbortError") {
          // Ignore
        } else {
          console.error("Passkey sign-in error:", err);
          throw err;
        }
      }
    };

    if (status === "unauthenticated") {
      handlePasskeySignIn();
    }
  }, [status, authsignal.passkey, router]);
2

Backend - Create NextAuth session

We need to add a CredentialsProvider to the providers array in authOptions within the [...nextauth] API route. This will validate the signInToken from step 1 using Authsignal’s validateChallenge method. On successful validation, NextAuth will create a session containing user information that you specify. Returning null will throw an error.

pages/api/auth/[...nextauth].ts
const authOptions = {
adapter: PrismaAdapter(prisma),
session: {
  strategy: "jwt" as SessionStrategy,
},
providers: [
  EmailProvider({
    server: {
      host: process.env.SMTP_HOST,
      port: Number(process.env.SMTP_PORT),
      auth: {
        user: process.env.SMTP_USER,
        pass: process.env.SMTP_PASSWORD,
      },
    },
   from: process.env.SMTP_FROM,
 }),
 CredentialsProvider({
   name: "webauthn",
   credentials: {},
   async authorize(cred) {
    const { signInToken } = cred as { signInToken: string };

    if (!signInToken) {
      return null;
    }

    try {
      const result = await authsignal.validateChallenge({
        token: signInToken,
      });

      const userId = result.userId;
      if (!userId) {
        return null;
      }

      const user = await prisma.user.findUnique({
        where: { id: userId },
      });

      if (!user) {
        return null;
      }

      const state = result.state;
      if (state === "CHALLENGE_SUCCEEDED") {
        return { id: user.id, email: user.email };
      }
    } catch {
      return null;
    }

    return null;
  },
}),
],
secret: process.env.NEXTAUTH_SECRET,
};

You’ll notice that we’ve also added a JWT strategy to the session option. We need to enable JWT session tokens for NextAuth’s CredentialsProvider to work, according to NextAuth’s documentation.

Conclusion

That’s it! You’ve successfully integrated passkey sign in with NextAuth.

For more information, check out our passkeys documentation or try our interactive demo to test passkey compatibility with your browser.