What is authenticator binding?

Authenticator binding is a security principle that ensures users can only add new authentication methods after proving their identity with existing methods.

Why authenticator binding matters

Consider this attack scenario:
  1. Attacker compromises a user’s password
  2. Without authenticator binding: Attacker adds their own phone number for SMS
  3. Attacker now controls the “second factor” and bypasses MFA

Using the pre-built UI

By default, the pre-built UI enforces strong binding automatically. Users must complete a challenge with an existing method before adding new ones. Implementation:
// User wants to add a new authenticator
const response = await authsignal.track({
  userId: "user-123",
  action: "manageAuthenticators",
  attributes: {
    redirectUrl: "https://yourapp.com/callback",
    redirectToSettings: true,
  },
});

// Launch pre-built UI - user will be challenged first
authsignal.launch(response.url);
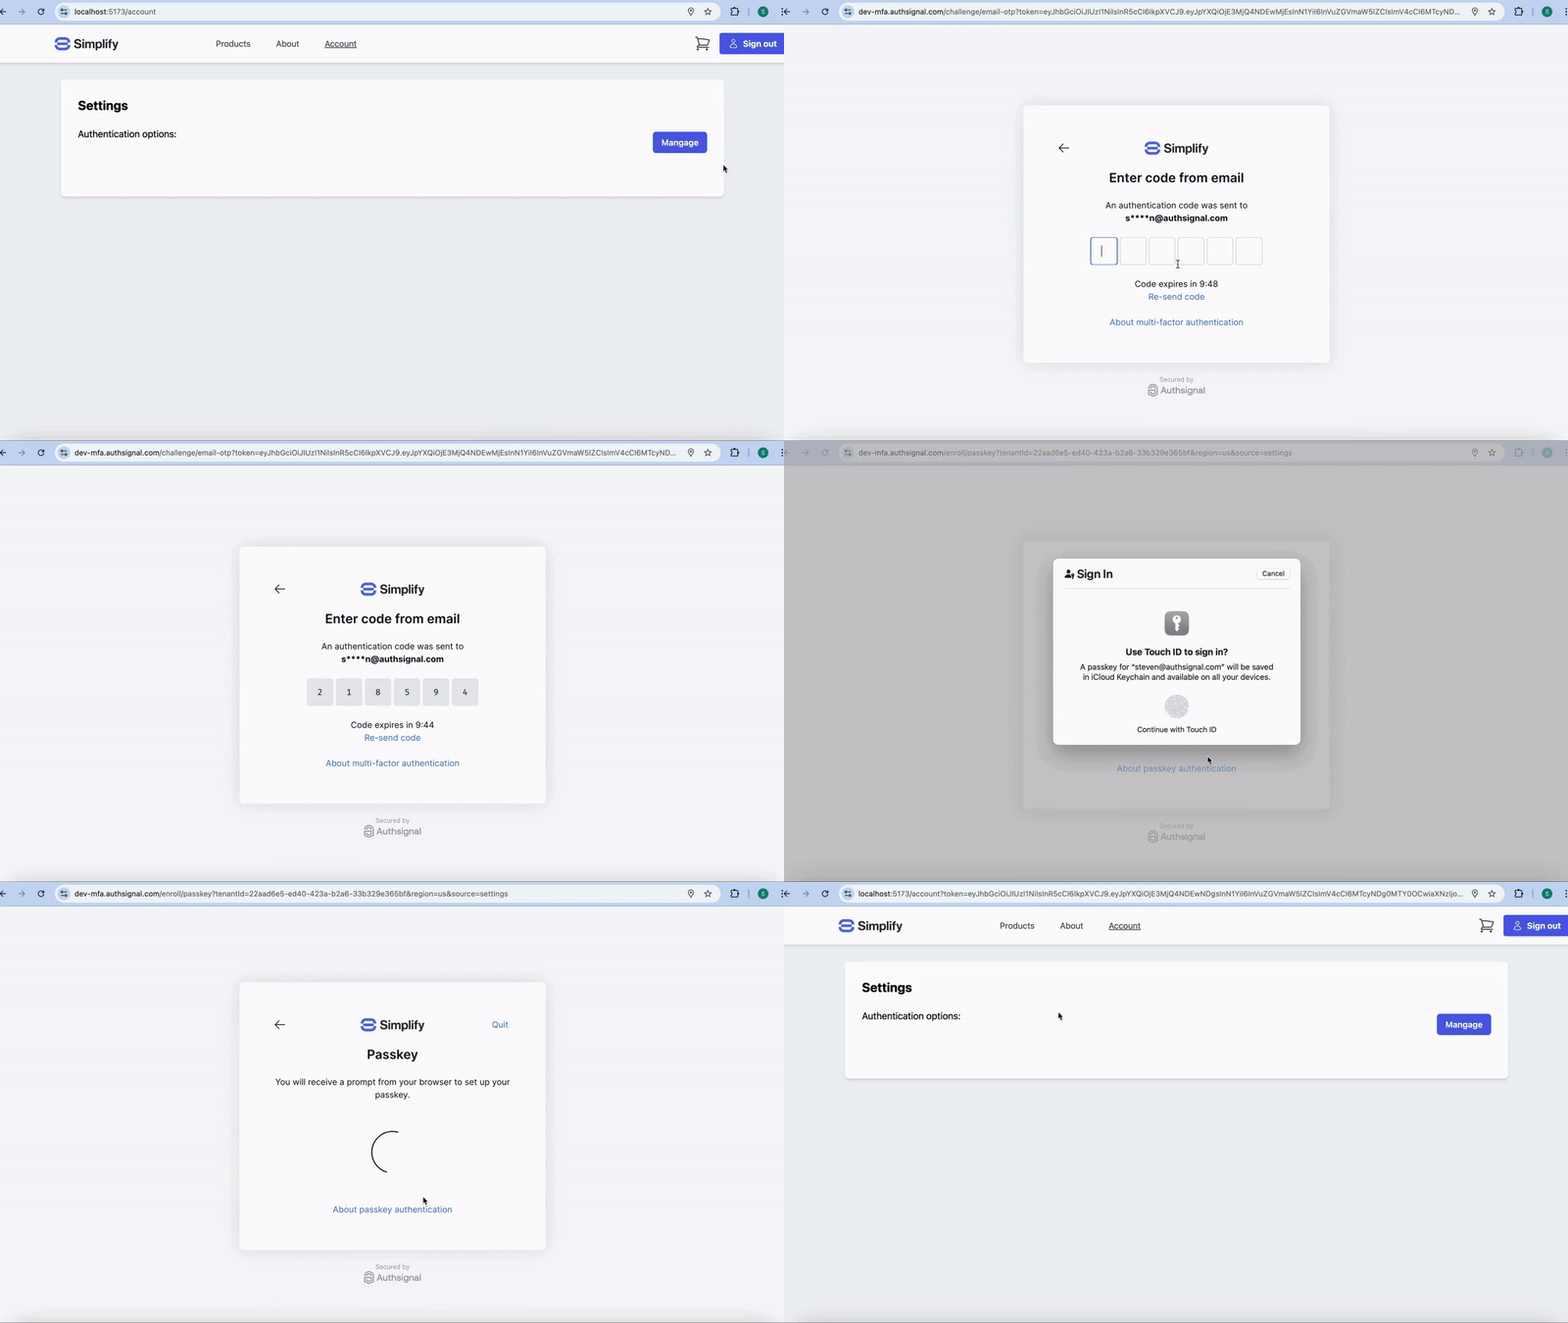
User experience:
  1. User clicks “Add authenticator” in your app
  2. Pre-built UI challenges with existing method (e.g., email OTP)
  3. After successful challenge, user can add new methods
  4. New authenticator is “bound” to the verified identity
Completing an email OTP challenge to enroll a
passkey

Challenge-then-enroll flow ensures strong binding

Skipping the challenge

In some cases, you may want to skip the prerequisite challenge. This is appropriate when:
  • User just completed MFA in your app
  • You’re in a trusted session context
  • User is enrolling their first additional method immediately after signup
const request = {
  userId: "dc58c6dc-a1fd-4a4f-8e2f-846636dd4833",
  action: "enroll",
  attributes: {
    redirectUrl: "https://yourapp.com/callback",
    redirectToSettings: true,
    scope: "add:authenticators update:authenticators remove:authenticators",
  },
};

const response = await authsignal.track(request);

const url = response.url;
Use with extreme caution: Only skip the challenge when the user has been strongly authenticated within your current session. Misuse can create MFA bypass vulnerabilities.

Using Client SDKs

Client SDKs offer two approaches for maintaining strong authenticator binding:

Option 1: Challenge-then-enroll

Present a challenge with an existing method, then allow enrollment:
// 1. Challenge with existing authenticator
const challengeResponse = await authsignal.passkey.signIn({
  action: "addAuthenticator",
});

if (challengeResponse.data?.isVerified) {
  // 2. Now user can enroll new methods
  const totpResponse = await authsignal.totp.enroll();
  const qrCodeUri = totpResponse.data.uri;

  // Display QR code for user to scan
}

Option 2: Token-based binding

Generate a token on your backend (after strong authentication), then use it for enrollment: Backend: Generate bound token
// Track action to generate token for passkey enrollment
const request = {
  userId: "dc58c6dc-a1fd-4a4f-8e2f-846636dd4833",
  action: "enroll-passkey",
  attributes: {
    scope: "add:authenticators",
  },
};

const response = await authsignal.track(request);
const token = response.token; // Pass this to frontend
Frontend: Use token for enrollment
// Set the token from your authenticated backend
await authsignal.setToken("eyJhbGciOiJ...");

// Now user can enroll - binding is enforced by token scope
const totpResponse = await authsignal.totp.enroll();
const qrCodeUri = totpResponse.data.uri;
Backend security: Only generate tokens with add:authenticators scope when the user has been strongly authenticated. This scope grants the ability to add new authenticators.