Getting started and concepts
What's the difference between MFA, adaptive MFA, and step-up authentication?
What's the difference between MFA, adaptive MFA, and step-up authentication?
- Requires additional authentication after primary credentials (username/password)
- Applied consistently to all users or specific groups
- Example: Always require SMS OTP after password login
- Uses rules to intelligently determine when to challenge users based on risk factors
- Challenges users only when necessary (new device, suspicious location, etc.)
- Balances security with user experience
- Requires additional verification for sensitive operations, even if already logged in
- Applied to specific high-risk actions (payments, account changes)
- Example: Require passkey verification before processing a large transaction
What are actions and rules in Authsignal?
What are actions and rules in Authsignal?
- Login attempts, payments, account changes, data access
- Each action returns one of four outcomes:
ALLOW,CHALLENGE,REVIEW, orBLOCK - Have configurable default outcomes
- Evaluate risk factors like device characteristics, IP data, user behavior
- Can override action default outcomes based on context
- Enable adaptive authentication policies
What are the four action outcomes and what do they mean?
What are the four action outcomes and what do they mean?
ALLOW- Action is permitted without additional authentication. Proceed with the user’s request.CHALLENGE_REQUIRED- User must complete an authentication challenge before proceeding.BLOCK- Action is blocked for security reasons. Deny the user’s request.REVIEW- Action requires manual review before proceeding.
CHALLENGE_REQUIRED is returned.Configuration and setup
Why should I use custom domains?
Why should I use custom domains?
What are the different ways to use WhatsApp OTP with Authsignal?
What are the different ways to use WhatsApp OTP with Authsignal?
- Users receive OTP codes directly via WhatsApp as their primary phone-based authentication
- Configured independently in the Authenticators section
- Follow our WhatsApp OTP guide for implementation
- WhatsApp automatically delivers OTP codes when SMS delivery fails or is unavailable
- Helps reduce messaging costs while maintaining reliable delivery
- Configured within the SMS OTP settings as a backup channel
- See the SMS OTP guide for setup instructions
Passkeys
How can I determine if a device has a passkey available?
How can I determine if a device has a passkey available?
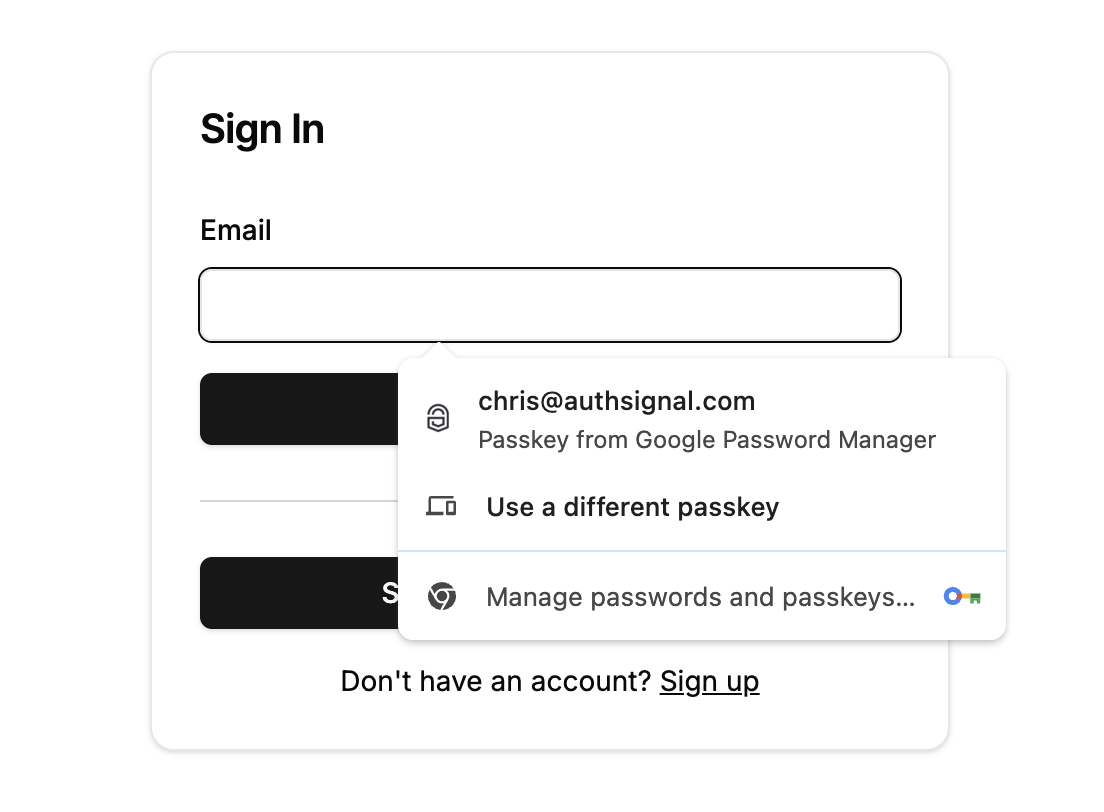
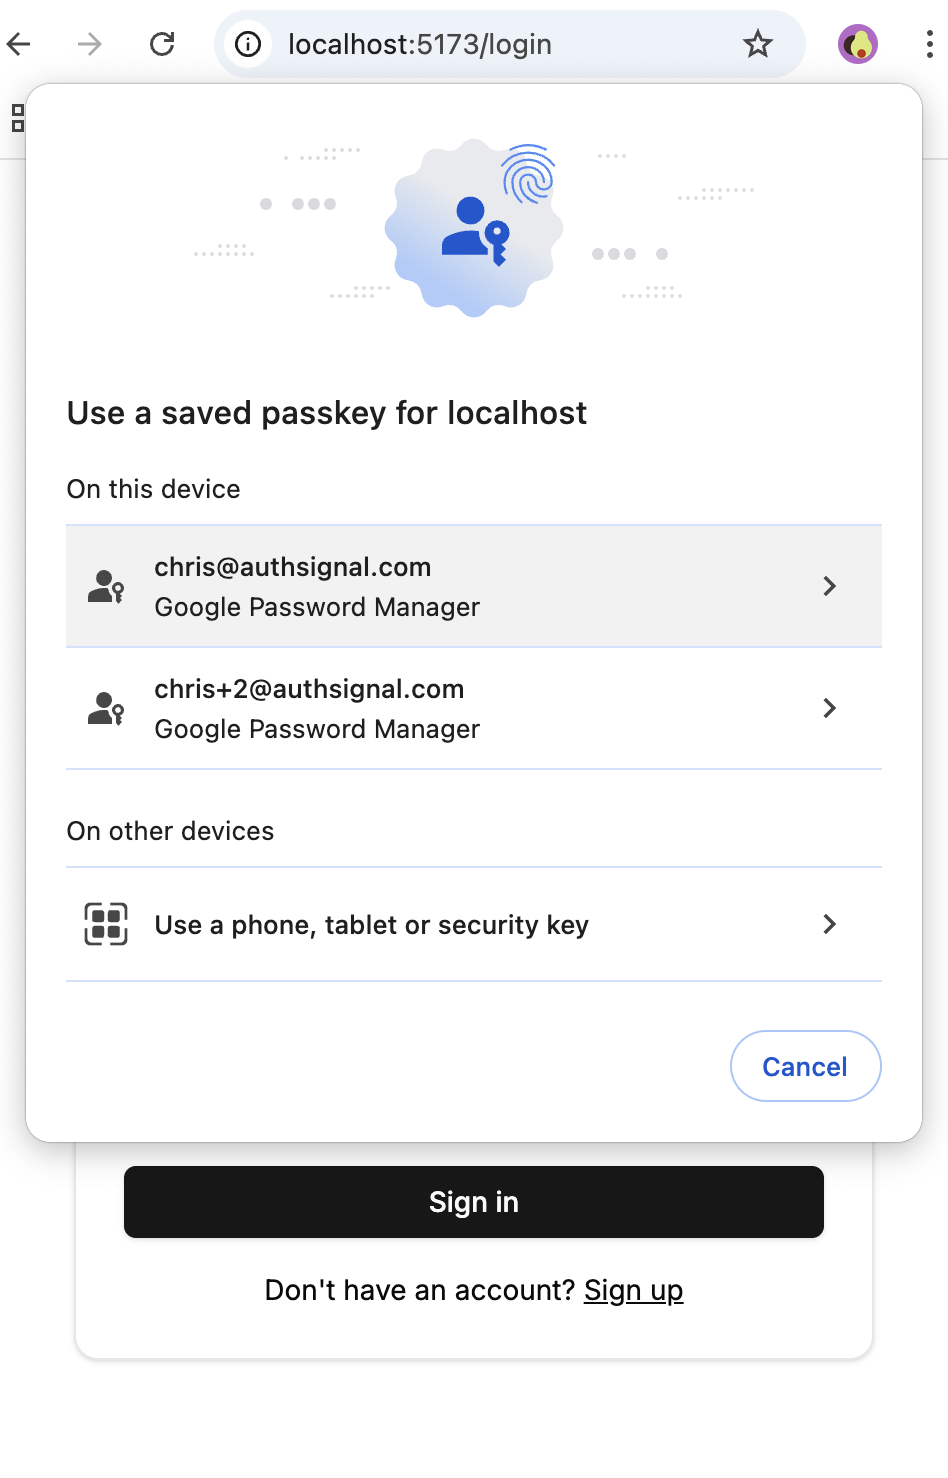
How do passkeys make sign-in easier than other methods?
How do passkeys make sign-in easier than other methods?
- You enter your username/email first
- The site looks up your account
- Then sends you a code or prompts for a password
- Your device shows available passkeys automatically
- You select which account to use
- Authentication happens instantly with biometrics or device PIN
What is passkey uplift and when should I use it?
What is passkey uplift and when should I use it?
- After a user completes email/SMS OTP authentication
- When a user signs in on a new device without a passkey
- During onboarding flows for new users
- After password-based sign-ins
- Explain the benefits clearly (faster, more secure, no passwords to remember)
- Make it optional, not mandatory
- Use timed cooldowns to avoid being intrusive
- Show the prompt at natural transition points in your app
Why aren't passkeys always available, and how should I handle this?
Why aren't passkeys always available, and how should I handle this?
- User created a passkey on one device but switched to a new device where it can’t be synced
- User deleted the passkey from their password manager
- Switching between iOS and Android devices (cross-platform sync limitations)
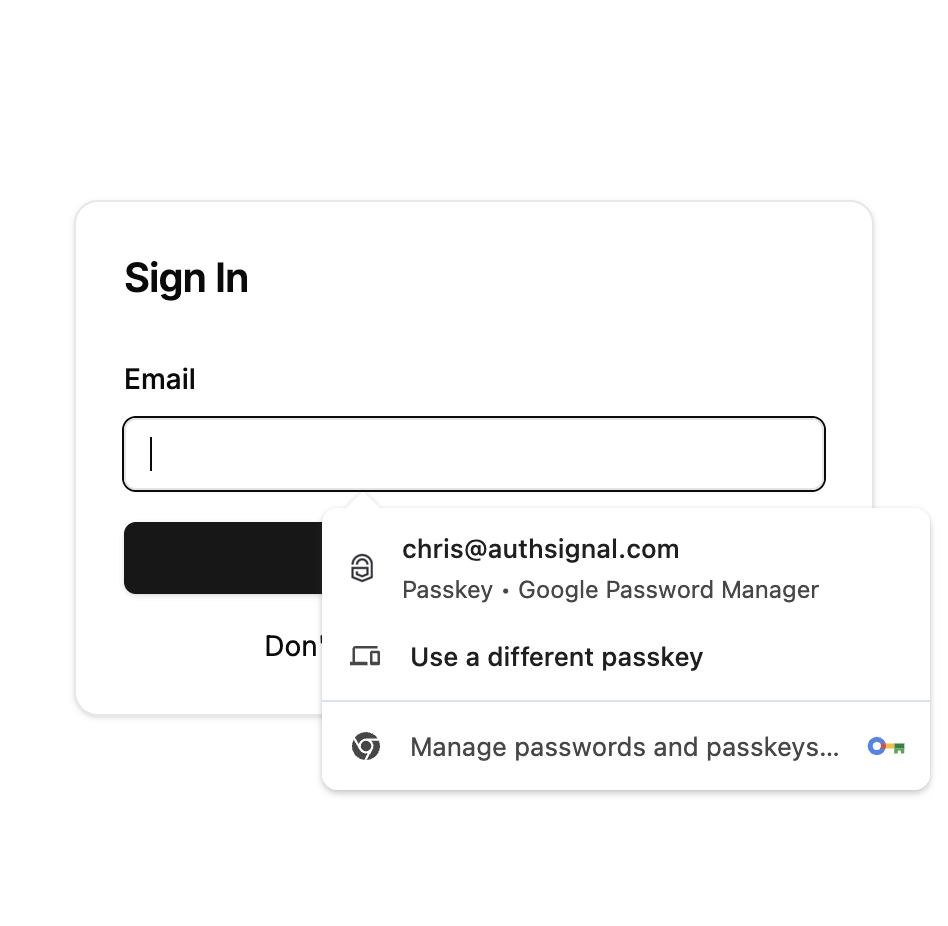
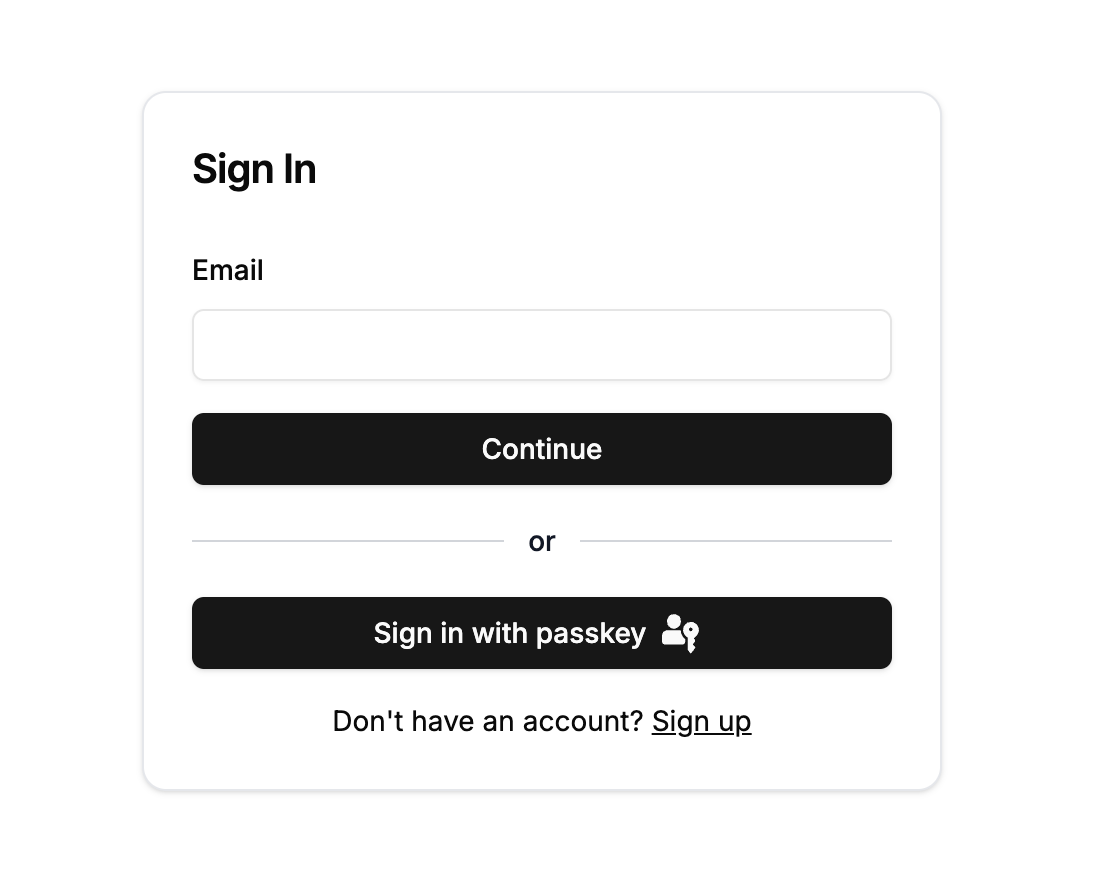
Should I use passkey autofill or a dedicated sign-in button?
Should I use passkey autofill or a dedicated sign-in button?
- Unobtrusive way to support passkeys while maintaining familiar UX
- Only shows passkeys if already created and available on device
- Users can manually enter username if no passkey is available
- Particularly good option when you already have a username input on your existing username and password login page
- Clear alternative authentication option
- Launches passkey prompt regardless of availability
- May show QR code if no passkey available (can be confusing for some users)
How should I handle passkeys for MFA vs. primary authentication?
How should I handle passkeys for MFA vs. primary authentication?
- Use
allowCredentialsparameter to restrict passkeys to the specific user’s credentials - Only show passkeys for one account to avoid confusion on shared devices
- Still provide backup options as the device may not have the user’s passkeys
- Can show all available passkeys on device
- Device-initiated flow allows users to select from available credentials
- Focus on smooth fallback experience when no passkeys are present
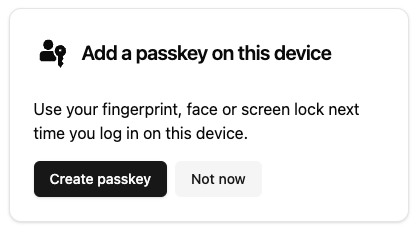
How can I increase passkey adoption among my users?
How can I increase passkey adoption among my users?
- Prompt users to create passkeys after they sign in with existing methods
- Provide clear explanations of passkey benefits (faster, more secure, no passwords)
- Use gentle prompts rather than forcing immediate adoption
- Prompt users to create passkeys when they authenticate on new devices
- Consider enrollment flows that create backup authentication methods first
- Use timed cooldowns or behavior-based prompts to avoid being intrusive
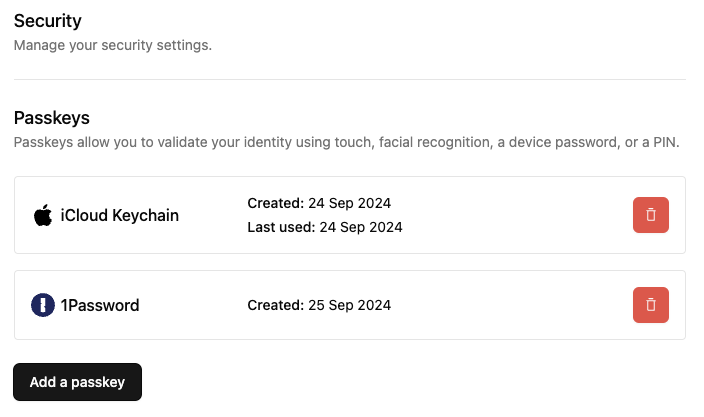
- Display passkeys using credential manager names (iCloud Keychain, Google Password Manager)
- Show appropriate icons using
webauthnCredential.aaguidMappingdata - Help users understand which devices their passkeys are available on
Should I create passkeys before or after other authentication methods on mobile?
Should I create passkeys before or after other authentication methods on mobile?
- User signs up and completes email OTP or SMS OTP enrollment
- After successful enrollment, prompt to create a passkey
- User now has both a backup method and a convenient passkey
What is `preferImmediatelyAvailableCredentials` and when should I use it?
What is `preferImmediatelyAvailableCredentials` and when should I use it?
true (recommended):- Only shows passkey prompt if credentials exist on the current device
- Avoids confusing QR code prompts for users without passkeys
- Enables smooth fallback to email/SMS authentication
false:- Always shows passkey prompt, even with no local credentials
- May display QR code for cross-device authentication
- Can be confusing for users unfamiliar with passkey cross-device flows
true for most mobile apps to ensure users aren’t presented with QR codes when they don’t have passkeys available locally.What is the difference between passkeys and security keys?
What is the difference between passkeys and security keys?
Push notifications
Does Authsignal push authentication rely on push notifications?
Does Authsignal push authentication rely on push notifications?
Can I use my own push notification provider?
Can I use my own push notification provider?
Can I customize the push message content and branding?
Can I customize the push message content and branding?
How does push authentication work when a user has multiple devices registered?
How does push authentication work when a user has multiple devices registered?
- Single option in UI: The pre-built UI shows “Push” as a single authentication option if the user has at least one registered push device, regardless of how many devices they have.
-
Any device can respond: A push authentication challenge can be completed (accepted or denied) by any device that has been registered for that user. The mobile app calls
getChallenge()when opened to check for pending authentication requests. - One response per challenge: Once a device has responded to a push challenge, other devices are unable to respond to that same challenge.
- Send to all devices: You should send push notifications to all registered devices for a user. This allows the user to complete authentication by opening your app on any of their devices, providing maximum flexibility and convenience.
Can I limit the number of devices a user can enroll for push authentication?
Can I limit the number of devices a user can enroll for push authentication?
Authenticators and user management
Are there limits on how many OTP codes users can send or verify?
Are there limits on how many OTP codes users can send or verify?
| Authenticator type | Rate limit |
|---|---|
| Email magic link | 12 per 10 mins |
| Email OTP | 12 per 10 mins |
| SMS OTP | 6 per 10 mins |
| Authenticator type | Rate limit |
|---|---|
| Email OTP | 10 per 5 mins |
| SMS OTP | 10 per 5 mins |
| Time-based OTP (TOTP) | 10 per 5 mins |
If I request a new OTP code, is the previous code still valid?
If I request a new OTP code, is the previous code still valid?
Can I remove authenticators for a user?
Can I remove authenticators for a user?
- Navigate to the user details page
- Click the “Remove authenticators” button
- Select which authenticators you want to remove and submit
API and integration
The track API call is returning a 401 HTTP status code
The track API call is returning a 401 HTTP status code
The track API call is returning `AUTHENTICATOR_NOT_FOUND` with a 400 HTTP status code
The track API call is returning `AUTHENTICATOR_NOT_FOUND` with a 400 HTTP status code
Where can I get the `deviceId`?
Where can I get the `deviceId`?
__as_aid is set on the user’s browser.When tracking an action on your server, you can extract the deviceId from this cookie:deviceId on the client via authsignal.anonymousId
and pass it to your server in the request body:Webhooks
Why is my webhook signature verification failing?
Why is my webhook signature verification failing?
- Framework parsing JSON and converting back to string
- Body compression/decompression
- Character encoding changes
- Middleware modifying the request
Which IP addresses do Authsignal webhooks come from?
Which IP addresses do Authsignal webhooks come from?
| Region | IP Addresses |
|---|---|
| US (Oregon) | 44.224.97.232 44.230.210.235 44.236.208.22 52.33.85.88 |
| AU (Sydney) | 13.210.81.243 3.105.80.107 54.252.129.142 |
| EU (Ireland) | 34.247.148.106 34.253.116.90 54.171.116.55 |
| CA (Montreal) | 16.52.98.180 16.54.49.43 16.54.18.28 |
Error handling and troubleshooting
How can an action get into a `CHALLENGE_FAILED` state?
How can an action get into a `CHALLENGE_FAILED` state?
- In push notification auth when the user presses “Deny” instead of “Accept” in the in-app notification
- In SMS or email OTP auth when the number of code submission attempts exceeds rate limit thresholds
CHALLENGE_FAILED state.What are the common SDK error codes and what do they mean?
What are the common SDK error codes and what do they mean?
invalid_configuration: Your tenant configuration is invalid. Check that authenticators are properly configured in the Authsignal Portal.invalid_credential: The credential (e.g., passkey) is invalid for the user. This may happen if the credential was deleted or is being used on the wrong device.invalid_request: Request failed due to invalid parameters. Check your request payload and ensure all required fields are provided.too_many_requests: Rate limit exceeded. Implement back-off and retry logic.unauthorized: Invalid tenant credentials or wrong region. Verify your API secret key and API URL match your tenant’s region.See our error handling documentation for implementation examples.How do I know which region my tenant is in?
How do I know which region my tenant is in?
- US (Oregon):
https://api.authsignal.com/v1 - AU (Sydney):
https://au.api.authsignal.com/v1 - EU (Ireland):
https://eu.api.authsignal.com/v1 - CA (Montreal):
https://ca.api.authsignal.com/v1
unauthorized errors.Why am I getting CORS errors with the Authsignal APIs?
Why am I getting CORS errors with the Authsignal APIs?
- Frontend sends request to your backend
- Your backend calls the Authsignal Server API
- Your backend returns response to frontend
- Use the pre-built UI (hosted by Authsignal, no CORS issues)
- Use our Client SDKs for custom UI implementations