Creating an action
To create an action, navigate to the actions page and click the Create a new action button.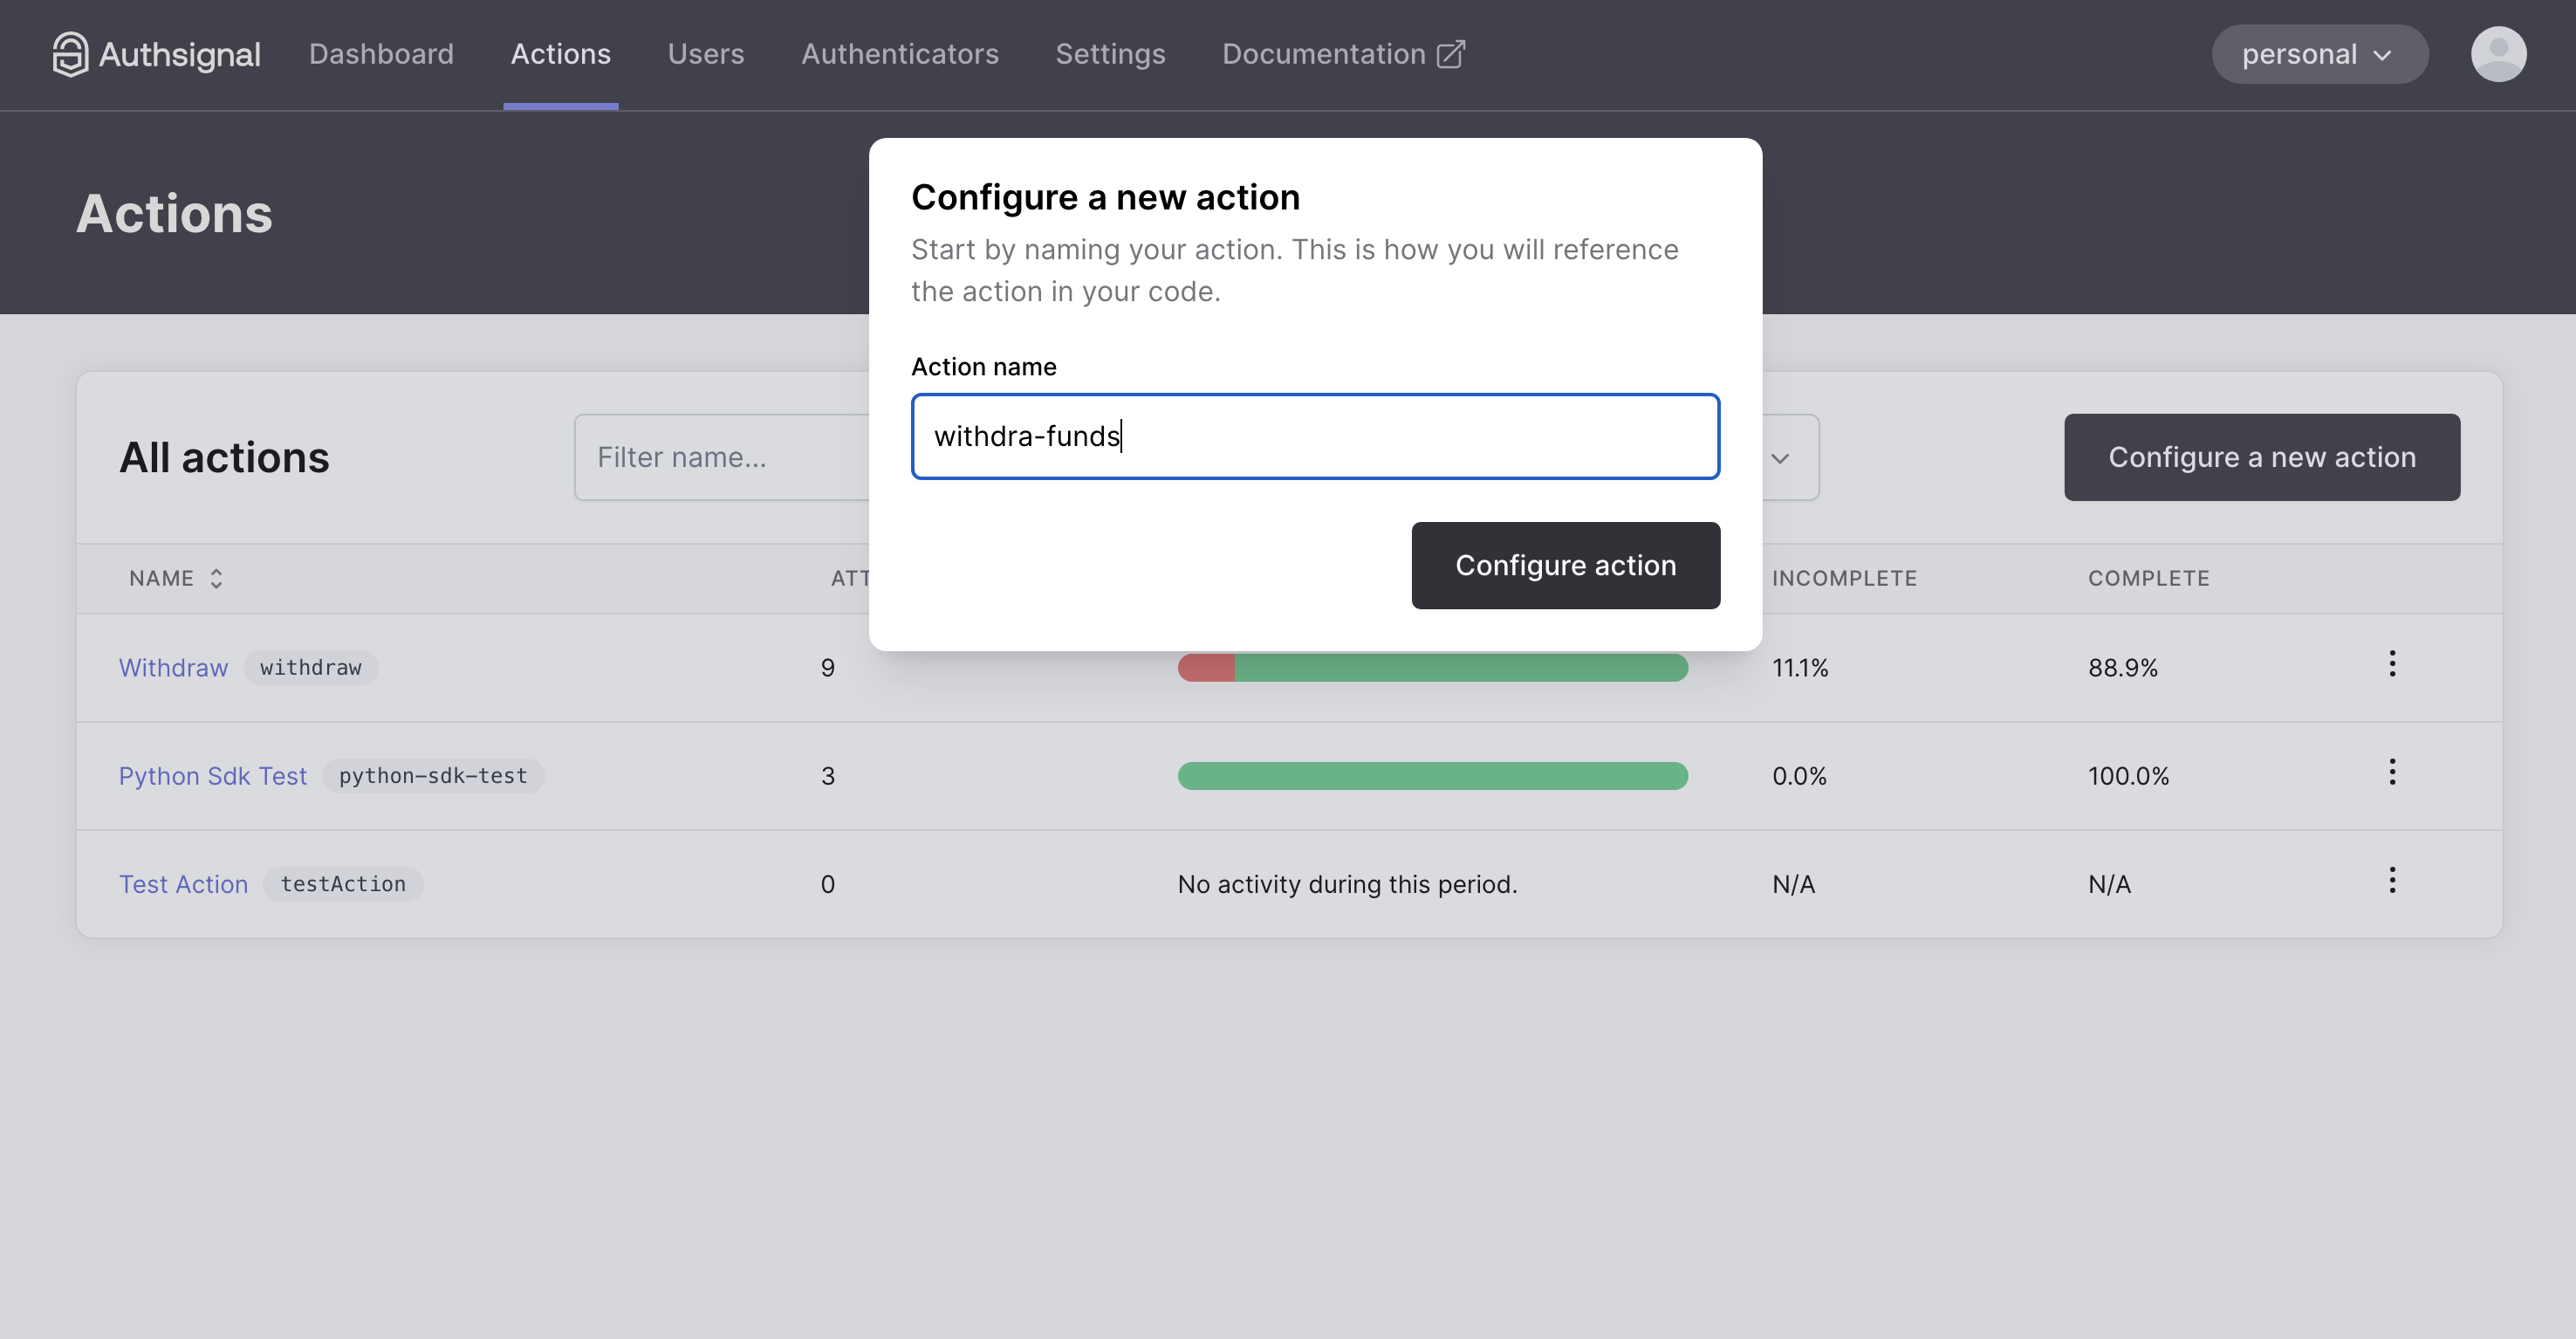
Core components of an action
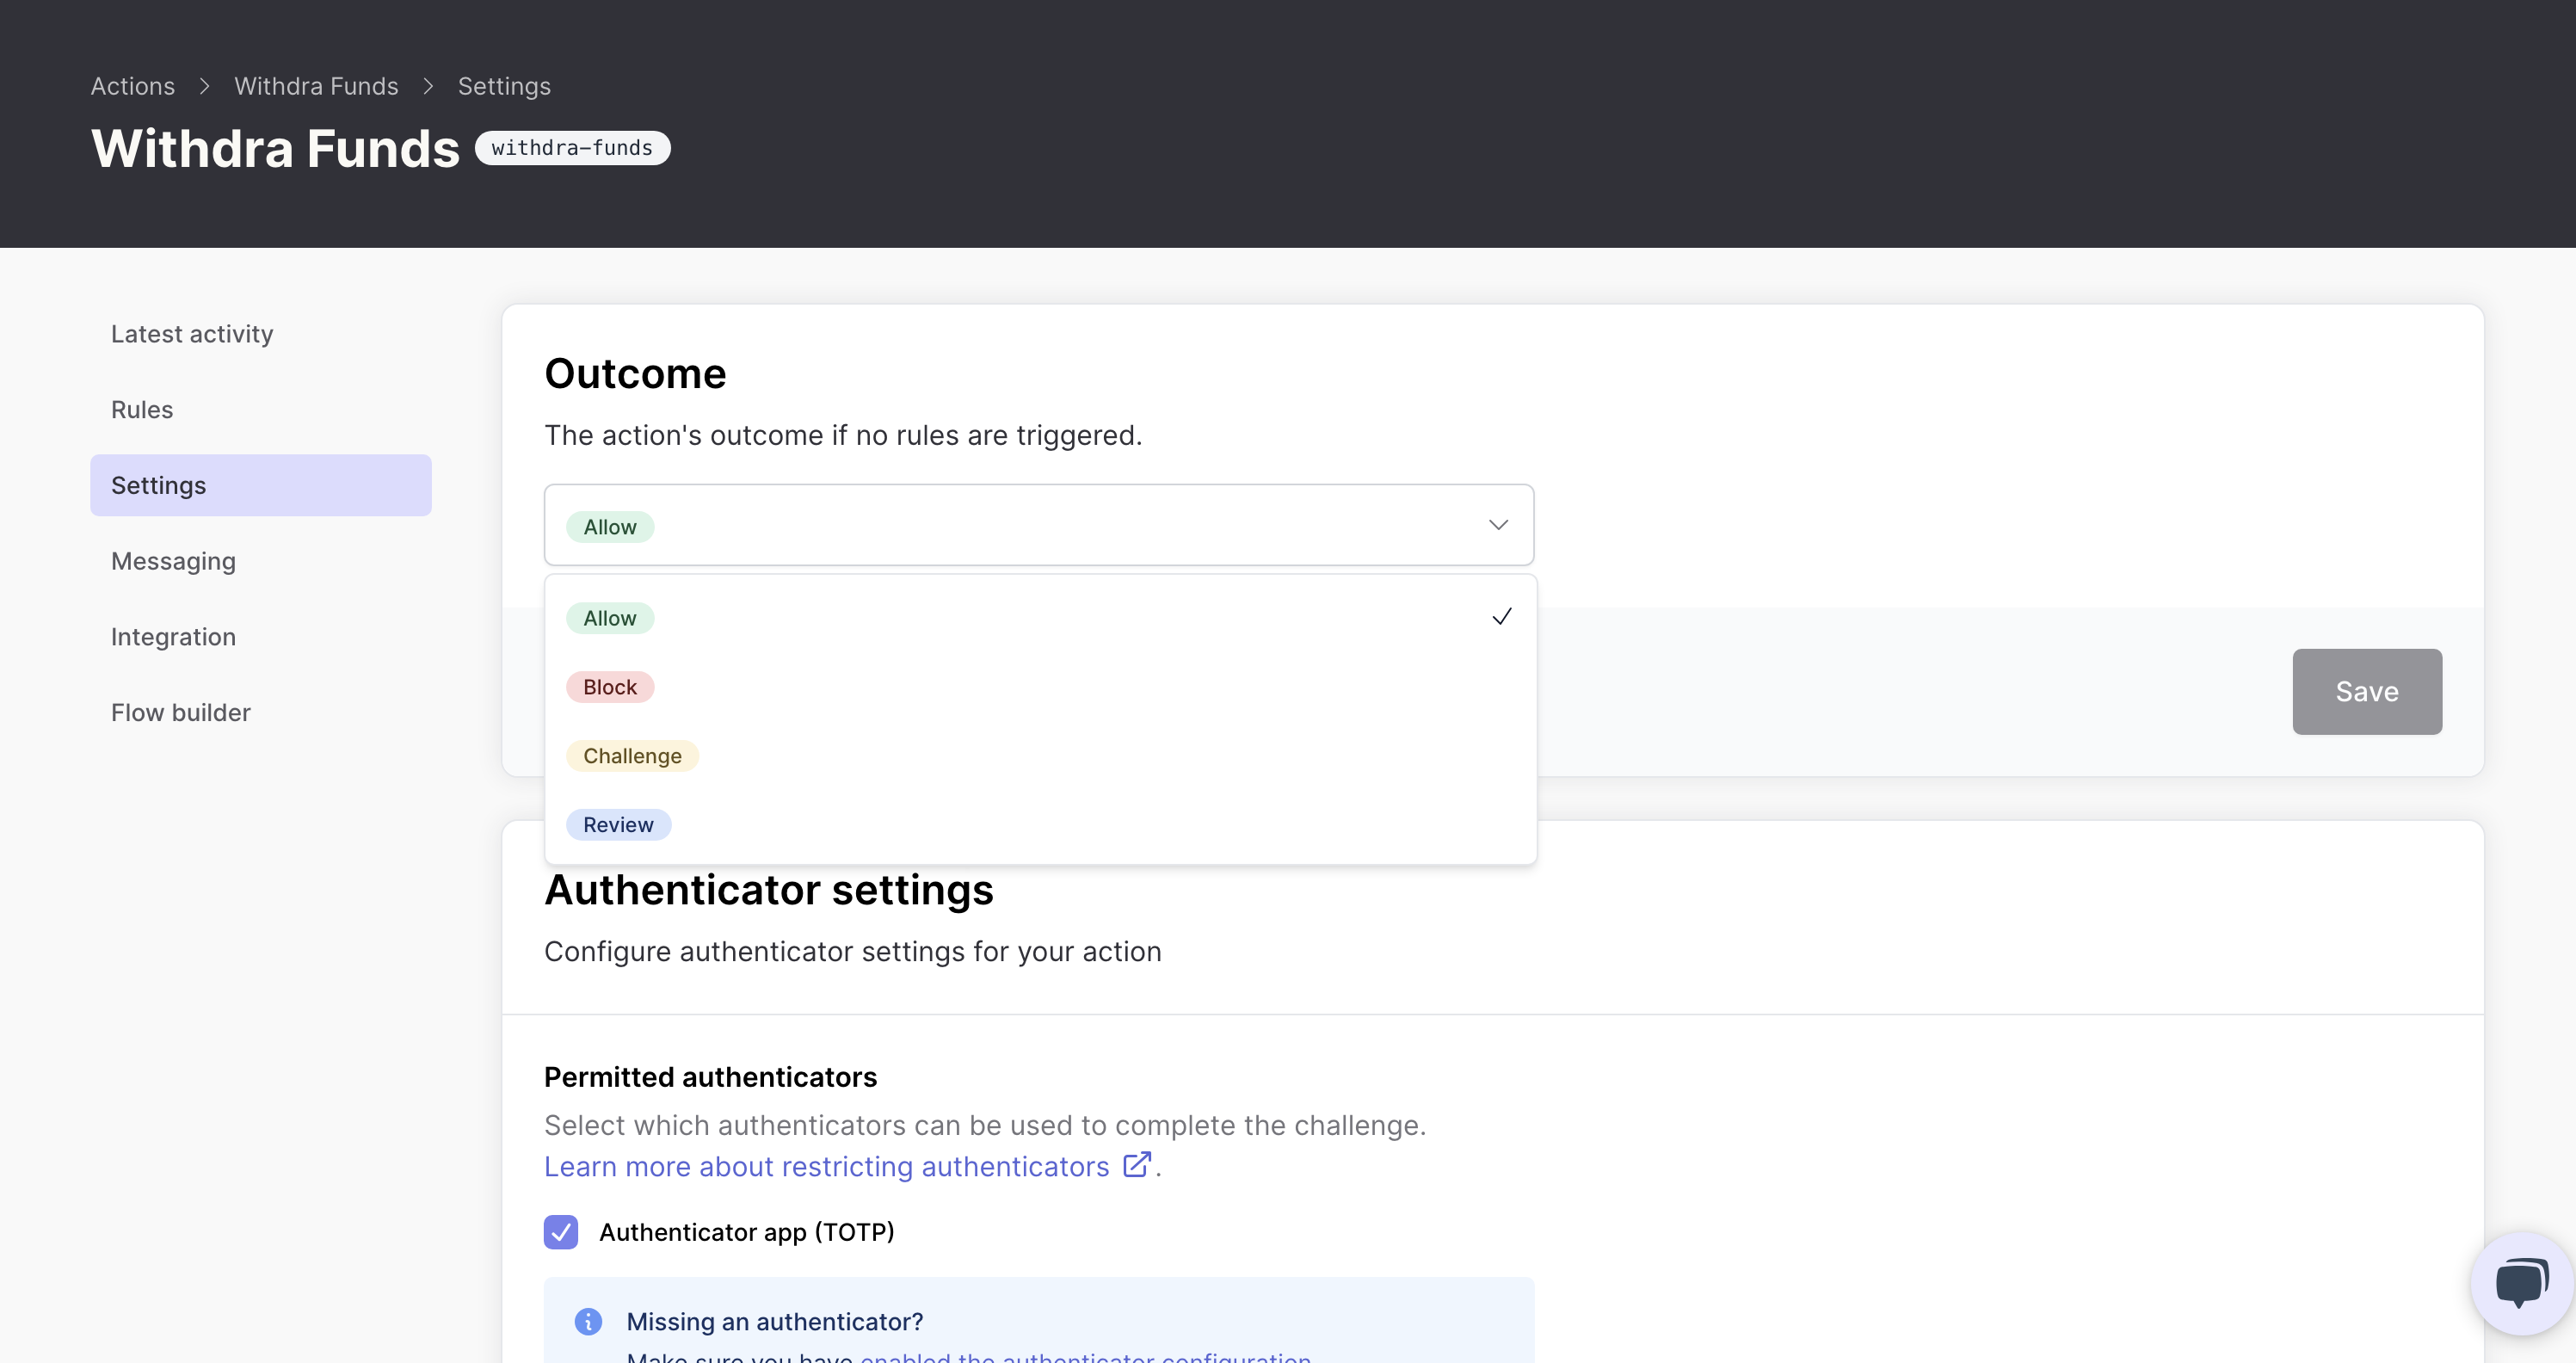
1. Action outcomes
Every action in Authsignal results in one of four possible outcomes that determine how to handle the user’s request:- ALLOW: Let the action proceed without additional authentication
- CHALLENGE: Require the user to complete an authentication challenge
- REVIEW: Place the action in a queue for manual review
- BLOCK: Prevent the action from proceeding entirely
2. Rules
The conditional logic that determines which outcome to apply based on risk factors and context. Rules can override the action’s default outcome. When you track an action, you provide the context needed for evaluation:await authsignal.track({
userId: "0272c312-e181-4cad-a494-43647b503a0a", // Unique identifier for the user
action: "withdraw-funds", // The action code (what the user is doing)
attributes: {
// Contextual information for rule evaluation
deviceId: "555c17e1-3837-4f13-81bb-131e5597e168",
ipAddress: "203.0.113.42",
userAgent: "Mozilla/5.0 (Windows NT 10.0; Win64; x64) AppleWebKit/537.36",
},
});
Setting up your action
1. Tracking an action
In your app’s backend, use an Authsignal Server SDK to track an action which represents what your user is doing (e.g.withdraw-funds).
This step will return a token which can be passed to a client SDK to perform a challenge for that user.
- Custom UI
- Pre-built UI
// Track an action on your backend
const result = await authsignal.track({
  userId: "0272c312-e181-4cad-a494-43647b503a0a",
  action: "withdraw-funds",
  attributes: {
    deviceId: "555c17e1-3837-4f13-81bb-131e5597e168",
    ipAddress: "203.0.113.42",
  },
});

// Handle different action outcomes
if (result.state === "CHALLENGE_REQUIRED") {
  // User needs to complete a challenge
  return {
    token: result.token,
  };
} else if (result.state === "ALLOW") {
  // Proceed with the action
  return { success: true };
} else if (result.state === "REVIEW") {
  // Action requires manual review
  return {
    status: "under_review",
    message: "Your request is being reviewed"
  };
} else if (result.state === "BLOCK") {
  // Action is blocked
  return {
    error: "This action cannot be completed for security reasons"
  };
}
// Track an action on your backend
var request = new TrackRequest(
    UserId: "0272c312-e181-4cad-a494-43647b503a0a",
    Action: "withdraw-funds",
    Attributes: new TrackAttributes(
        DeviceId: "555c17e1-3837-4f13-81bb-131e5597e168",
        IpAddress: "203.0.113.42"
    )
);

var result = await authsignal.Track(request);

// Handle different action outcomes
if (result.State == "CHALLENGE_REQUIRED")
{
    // User needs to complete a challenge
    return new {
        Token = result.Token
    };
}
else if (result.State == "ALLOW")
{
    // Proceed with the action
    return new { Success = true };
}
else if (result.State == "REVIEW")
{
    // Action requires manual review
    return new {
        Status = "under_review",
        Message = "Your request is being reviewed"
    };
}
else if (result.State == "BLOCK")
{
    // Action is blocked
    return new {
        Error = "This action cannot be completed for security reasons"
    };
}
// Track an action on your backend
TrackRequest request = new TrackRequest();
request.userId = "0272c312-e181-4cad-a494-43647b503a0a";
request.action = "withdraw-funds";
request.attributes = new TrackAttributes();
request.attributes.deviceId = "555c17e1-3837-4f13-81bb-131e5597e168";
request.attributes.ipAddress = "203.0.113.42";

TrackResponse result = authsignal.track(request).get();

// Handle different action outcomes
if ("CHALLENGE_REQUIRED".equals(result.state)) {
    // User needs to complete a challenge
    Map<String, Object> response = new HashMap<>();
    response.put("token", result.token);
    return response;
} else if ("ALLOW".equals(result.state)) {
    // Proceed with the action
    return Map.of("success", true);
} else if ("REVIEW".equals(result.state)) {
    // Action requires manual review
    return Map.of(
        "status", "under_review",
        "message", "Your request is being reviewed"
    );
} else if ("BLOCK".equals(result.state)) {
    // Action is blocked
    return Map.of(
        "error", "This action cannot be completed for security reasons"
    );
}
# Track an action on your backend
result = Authsignal.track({
  user_id: "0272c312-e181-4cad-a494-43647b503a0a",
  action: "withdraw-funds",
  attributes: {
    device_id: "555c17e1-3837-4f13-81bb-131e5597e168",
    ip_address: "203.0.113.42",
  }
})

# Handle different action outcomes
case result[:state]
when "CHALLENGE_REQUIRED"
  # User needs to complete a challenge
  {
    token: result[:token]
  }
when "ALLOW"
  # Proceed with the action
  { success: true }
when "REVIEW"
  # Action requires manual review
  {
    status: "under_review",
    message: "Your request is being reviewed"
  }
when "BLOCK"
  # Action is blocked
  {
    error: "This action cannot be completed for security reasons"
  }
end
# Track an action on your backend
result = authsignal.track(
    user_id="0272c312-e181-4cad-a494-43647b503a0a",
    action="withdraw-funds",
    attributes={
        "deviceId": "555c17e1-3837-4f13-81bb-131e5597e168",
        "ipAddress": "203.0.113.42"
    }
)

# Handle different action outcomes
if result["state"] == "CHALLENGE_REQUIRED":
    # User needs to complete a challenge
    return {
        "token": result["token"]
    }
elif result["state"] == "ALLOW":
    # Proceed with the action
    return {"success": True}
elif result["state"] == "REVIEW":
    # Action requires manual review
    return {
        "status": "under_review",
        "message": "Your request is being reviewed"
    }
elif result["state"] == "BLOCK":
    # Action is blocked
    return {
        "error": "This action cannot be completed for security reasons"
    }
// Track an action on your backend
$result = Authsignal::track([
    'userId' => "0272c312-e181-4cad-a494-43647b503a0a",
    'action' => "withdraw-funds",
    'attributes' => [
        'deviceId' => "555c17e1-3837-4f13-81bb-131e5597e168",
        'ipAddress' => "203.0.113.42"
    ]
]);

// Handle different action outcomes
switch ($result["state"]) {
    case "CHALLENGE_REQUIRED":
        // User needs to complete a challenge
        return [
            'token' => $result["token"]
        ];
    case "ALLOW":
        // Proceed with the action
        return ['success' => true];
    case "REVIEW":
        // Action requires manual review
        return [
            'status' => "under_review",
            'message' => "Your request is being reviewed"
        ];
    case "BLOCK":
        // Action is blocked
        return [
            'error' => "This action cannot be completed for security reasons"
        ];
}
// Track an action on your backend
result, err := client.Track(
    TrackRequest{
        UserId: "0272c312-e181-4cad-a494-43647b503a0a",
        Action: "withdraw-funds",
        Attributes: &TrackAttributes{
            DeviceId:  "555c17e1-3837-4f13-81bb-131e5597e168",
            IpAddress: "203.0.113.42",
        },
    },
)
if err != nil {
    return err
}

// Handle different action outcomes
switch result.State {
case "CHALLENGE_REQUIRED":
    // User needs to complete a challenge
    return map[string]interface{}{
        "token": result.Token,
    }
case "ALLOW":
    // Proceed with the action
    return map[string]interface{}{"success": true}
case "REVIEW":
    // Action requires manual review
    return map[string]interface{}{
        "status":  "under_review",
        "message": "Your request is being reviewed",
    }
case "BLOCK":
    // Action is blocked
    return map[string]interface{}{
        "error": "This action cannot be completed for security reasons",
    }
}
// Track an action on your backend
const result = await authsignal.track({
  userId: "0272c312-e181-4cad-a494-43647b503a0a",
  action: "withdraw-funds",
  attributes: {
    redirectUrl: "https://yourapp.com/callback",
    deviceId: "deviceId",
    ipAddress: "ipAddress",
  },
});

// Handle different action outcomes
if (result.state === "CHALLENGE_REQUIRED") {
  // User needs to complete a challenge
  return {
    url: result.url,
  };
} else if (result.state === "ALLOW") {
  // Proceed with the action
  return { success: true };
} else if (result.state === "REVIEW") {
  // Action requires manual review
  return {
    status: "under_review",
    message: "Your request is being reviewed"
  };
} else if (result.state === "BLOCK") {
  // Action is blocked
  return {
    error: "This action cannot be completed for security reasons"
  };
}
// Track an action on your backend
var request = new TrackRequest(
    UserId: "0272c312-e181-4cad-a494-43647b503a0a",
    Action: "withdraw-funds",
    Attributes: new TrackAttributes(
        RedirectUrl: "https://yourapp.com/callback",
        DeviceId: "555c17e1-3837-4f13-81bb-131e5597e168",
        IpAddress: "203.0.113.42"
    )
);

var result = await authsignal.Track(request);

// Handle different action outcomes
if (result.State == "CHALLENGE_REQUIRED")
{
    // User needs to complete a challenge
    return new {
        Url = result.Url
    };
}
else if (result.State == "ALLOW")
{
    // Proceed with the action
    return new { Success = true };
}
else if (result.State == "REVIEW")
{
    // Action requires manual review
    return new {
        Status = "under_review",
        Message = "Your request is being reviewed"
    };
}
else if (result.State == "BLOCK")
{
    // Action is blocked
    return new {
        Error = "This action cannot be completed for security reasons"
    };
}
// Track an action on your backend
TrackRequest request = new TrackRequest();
request.userId = "0272c312-e181-4cad-a494-43647b503a0a";
request.action = "withdraw-funds";
request.attributes = new TrackAttributes();
request.attributes.redirectUrl = "https://yourapp.com/callback";
request.attributes.deviceId = "555c17e1-3837-4f13-81bb-131e5597e168";
request.attributes.ipAddress = "203.0.113.42";

TrackResponse result = authsignal.track(request).get();

// Handle different action outcomes
if ("CHALLENGE_REQUIRED".equals(result.state)) {
    // User needs to complete a challenge
    Map<String, Object> response = new HashMap<>();
    response.put("url", result.url);
    return response;
} else if ("ALLOW".equals(result.state)) {
    // Proceed with the action
    return Map.of("success", true);
} else if ("REVIEW".equals(result.state)) {
    // Action requires manual review
    return Map.of(
        "status", "under_review",
        "message", "Your request is being reviewed"
    );
} else if ("BLOCK".equals(result.state)) {
    // Action is blocked
    return Map.of(
        "error", "This action cannot be completed for security reasons"
    );
}
# Track an action on your backend
result = Authsignal.track({
  user_id: "0272c312-e181-4cad-a494-43647b503a0a",
  action: "withdraw-funds",
  attributes: {
    redirect_url: "https://yourapp.com/callback",
    device_id: "555c17e1-3837-4f13-81bb-131e5597e168",
    ip_address: "203.0.113.42",
  }
})

# Handle different action outcomes
case result[:state]
when "CHALLENGE_REQUIRED"
  # User needs to complete a challenge
  {
    url: result[:url]
  }
when "ALLOW"
  # Proceed with the action
  { success: true }
when "REVIEW"
  # Action requires manual review
  {
    status: "under_review",
    message: "Your request is being reviewed"
  }
when "BLOCK"
  # Action is blocked
  {
    error: "This action cannot be completed for security reasons"
  }
end
# Track an action on your backend
result = authsignal.track(
    user_id="0272c312-e181-4cad-a494-43647b503a0a",
    action="withdraw-funds",
    attributes={
        "redirectUrl": "https://yourapp.com/callback",
        "deviceId": "555c17e1-3837-4f13-81bb-131e5597e168",
        "ipAddress": "203.0.113.42"
    }
)

# Handle different action outcomes
if result["state"] == "CHALLENGE_REQUIRED":
    # User needs to complete a challenge
    return {
        "url": result["url"]
    }
elif result["state"] == "ALLOW":
    # Proceed with the action
    return {"success": True}
elif result["state"] == "REVIEW":
    # Action requires manual review
    return {
        "status": "under_review",
        "message": "Your request is being reviewed"
    }
elif result["state"] == "BLOCK":
    # Action is blocked
    return {
        "error": "This action cannot be completed for security reasons"
    }
// Track an action on your backend
$result = Authsignal::track([
    'userId' => "0272c312-e181-4cad-a494-43647b503a0a",
    'action' => "withdraw-funds",
    'attributes' => [
        'redirectUrl' => "https://yourapp.com/callback",
        'deviceId' => "555c17e1-3837-4f13-81bb-131e5597e168",
        'ipAddress' => "203.0.113.42"
    ]
]);

// Handle different action outcomes
switch ($result["state"]) {
    case "CHALLENGE_REQUIRED":
        // User needs to complete a challenge
        return [
            'url' => $result["url"]
        ];
    case "ALLOW":
        // Proceed with the action
        return ['success' => true];
    case "REVIEW":
        // Action requires manual review
        return [
            'status' => "under_review",
            'message' => "Your request is being reviewed"
        ];
    case "BLOCK":
        // Action is blocked
        return [
            'error' => "This action cannot be completed for security reasons"
        ];
}
// Track an action on your backend
result, err := client.Track(
    TrackRequest{
        UserId: "0272c312-e181-4cad-a494-43647b503a0a",
        Action: "withdraw-funds",
        Attributes: &TrackAttributes{
            RedirectUrl: "https://yourapp.com/callback",
            DeviceId:    "555c17e1-3837-4f13-81bb-131e5597e168",
            IpAddress:   "203.0.113.42",
        },
    },
)
if err != nil {
    return err
}

// Handle different action outcomes
switch result.State {
case "CHALLENGE_REQUIRED":
    // User needs to complete a challenge
    return map[string]interface{}{
        "url": result.Url,
    }
case "ALLOW":
    // Proceed with the action
    return map[string]interface{}{"success": true}
case "REVIEW":
    // Action requires manual review
    return map[string]interface{}{
        "status":  "under_review",
        "message": "Your request is being reviewed",
    }
case "BLOCK":
    // Action is blocked
    return map[string]interface{}{
        "error": "This action cannot be completed for security reasons",
    }
}
2. Challenging the user
Challenging the user performing an action.- Custom UI
- Pre-built UI
In your frontend, call
setToken with the client token obtained, then use the relevant SDK methods to progress the user through a challenge.// Set the token from the track result
authsignal.setToken(token);
// Show the appropriate challenge based on the user's enrolled methods
const result = await authsignal.passkey.signIn({
action: "withdraw-funds",
});
// Send the result token back to your server for validation
if (result.token) {
await validateChallenge(result.token);
}
In your frontend, pass the url from the
track call to the Authsignal Web SDK to launch an enrollment or re-authentication flow.// Launch the Pre-built UI
authsignal.launch({
url: challengeUrl,
mode: "popup", // or "redirect"
});
3. Validating a challenge
After the user completes the challenge, you’ll receive atoken that you can validate on your backend to verify the authentication result.
For pre-built UI, this token is appended to your redirect URL as a query parameter, while for custom UI implementation, you’ll get the token directly from the challenge completion result.
- Custom UI
- Pre-built UI
Pass the token obtained from the challenge result to your backend and validate it server-side to complete authentication.
const request = {
  token: "eyJhbGciOiJ...", // Token from challenge completion
};

const response = await authsignal.validateChallenge(request);

if (response.state === "CHALLENGE_SUCCEEDED") {
  // The user completed the challenge successfully
  // Proceed with authenticated action or create authenticated session
  return { success: true, userId: response.userId };
} else {
  // The user did not complete the challenge successfully
  return { error: "Challenge validation failed" };
}
var request = new ValidateChallengeRequest(
    Token: "eyJhbGciOiJ..." // Token from challenge completion
);

var response = await authsignal.ValidateChallenge(request);

if (response.State == "CHALLENGE_SUCCEEDED")
{
    // The user completed the challenge successfully
    // Proceed with authenticated action or create authenticated session
    return new { Success = true, UserId = response.UserId };
}
else
{
    // The user did not complete the challenge successfully
    return new { Error = "Challenge validation failed" };
}
ValidateChallengeRequest request = new ValidateChallengeRequest();
request.token = "eyJhbGciOiJ..."; // Token from challenge completion

ValidateChallengeResponse response = authsignal.validateChallenge(request).get();

if ("CHALLENGE_SUCCEEDED".equals(response.state)) {
    // The user completed the challenge successfully
    // Proceed with authenticated action or create authenticated session
    return Map.of("success", true, "userId", response.userId);
} else {
    // The user did not complete the challenge successfully
    return Map.of("error", "Challenge validation failed");
}
response = Authsignal.validate_challenge({
  token: "eyJhbGciOiJ..." # Token from challenge completion
})

if response[:state] == "CHALLENGE_SUCCEEDED"
  # The user completed the challenge successfully
  # Proceed with authenticated action or create authenticated session
  { success: true, user_id: response[:user_id] }
else
  # The user did not complete the challenge successfully
  { error: "Challenge validation failed" }
end
response = authsignal.validate_challenge(
    token="eyJhbGciOiJ..."  # Token from challenge completion
)

if response["state"] == "CHALLENGE_SUCCEEDED":
    # The user completed the challenge successfully
    # Proceed with authenticated action or create authenticated session
    return {"success": True, "userId": response["userId"]}
else:
    # The user did not complete the challenge successfully
    return {"error": "Challenge validation failed"}
$response = Authsignal::validateChallenge([
    'token' => "eyJhbGciOiJ..." // Token from challenge completion
]);

if ($response["state"] === "CHALLENGE_SUCCEEDED") {
    // The user completed the challenge successfully
    // Proceed with authenticated action or create authenticated session
    return [
        'success' => true,
        'userId' => $response["userId"]
    ];
} else {
    // The user did not complete the challenge successfully
    return ['error' => "Challenge validation failed"];
}
response, err := client.ValidateChallenge(
    ValidateChallengeRequest{
        Token: "eyJhbGciOiJ...", // Token from challenge completion
    },
)
if err != nil {
    return err
}

if response.State == "CHALLENGE_SUCCEEDED" {
    // The user completed the challenge successfully
    // Proceed with authenticated action or create authenticated session
    return map[string]interface{}{
        "success": true,
        "userId":  response.UserId,
    }
} else {
    // The user did not complete the challenge successfully
    return map[string]interface{}{
        "error": "Challenge validation failed",
    }
}
const result = await authsignal.validateChallenge({
  token: "eyJhbGciOiJ..." // Token from redirect URL query parameter
});

if (result.state === "CHALLENGE_SUCCEEDED") {
  // The user completed the challenge successfully
  // Proceed with the action
  return { success: true };
}
var result = await authsignal.ValidateChallenge(new ValidateChallengeRequest(
    Token: "eyJhbGciOiJ..." // Token from redirect URL query parameter
));

if (result.State == "CHALLENGE_SUCCEEDED")
{
    // The user completed the challenge successfully
    // Proceed with the action
    return new { Success = true };
}
ValidateChallengeRequest request = new ValidateChallengeRequest();
request.token = "eyJhbGciOiJ..."; // Token from redirect URL query parameter

ValidateChallengeResponse result = authsignal.validateChallenge(request).get();

if ("CHALLENGE_SUCCEEDED".equals(result.state)) {
    // The user completed the challenge successfully
    // Proceed with the action
    return Map.of("success", true);
}
result = Authsignal.validate_challenge({
  token: "eyJhbGciOiJ..." # Token from redirect URL query parameter
})

if result[:state] == "CHALLENGE_SUCCEEDED"
  # The user completed the challenge successfully
  # Proceed with the action
  { success: true }
end
result = authsignal.validate_challenge(
    token="eyJhbGciOiJ..."  # Token from redirect URL query parameter
)

if result["state"] == "CHALLENGE_SUCCEEDED":
    # The user completed the challenge successfully
    # Proceed with the action
    return {"success": True}
$result = Authsignal::validateChallenge([
    'token' => "eyJhbGciOiJ..." // Token from redirect URL query parameter
]);

if ($result["state"] === "CHALLENGE_SUCCEEDED") {
    // The user completed the challenge successfully
    // Proceed with the action
    return ['success' => true];
}
result, err := client.ValidateChallenge(
    ValidateChallengeRequest{
        Token: "eyJhbGciOiJ...", // Token from redirect URL query parameter
    },
)
if err != nil {
    return err
}

if (result.State == "CHALLENGE_SUCCEEDED") {
    // The user completed the challenge successfully
    // Proceed with the action
    return map[string]interface{}{"success": true}
}