> ## Documentation Index
> Fetch the complete documentation index at: https://docs.authsignal.com/llms.txt
> Use this file to discover all available pages before exploring further.
# Passkeys
> Implement passkeys in your mobile apps using the Authsignal SDKs for iOS, Android, React Native, and Flutter.
In addition to the reference documentation below, check out our end-to-end guide on [how to
implement passkeys in mobile apps using Authsignal](/authentication-methods/passkey/mobile-sdks).
## Prerequisites
After you have [configured your Relying Party](/authentication-methods/passkey/custom-ui#configuration) you should follow the steps below.
To use passkeys you must first [setup an associated domain](https://developer.apple.com/documentation/authenticationservices/public-private_key_authentication/supporting_passkeys#overview) with the `webcredentials` service type.
Host an `apple-app-site-association` file on the domain that matches your [relying party](/authentication-methods/passkey/custom-ui#configuration):
```
GET https:///.well-known/apple-app-site-association
```
The response JSON should look something like this:
```json theme={null}
{
"applinks": {},
"webcredentials": {
"apps": ["ABCDE12345.com.example.app"]
},
"appclips": {}
}
```
where `ABCDE12345` is your team id and `com.example.app` is your bundle identifier.
In XCode under "Signing & Capabilities" add a `webcredentials` entry for your domain / relying party e.g. `example.com`:
 To use passkeys on Android you must [setup a Digital Asset Links JSON](https://developer.android.com/identity/sign-in/credential-manager#add-support-dal) file on your web domain.
Host an `assetlinks.json` file on the domain that matches your [relying party](/authentication-methods/passkey/custom-ui#configuration):
```
GET https:///.well-known/assetlinks.json
```
The response JSON should look something like this:
```json theme={null}
[
{
"relation": [
"delegate_permission/common.handle_all_urls",
"delegate_permission/common.get_login_creds"
],
"target": {
"namespace": "android_app",
"package_name": "com.example",
"sha256_cert_fingerprints": [
"FA:C6:17:45:DC:09:03:78:6F:B9:ED:E6:2A:96:2B:39:9F:73:48:F0:BB:6F:89:9B:83:32:66:75:91:03:3B:9C"
]
}
}
]
```
but with the package name and **SHA-256 fingerprint** updated to match your own app.
You can obtain your app's SHA-256 fingerprint by running a [signing report](https://developer.android.com/studio/publish/app-signing#signing_report) in Android Studio.
```bash highlight={8} theme={null}
Task :app:signingReport
Variant: debug
Config: debug
Alias: androiddebugkey
MD5: 20:F4:61:48:B7:2D:8E:5E:5C:A2:3D:37:A4:F4:14:90
SHA1: 5E:8F:16:06:2E:A3:CD:2C:4A:0D:54:78:76:BA:A6:F3:8C:AB:F6:25
SHA-256: FA:C6:17:45:DC:09:03:78:6F:B9:ED:E6:2A:96:2B:39:9F:73:48:F0:BB:6F:89:9B:83:32:66:75:91:03:3B:9C
```
For more information on this step refer to the [Credential Manager documentation](https://developer.android.com/identity/sign-in/credential-manager#add-support-dal).
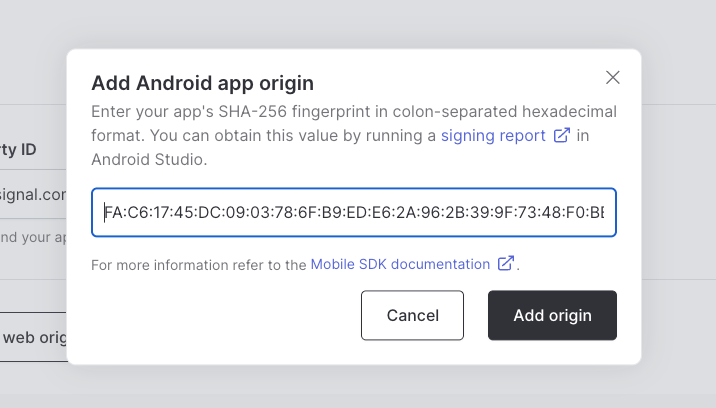
Finally, you will need to add an expected origin value for your Android app when configuring passkeys in the [Authsignal Portal](https://portal.authsignal.com/organisations/tenants/authenticators/passkey).
Enter your app's SHA-256 value which you obtained in the previous step.
To use passkeys on Android you must [setup a Digital Asset Links JSON](https://developer.android.com/identity/sign-in/credential-manager#add-support-dal) file on your web domain.
Host an `assetlinks.json` file on the domain that matches your [relying party](/authentication-methods/passkey/custom-ui#configuration):
```
GET https:///.well-known/assetlinks.json
```
The response JSON should look something like this:
```json theme={null}
[
{
"relation": [
"delegate_permission/common.handle_all_urls",
"delegate_permission/common.get_login_creds"
],
"target": {
"namespace": "android_app",
"package_name": "com.example",
"sha256_cert_fingerprints": [
"FA:C6:17:45:DC:09:03:78:6F:B9:ED:E6:2A:96:2B:39:9F:73:48:F0:BB:6F:89:9B:83:32:66:75:91:03:3B:9C"
]
}
}
]
```
but with the package name and **SHA-256 fingerprint** updated to match your own app.
You can obtain your app's SHA-256 fingerprint by running a [signing report](https://developer.android.com/studio/publish/app-signing#signing_report) in Android Studio.
```bash highlight={8} theme={null}
Task :app:signingReport
Variant: debug
Config: debug
Alias: androiddebugkey
MD5: 20:F4:61:48:B7:2D:8E:5E:5C:A2:3D:37:A4:F4:14:90
SHA1: 5E:8F:16:06:2E:A3:CD:2C:4A:0D:54:78:76:BA:A6:F3:8C:AB:F6:25
SHA-256: FA:C6:17:45:DC:09:03:78:6F:B9:ED:E6:2A:96:2B:39:9F:73:48:F0:BB:6F:89:9B:83:32:66:75:91:03:3B:9C
```
For more information on this step refer to the [Credential Manager documentation](https://developer.android.com/identity/sign-in/credential-manager#add-support-dal).
Finally, you will need to add an expected origin value for your Android app when configuring passkeys in the [Authsignal Portal](https://portal.authsignal.com/organisations/tenants/authenticators/passkey).
Enter your app's SHA-256 value which you obtained in the previous step.
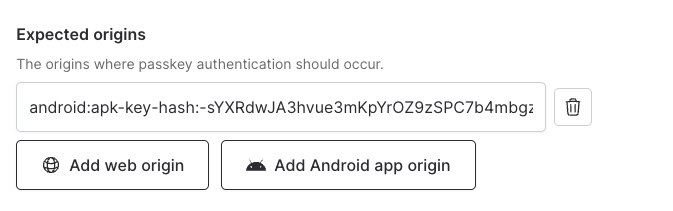
 This value will automatically be converted into a **base64URL encoded string with no padding**.
 ## Creating a passkey
Creating a passkey must be authorized by [presenting a challenge with an existing method](/advanced-usage/authenticator-binding#option-1%3A-challenge-then-enroll) or [tracking an action to obtain a short-lived token](/advanced-usage/authenticator-binding#option-2%3A-token-based-binding).
```swift Swift theme={null}
let response = await authsignal.passkey.signUp(
token: "eyJhbGciOiJIUzI....",
username: "jane.smith@authsignal.com",
displayName: "Jane Smith"
)
```
```kotlin Kotlin theme={null}
val response = authsignal.passkey.signUp(
token = "eyJhbGciOiJIUzI....",
username = "jane.smith@authsignal.com",
displayName = "Jane Smith",
)
```
```ts React Native theme={null}
const response = await authsignal.passkey.signUp({
token: "eyJhbGciOiJIUzI....",
username: "jane.smith@authsignal.com",
displayName: "Jane Smith",
});
```
```dart Flutter theme={null}
var response = await authsignal.passkey.signUp(
"eyJhbGciOiJIUzI....",
"jane.smith@authsignal.com",
"Jane Smith",
);
```
You can also use our SDK to help determine **when to display a passkey creation prompt** based on whether or not the user has an existing passkey available on their device.
```swift Swift theme={null}
let showPrompt = await authsignal.passkey.shouldPromptToCreatePasskey()
if showPrompt {
let response = await authsignal.passkey.signUp(
token: "eyJhbGciOiJIUzI....",
username: "jane.smith@authsignal.com",
ignorePasskeyAlreadyExistsError: true,
)
}
```
```kotlin Kotlin theme={null}
val showPrompt = authsignal.passkey.shouldPromptToCreatePasskey()
if (showPrompt) {
val response = authsignal.passkey.signUp(
token = "eyJhbGciOiJIUzI....",
username = "jane.smith@authsignal.com",
ignorePasskeyAlreadyExistsError: true,
)
}
```
```ts React Native theme={null}
const showPrompt = await authsignal.passkey.shouldPromptToCreatePasskey();
if (showPrompt) {
const response = await authsignal.passkey.signUp({
token: "eyJhbGciOiJIUzI....",
username: "jane.smith@authsignal.com",
ignorePasskeyAlreadyExistsError: true,
});
}
```
To learn more about how to conditionally create passkeys refer to our guide on [handling passkey availability](/authentication-methods/passkey/mobile-sdks#passkey-availability).
### Parameters
A short-lived token obtained by [tracking an
action](/advanced-usage/authenticator-binding#tracking-an-action-to-generate-a-token).
The primary user identifier associated with the passkey, e.g. the user's email address.
An optional secondary user identifier which the OS may display in place of or alongside the
username, e.g. the user's full name.
### Response
An unstructured error description present if the SDK call encountered an error.
A formatted error code which may additionally be present if the SDK call encountered an error.
Possible values are: `token_not_set`, `expired_token`, `network_error` or `user_canceled`.
A new token which can optionally be used to [bind another
authenticator](#authenticator-binding) for the user.
## Using a passkey
Calling `signIn` will present the passkey sign-in prompt if a credential is available on the device.
If the user successfully authenticates with their passkey, send the result token to your server to [validate the challenge](/sdks/server/challenges#validate-challenge).
```swift Swift theme={null}
let response = await authsignal.passkey.signIn(action: "signInWithPasskey")
if let token = response.data?.token {
// Send token to your backend for validation
}
```
```kotlin Kotlin theme={null}
val response = authsignal.passkey.signIn(action = "signInWithPasskey")
if (response.data?.token != null) {
// Send token to your backend for validation
}
```
```ts React Native theme={null}
const response = await authsignal.passkey.signIn({ action: "signInWithPasskey" });
if (response.data?.token) {
// Send token to your backend for validation
}
```
```dart Flutter theme={null}
final response = await authsignal.passkey.signIn(action: "signInWithPasskey");
if (response.data?.token != null) {
// Send token to your backend for validation
}
```
Because some users **may not have a passkey available**, you can conditionally present a fallback authentication method by handling error codes returned by the SDK.
```swift Swift theme={null}
let response = await authsignal.passkey.signIn(action: "signInWithPasskey")
if response.errorCode == "user_canceled" {
// Present fallback authentication method
}
```
```kotlin Kotlin theme={null}
val response = authsignal.passkey.signIn(action = "signInWithPasskey")
if (response.errorCode == "user_canceled" ||
response.errorCode == "no_credential") {
// Present fallback authentication method
}
```
```ts React Native theme={null}
const response = await authsignal.passkey.signIn({ action: "signInWithPasskey" });
if (
response.errorCode === ErrorCode.user_canceled ||
response.errorCode === ErrorCode.no_credential
) {
// Present fallback authentication method
}
```
```dart Flutter theme={null}
final response = await authsignal.passkey.signIn(action: "signInWithPasskey");
if (response.errorCode == ErrorCode.userCanceled.value ||
response.errorCode == ErrorCode.noCredential.value) {
// Present fallback authentication method
}
```
To learn more about how to handle if passkeys are available when authenticating refer our guide on [handling passkey availability](/authentication-methods/passkey/mobile-sdks#passkey-availability).
### Parameters
A string which determines how the action associated with the passkey sign-in attempt will be named
in the [Authsignal Portal](https://portal.authsignal.com). Values are validated with the following
regex: `^[a-zA-Z0-9_-]{(1, 64)}$`.
If set to true, the passkey prompt will not be shown when no credentials are available on the
device and an [error code will be
returned](/authentication-methods/passkey/best-practices-mobile#optimal-sign-in-experience).
Defaults to true. Set this to false if you want to support signing in with credentials on another
device via QR code.
### Response
An unstructured error description present if the SDK call encountered an error.
A formatted error code which may additionally be present if the SDK call encountered an error.
Possible values are: `user_canceled` or `no_credential` (Android only). These values can be
used to [handle if a passkey is not available on the
device](/authentication-methods/passkey/best-practices-mobile#optimal-sign-in-experience).
True if the passkey sign-in attempt was successful.
A new token which can be used to [validate the
challenge](/sdks/server/challenges#validate-challenge) on your server or optionally to
[bind another authenticator](#authenticator-binding) for the user.
The ID of the Authsignal user if the sign-in attempt was successful.
The ID of the Authsignal user authenticator if the sign-in attempt was successful.
The username associated with the passkey if the sign-in attempt was successful.
The display name associated with the passkey if the sign-in attempt was successful.
## Device support
Passkeys are supported from iOS 15 and Android API level 28 or higher.
You can detect whether or not the current device supports passkeys by using the `isSupported` helper method.
```swift iOS theme={null}
let isSupported = authsignal.passkey.isSupported
```
```kotlin Android theme={null}
val isSupported = authsignal.passkey.isSupported
```
```ts React Native theme={null}
const isSupported = authsignal.passkey.isSupported;
```
### Passkey autofill (iOS)
This feature requires rendering a text field with the `textContentType` property.
```swift iOS theme={null}
userTextField.textContentType = .username
```
```tsx React Native theme={null}
```
Then when the screen loads, you should initialize the text field for passkey autofill by running the following code.
```swift iOS theme={null}
let result = await authsignal.passkey.signIn(
action: "signInWithPasskeyAutofill",
autofill: true
)
if let token = result.data?.token {
// The user has focused your text input and authenticated with an existing passkey
// Send the response token to your server to validate the result of the challenge
}
```
```ts React Native theme={null}
authsignal.passkey
.signIn({ action: "signInWithPasskeyAutofill", autofill: true })
.then(({ data, error }) => {
if (data?.token) {
// The user has focused your text input and authenticated with an existing passkey
// Send the response token to your server to validate the result of the challenge
}
});
```
## Cancelling a request (iOS)
If you call `signIn` to present the passkey sign-in prompt, you will need to cancel a request that is already in progress (e.g. an autofill request).
```swift iOS theme={null}
authsignal.passkey.cancel()
```
```ts React Native theme={null}
await authsignal.passkey.cancel();
```
```dart Flutter theme={null}
await authsignal.passkey.cancel();
```
This is typically required if your UI presents an username input with autofill as well as a separate "Sign in with passkey" button.
## Creating a passkey
Creating a passkey must be authorized by [presenting a challenge with an existing method](/advanced-usage/authenticator-binding#option-1%3A-challenge-then-enroll) or [tracking an action to obtain a short-lived token](/advanced-usage/authenticator-binding#option-2%3A-token-based-binding).
```swift Swift theme={null}
let response = await authsignal.passkey.signUp(
token: "eyJhbGciOiJIUzI....",
username: "jane.smith@authsignal.com",
displayName: "Jane Smith"
)
```
```kotlin Kotlin theme={null}
val response = authsignal.passkey.signUp(
token = "eyJhbGciOiJIUzI....",
username = "jane.smith@authsignal.com",
displayName = "Jane Smith",
)
```
```ts React Native theme={null}
const response = await authsignal.passkey.signUp({
token: "eyJhbGciOiJIUzI....",
username: "jane.smith@authsignal.com",
displayName: "Jane Smith",
});
```
```dart Flutter theme={null}
var response = await authsignal.passkey.signUp(
"eyJhbGciOiJIUzI....",
"jane.smith@authsignal.com",
"Jane Smith",
);
```
You can also use our SDK to help determine **when to display a passkey creation prompt** based on whether or not the user has an existing passkey available on their device.
```swift Swift theme={null}
let showPrompt = await authsignal.passkey.shouldPromptToCreatePasskey()
if showPrompt {
let response = await authsignal.passkey.signUp(
token: "eyJhbGciOiJIUzI....",
username: "jane.smith@authsignal.com",
ignorePasskeyAlreadyExistsError: true,
)
}
```
```kotlin Kotlin theme={null}
val showPrompt = authsignal.passkey.shouldPromptToCreatePasskey()
if (showPrompt) {
val response = authsignal.passkey.signUp(
token = "eyJhbGciOiJIUzI....",
username = "jane.smith@authsignal.com",
ignorePasskeyAlreadyExistsError: true,
)
}
```
```ts React Native theme={null}
const showPrompt = await authsignal.passkey.shouldPromptToCreatePasskey();
if (showPrompt) {
const response = await authsignal.passkey.signUp({
token: "eyJhbGciOiJIUzI....",
username: "jane.smith@authsignal.com",
ignorePasskeyAlreadyExistsError: true,
});
}
```
To learn more about how to conditionally create passkeys refer to our guide on [handling passkey availability](/authentication-methods/passkey/mobile-sdks#passkey-availability).
### Parameters
A short-lived token obtained by [tracking an
action](/advanced-usage/authenticator-binding#tracking-an-action-to-generate-a-token).
The primary user identifier associated with the passkey, e.g. the user's email address.
An optional secondary user identifier which the OS may display in place of or alongside the
username, e.g. the user's full name.
### Response
An unstructured error description present if the SDK call encountered an error.
A formatted error code which may additionally be present if the SDK call encountered an error.
Possible values are: `token_not_set`, `expired_token`, `network_error` or `user_canceled`.
A new token which can optionally be used to [bind another
authenticator](#authenticator-binding) for the user.
## Using a passkey
Calling `signIn` will present the passkey sign-in prompt if a credential is available on the device.
If the user successfully authenticates with their passkey, send the result token to your server to [validate the challenge](/sdks/server/challenges#validate-challenge).
```swift Swift theme={null}
let response = await authsignal.passkey.signIn(action: "signInWithPasskey")
if let token = response.data?.token {
// Send token to your backend for validation
}
```
```kotlin Kotlin theme={null}
val response = authsignal.passkey.signIn(action = "signInWithPasskey")
if (response.data?.token != null) {
// Send token to your backend for validation
}
```
```ts React Native theme={null}
const response = await authsignal.passkey.signIn({ action: "signInWithPasskey" });
if (response.data?.token) {
// Send token to your backend for validation
}
```
```dart Flutter theme={null}
final response = await authsignal.passkey.signIn(action: "signInWithPasskey");
if (response.data?.token != null) {
// Send token to your backend for validation
}
```
Because some users **may not have a passkey available**, you can conditionally present a fallback authentication method by handling error codes returned by the SDK.
```swift Swift theme={null}
let response = await authsignal.passkey.signIn(action: "signInWithPasskey")
if response.errorCode == "user_canceled" {
// Present fallback authentication method
}
```
```kotlin Kotlin theme={null}
val response = authsignal.passkey.signIn(action = "signInWithPasskey")
if (response.errorCode == "user_canceled" ||
response.errorCode == "no_credential") {
// Present fallback authentication method
}
```
```ts React Native theme={null}
const response = await authsignal.passkey.signIn({ action: "signInWithPasskey" });
if (
response.errorCode === ErrorCode.user_canceled ||
response.errorCode === ErrorCode.no_credential
) {
// Present fallback authentication method
}
```
```dart Flutter theme={null}
final response = await authsignal.passkey.signIn(action: "signInWithPasskey");
if (response.errorCode == ErrorCode.userCanceled.value ||
response.errorCode == ErrorCode.noCredential.value) {
// Present fallback authentication method
}
```
To learn more about how to handle if passkeys are available when authenticating refer our guide on [handling passkey availability](/authentication-methods/passkey/mobile-sdks#passkey-availability).
### Parameters
A string which determines how the action associated with the passkey sign-in attempt will be named
in the [Authsignal Portal](https://portal.authsignal.com). Values are validated with the following
regex: `^[a-zA-Z0-9_-]{(1, 64)}$`.
If set to true, the passkey prompt will not be shown when no credentials are available on the
device and an [error code will be
returned](/authentication-methods/passkey/best-practices-mobile#optimal-sign-in-experience).
Defaults to true. Set this to false if you want to support signing in with credentials on another
device via QR code.
### Response
An unstructured error description present if the SDK call encountered an error.
A formatted error code which may additionally be present if the SDK call encountered an error.
Possible values are: `user_canceled` or `no_credential` (Android only). These values can be
used to [handle if a passkey is not available on the
device](/authentication-methods/passkey/best-practices-mobile#optimal-sign-in-experience).
True if the passkey sign-in attempt was successful.
A new token which can be used to [validate the
challenge](/sdks/server/challenges#validate-challenge) on your server or optionally to
[bind another authenticator](#authenticator-binding) for the user.
The ID of the Authsignal user if the sign-in attempt was successful.
The ID of the Authsignal user authenticator if the sign-in attempt was successful.
The username associated with the passkey if the sign-in attempt was successful.
The display name associated with the passkey if the sign-in attempt was successful.
## Device support
Passkeys are supported from iOS 15 and Android API level 28 or higher.
You can detect whether or not the current device supports passkeys by using the `isSupported` helper method.
```swift iOS theme={null}
let isSupported = authsignal.passkey.isSupported
```
```kotlin Android theme={null}
val isSupported = authsignal.passkey.isSupported
```
```ts React Native theme={null}
const isSupported = authsignal.passkey.isSupported;
```
### Passkey autofill (iOS)
This feature requires rendering a text field with the `textContentType` property.
```swift iOS theme={null}
userTextField.textContentType = .username
```
```tsx React Native theme={null}
```
Then when the screen loads, you should initialize the text field for passkey autofill by running the following code.
```swift iOS theme={null}
let result = await authsignal.passkey.signIn(
action: "signInWithPasskeyAutofill",
autofill: true
)
if let token = result.data?.token {
// The user has focused your text input and authenticated with an existing passkey
// Send the response token to your server to validate the result of the challenge
}
```
```ts React Native theme={null}
authsignal.passkey
.signIn({ action: "signInWithPasskeyAutofill", autofill: true })
.then(({ data, error }) => {
if (data?.token) {
// The user has focused your text input and authenticated with an existing passkey
// Send the response token to your server to validate the result of the challenge
}
});
```
## Cancelling a request (iOS)
If you call `signIn` to present the passkey sign-in prompt, you will need to cancel a request that is already in progress (e.g. an autofill request).
```swift iOS theme={null}
authsignal.passkey.cancel()
```
```ts React Native theme={null}
await authsignal.passkey.cancel();
```
```dart Flutter theme={null}
await authsignal.passkey.cancel();
```
This is typically required if your UI presents an username input with autofill as well as a separate "Sign in with passkey" button.