> ## Documentation Index
> Fetch the complete documentation index at: https://docs.authsignal.com/llms.txt
> Use this file to discover all available pages before exploring further.
# ServiceNow
> Learn how to configure Authsignal Call Connect with ServiceNow for secure caller verification.
This guide shows how to configure Authsignal Call Connect with ServiceNow. This integration enables IT help-desks and service desks to securely verify the identity of customers before taking action.
View the ServiceNow Store listing for Authsignal Call Connect
## Prerequisites
* ServiceNow instance with [API Key and HMAC Authentication](https://www.servicenow.com/docs/r/platform-security/authentication/api-key-and-hmac-rest-apis.html) (`com.glide.tokenbased_auth`) plugin installed and configured.
* ServiceNow instance with the [Authsignal Call Connect app](https://store.servicenow.com/store/app/aa1018ac33907a9457d93c128d5c7b14) installed from the ServiceNow Store
* Twilio or Bird account with SMS enabled and configured in Authsignal
* ServiceNow ITSM module with a contact that has at least a mobile phone number
## Configuration
### 1. Create a ServiceNow API key record
Create a ServiceNow API key record with a generated key. This key will be used for the callback from Authsignal to ServiceNow.
In your ServiceNow instance, navigate to **All -> Organization -> Users** and select **New**.
Enter user details:
| Field | Value |
| ------------- | ------------------- |
| User ID | svc-authsignal |
| First name | Authsignal |
| Last name | Service Account |
| Identity Type | Machine |
| Email | Enter Email Address |
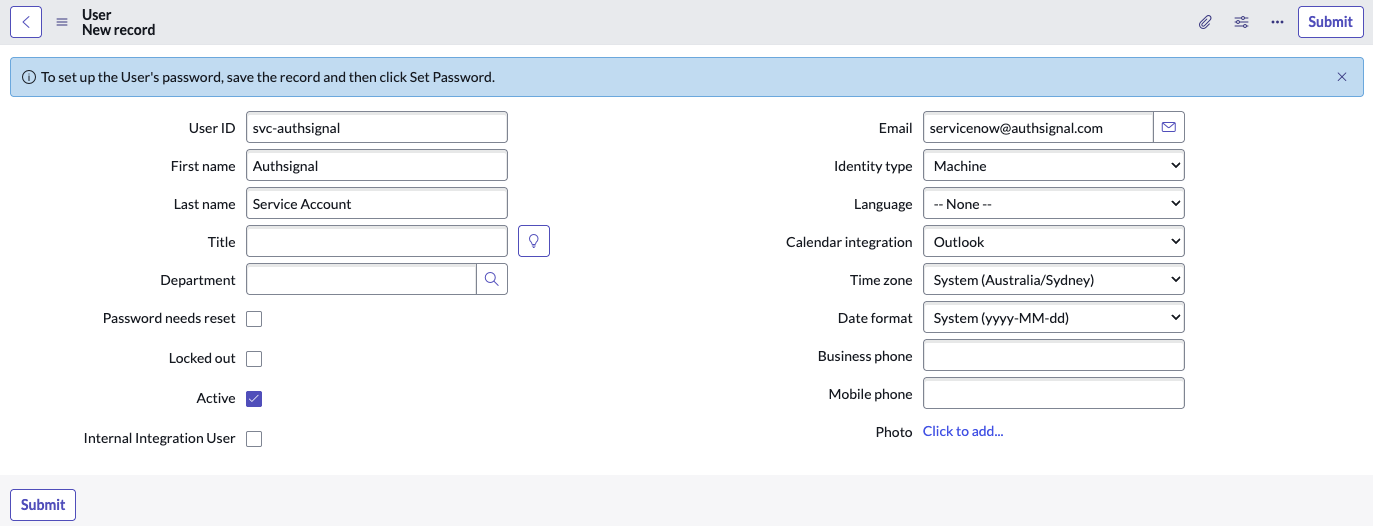 Click **Submit**
Navigate to your newly created User.
Select **Roles** and then **Edit**
Add the following roles:
* `itil`
* `snc_internal`
* `x_auths_cc.admin`
* `x_auths_cc.agent`
* `x_auths_cc.user`
Click **Submit**
Navigate to your newly created User.
Select **Roles** and then **Edit**
Add the following roles:
* `itil`
* `snc_internal`
* `x_auths_cc.admin`
* `x_auths_cc.agent`
* `x_auths_cc.user`
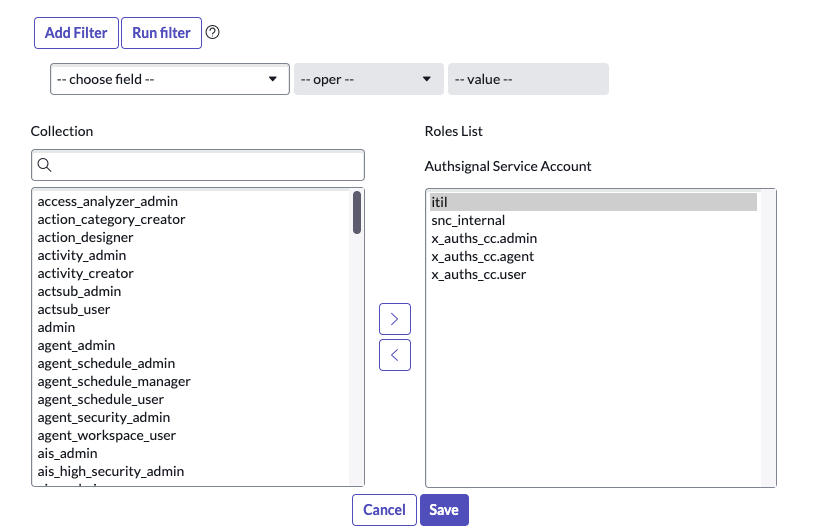 Click **Save**
In your ServiceNow instance, navigate to **All -> System Web Services -> API Access Policies -> REST API Key**.
Select **New**, fill in the name "Authsignal Call Connect Webhook".
Select the service account you made earlier, set the Auth Scope to `useraccount`, and set an expiry date for the API key.
Click **Save**
In your ServiceNow instance, navigate to **All -> System Web Services -> API Access Policies -> REST API Key**.
Select **New**, fill in the name "Authsignal Call Connect Webhook".
Select the service account you made earlier, set the Auth Scope to `useraccount`, and set an expiry date for the API key.
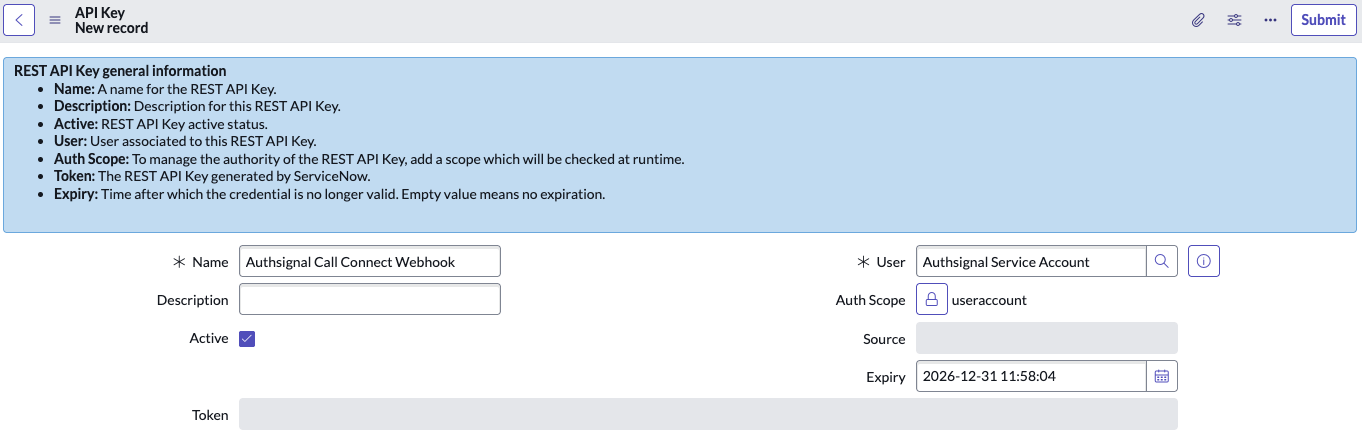 Click **Submit**.
Click on the newly created record and reveal the token value. Copy this value - you'll need it for the Authsignal configuration in the next step.
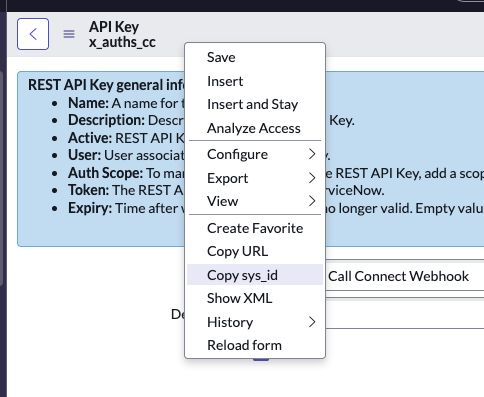
Additionally, right click on the API key name and click **Copy sys\_id** and save this for later.
Click **Submit**.
Click on the newly created record and reveal the token value. Copy this value - you'll need it for the Authsignal configuration in the next step.
Additionally, right click on the API key name and click **Copy sys\_id** and save this for later.
 ### 2. Configure Call Connect in Authsignal portal
Navigate to the Call Connect section in the Authsignal portal ([Settings > Call Connect](https://portal.authsignal.com/organisations/tenants/call_connect)) and select the ServiceNow option.
Fill in the ServiceNow instance name field. The instance name is usually the subdomain of your ServiceNow instance URL.
Paste the API key token from the previous step into the **ServiceNow webhook API key** field.
### 2. Configure Call Connect in Authsignal portal
Navigate to the Call Connect section in the Authsignal portal ([Settings > Call Connect](https://portal.authsignal.com/organisations/tenants/call_connect)) and select the ServiceNow option.
Fill in the ServiceNow instance name field. The instance name is usually the subdomain of your ServiceNow instance URL.
Paste the API key token from the previous step into the **ServiceNow webhook API key** field.
 Click the **Activate Call Connect** button to activate the integration.
### 3. Complete ServiceNow configuration
In your ServiceNow instance, navigate to **All > Authsignal Call Connect > Call Connect Tracking > Properties** and configure the following mandatory properties:
Click the **Activate Call Connect** button to activate the integration.
### 3. Complete ServiceNow configuration
In your ServiceNow instance, navigate to **All > Authsignal Call Connect > Call Connect Tracking > Properties** and configure the following mandatory properties:
 Based on the region of your Authsignal tenant, copy the following URL and paste it into the **Authsignal Call Connect URL with path** field:
| Region | Call Connect URL |
| ------------- | ---------------------------------------------- |
| US (Oregon) | `https://us-connect.authsignal.com/call/start` |
| AU (Sydney) | `https://au-connect.authsignal.com/call/start` |
| EU (Ireland) | `https://eu-connect.authsignal.com/call/start` |
| CA (Montreal) | `https://ca-connect.authsignal.com/call/start` |
Paste the API key from the [Authsignal portal for the Call Connect API](https://portal.authsignal.com/organisations/tenants/call_connect) into the **Authsignal API key** field.
Paste the Sys ID of the webhook API key record created in step 1 into the **Sys ID of the webhook API key record** field.
Click **Save** to complete the configuration.
### 4. Final configuration
Complete the setup by ensuring:
* All callers in the `sys_user` table have phone numbers in E.164 format (e.g., `+61417888999`)
* All engaged agents have the agent role assigned (`x_auths_cc.agent`) to appropriate groups and/or users
Based on the region of your Authsignal tenant, copy the following URL and paste it into the **Authsignal Call Connect URL with path** field:
| Region | Call Connect URL |
| ------------- | ---------------------------------------------- |
| US (Oregon) | `https://us-connect.authsignal.com/call/start` |
| AU (Sydney) | `https://au-connect.authsignal.com/call/start` |
| EU (Ireland) | `https://eu-connect.authsignal.com/call/start` |
| CA (Montreal) | `https://ca-connect.authsignal.com/call/start` |
Paste the API key from the [Authsignal portal for the Call Connect API](https://portal.authsignal.com/organisations/tenants/call_connect) into the **Authsignal API key** field.
Paste the Sys ID of the webhook API key record created in step 1 into the **Sys ID of the webhook API key record** field.
Click **Save** to complete the configuration.
### 4. Final configuration
Complete the setup by ensuring:
* All callers in the `sys_user` table have phone numbers in E.164 format (e.g., `+61417888999`)
* All engaged agents have the agent role assigned (`x_auths_cc.agent`) to appropriate groups and/or users