> ## Documentation Index
> Fetch the complete documentation index at: https://docs.authsignal.com/llms.txt
> Use this file to discover all available pages before exploring further.
# Getting started with Salesforce
> Learn how to configure Authsignal Call Connect with Salesforce for secure caller verification.
This guide shows how to configure Authsignal Call Connect with Salesforce. This integration enables IT help-desks and service desks to securely verify the identity of customers before taking action.
Please [get in touch with the Authsignal team](https://www.authsignal.com/contact) to enquire
about using our Salesforce integration
## Package installation
### Prerequisites
* Salesforce Organization (Enterprise Edition and up)
* System Administrator access
* Lightning Experience enabled
* Sites feature enabled
### Step 1: Install the package
The Authsignal team will provide you with a URL to use to install the managed package to your Salesforce instance.
Navigate to this URL to begin.
Be sure to use the correct URL for your environment type `Production`/`Developer` vs `Sandbox`
Select **Install for Admins Only**, additional permissions settings will be set later.
When prompted about remote sites, click **Yes, grant access to these third-party websites**.
This allows Authsignal Call Connect to communicate with Authsignal APIs.
Typically installation takes 2-5 minutes.
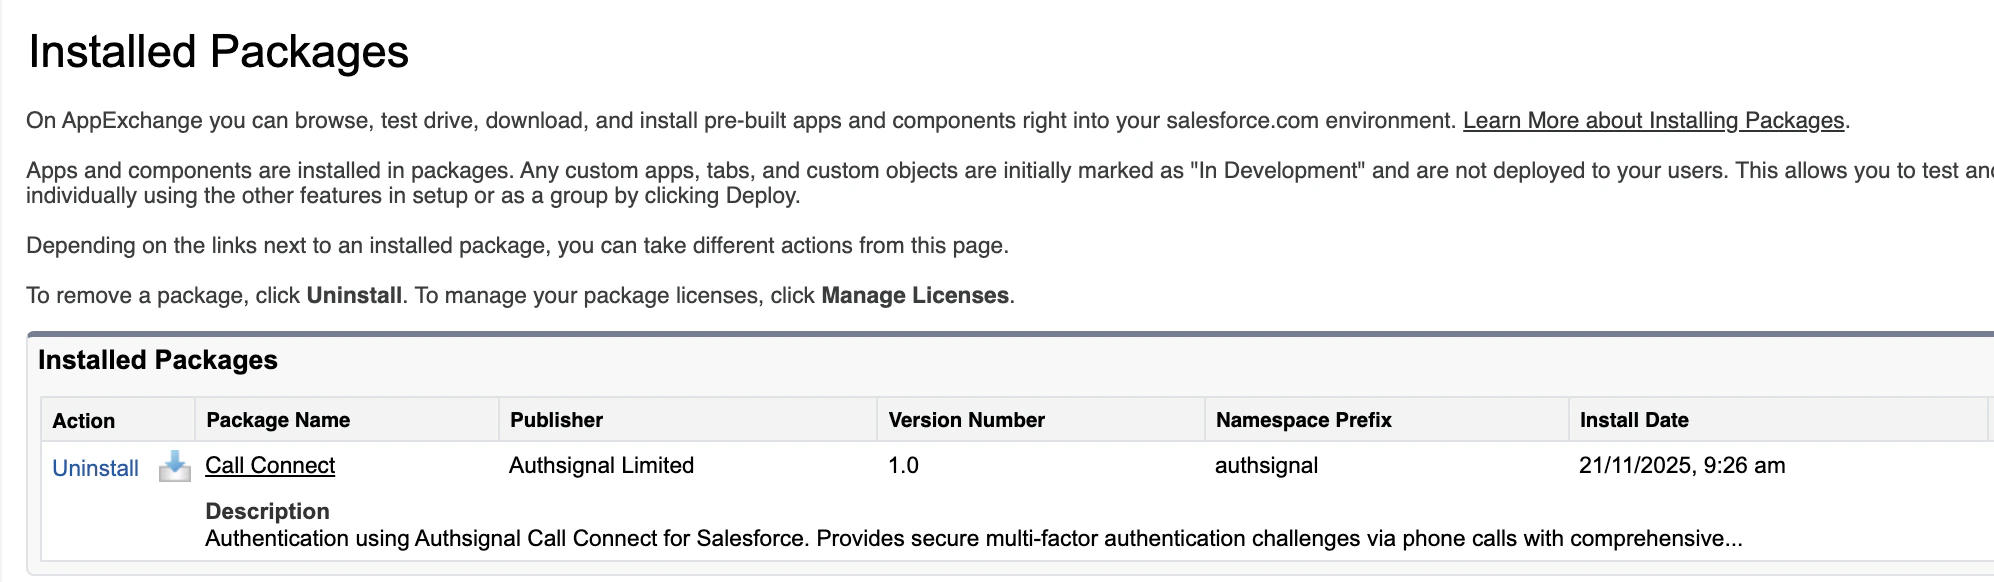
Once complete navigate to **Setup -> Apps -> Packaging -> Installed Packages** to verify the presence of **Call Connect**
 ### Step 2: Assign permission sets
You must assign permission sets **immediately** after installation to access Call Connect
functionality.
1. Navigate to **Setup → Users → Permission Sets**
2. Click **Call Connect Administrator**
3. Click **Manage Assignments**
4. Select your admin user(s) to assign them the Call Connect Administrator role
5. Click **Save**
1. Navigate to **Setup → Users → Permission Sets**
2. Click **Call Connect Standard User**
3. Click **Manage Assignments**
4. Select all users who need to create authentication challenges and add them to assign the Standard User role
5. Click **Save**
## Salesforce Sites configuration
Authsignal Call Connect uses a Site in order to receive a webhook from Authsignal. This informs Salesforce of the outcome of the Authsignal Call Connect authentication session.
### Step 3: Enable and configure Site
Authsignal Call Connect makes use of Salesforce Sites. Other site types, such as Experience Sites,
will not work with this webhook configuration.{" "}
Navigate to **Setup → Sites and Domains -> Sites**
If sites is not enabled for your Salesforce instance: click **Enable Sites**, accept the terms and conditions, and then you will be prompted to register for a domain.
If Sites is already enabled but no domain exists, you will be asked to register for a domain name (e.g., `yourcompany-callconnect`)
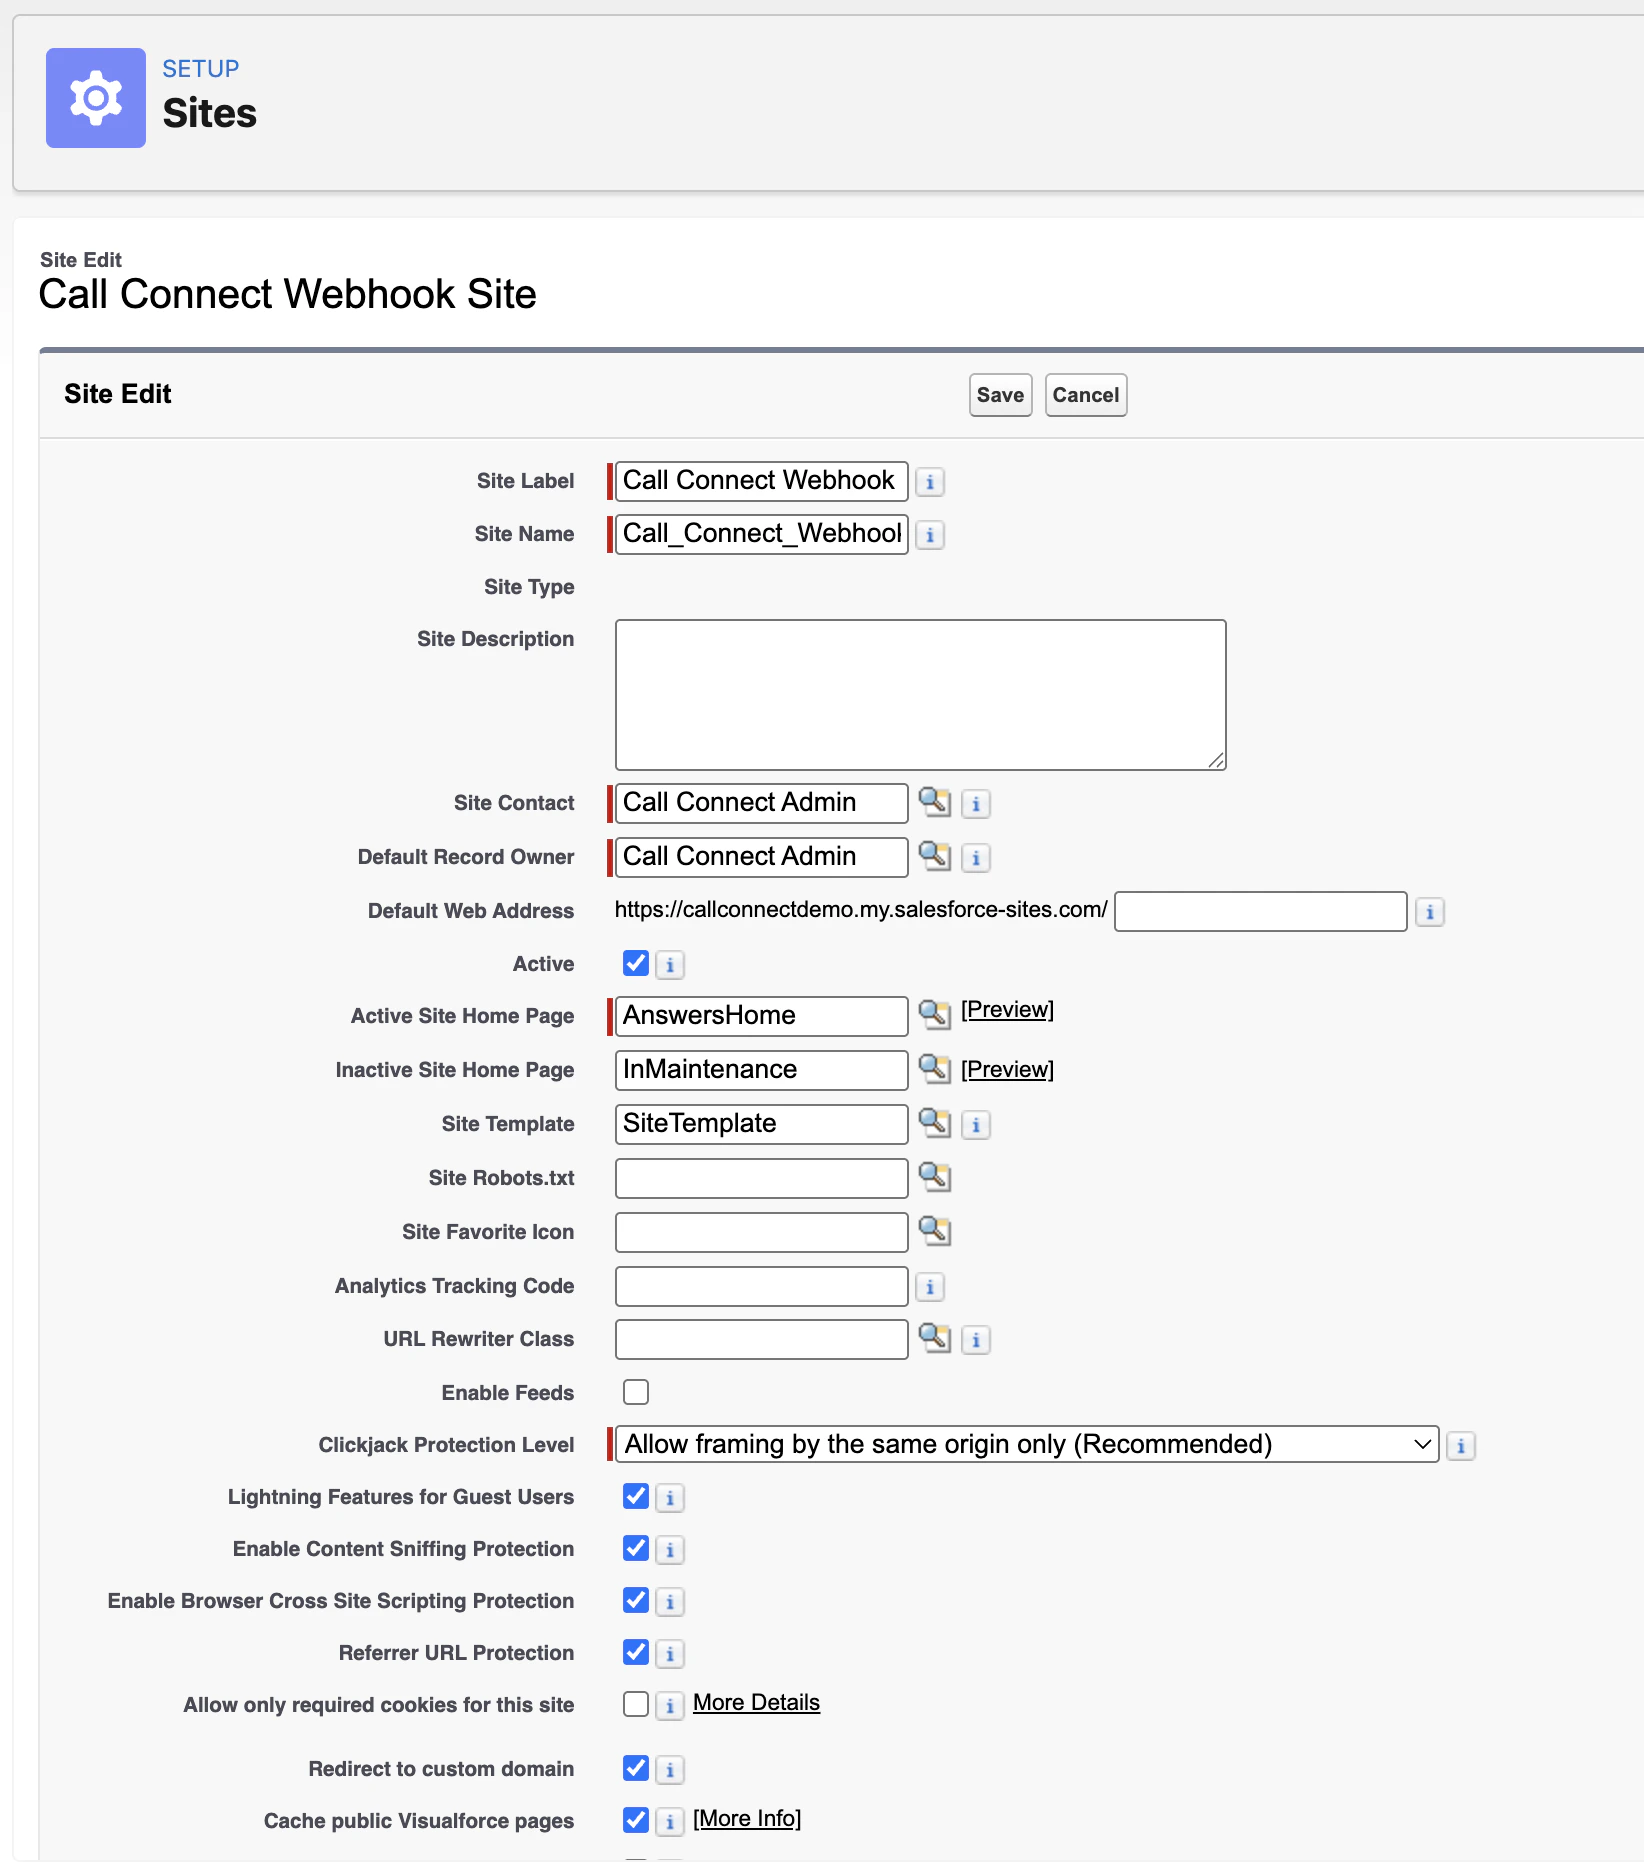
* Click **New Site**
* Enter the following details to configure your site:
| Parameter | Value |
| --------------------- | ---------------------------------------------------------------------------------- |
| Site Label | Call Connect Webhook Site |
| Site Name | CallConnectWebhookSite |
| Active Site Home Page | Select any available page e.g. **AnswersHome**, **FileNotFound**, or **SiteLogin** |
### Step 2: Assign permission sets
You must assign permission sets **immediately** after installation to access Call Connect
functionality.
1. Navigate to **Setup → Users → Permission Sets**
2. Click **Call Connect Administrator**
3. Click **Manage Assignments**
4. Select your admin user(s) to assign them the Call Connect Administrator role
5. Click **Save**
1. Navigate to **Setup → Users → Permission Sets**
2. Click **Call Connect Standard User**
3. Click **Manage Assignments**
4. Select all users who need to create authentication challenges and add them to assign the Standard User role
5. Click **Save**
## Salesforce Sites configuration
Authsignal Call Connect uses a Site in order to receive a webhook from Authsignal. This informs Salesforce of the outcome of the Authsignal Call Connect authentication session.
### Step 3: Enable and configure Site
Authsignal Call Connect makes use of Salesforce Sites. Other site types, such as Experience Sites,
will not work with this webhook configuration.{" "}
Navigate to **Setup → Sites and Domains -> Sites**
If sites is not enabled for your Salesforce instance: click **Enable Sites**, accept the terms and conditions, and then you will be prompted to register for a domain.
If Sites is already enabled but no domain exists, you will be asked to register for a domain name (e.g., `yourcompany-callconnect`)
* Click **New Site**
* Enter the following details to configure your site:
| Parameter | Value |
| --------------------- | ---------------------------------------------------------------------------------- |
| Site Label | Call Connect Webhook Site |
| Site Name | CallConnectWebhookSite |
| Active Site Home Page | Select any available page e.g. **AnswersHome**, **FileNotFound**, or **SiteLogin** |
 * Click **Save**
* Note the site domain name configuration, for later configuration in the Authsignal portal.
You must select an active home page for the site to function properly
### Step 4: Assign webhook permissions to guest user
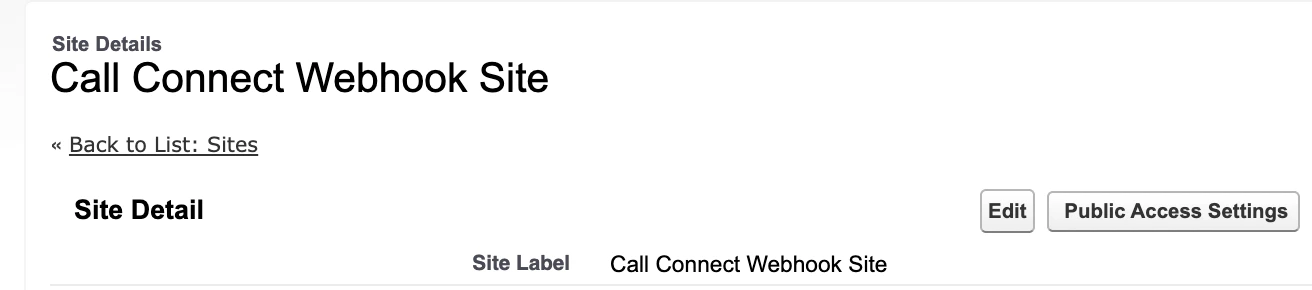
In the Site details, click **Public Access Settings**.
* Click **Save**
* Note the site domain name configuration, for later configuration in the Authsignal portal.
You must select an active home page for the site to function properly
### Step 4: Assign webhook permissions to guest user
In the Site details, click **Public Access Settings**.
 Click **View Users**, and find the **Site Guest User**.
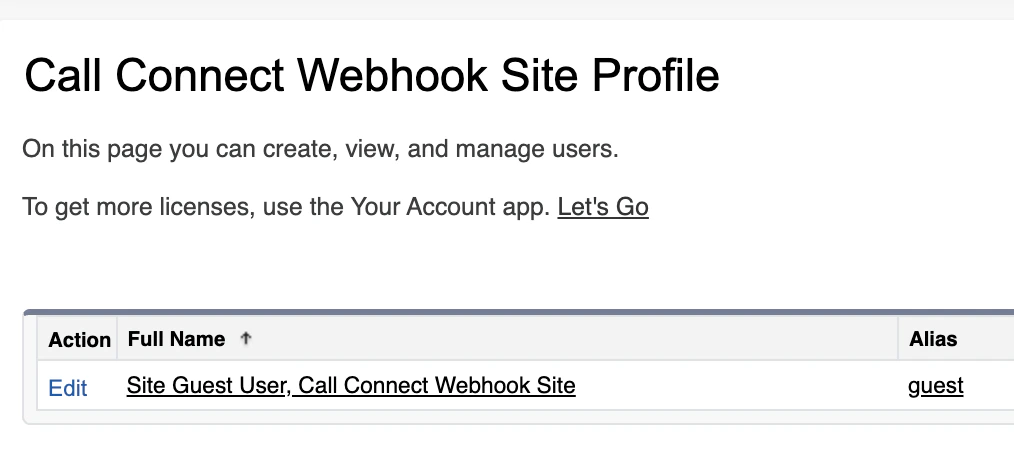 Click on their name **Site guest user** to open their profile.
Click **Edit Assignments** under Permission Set Assignments
Click on their name **Site guest user** to open their profile.
Click **Edit Assignments** under Permission Set Assignments
 Add **Call Connect Webhook User** permission set to the list.
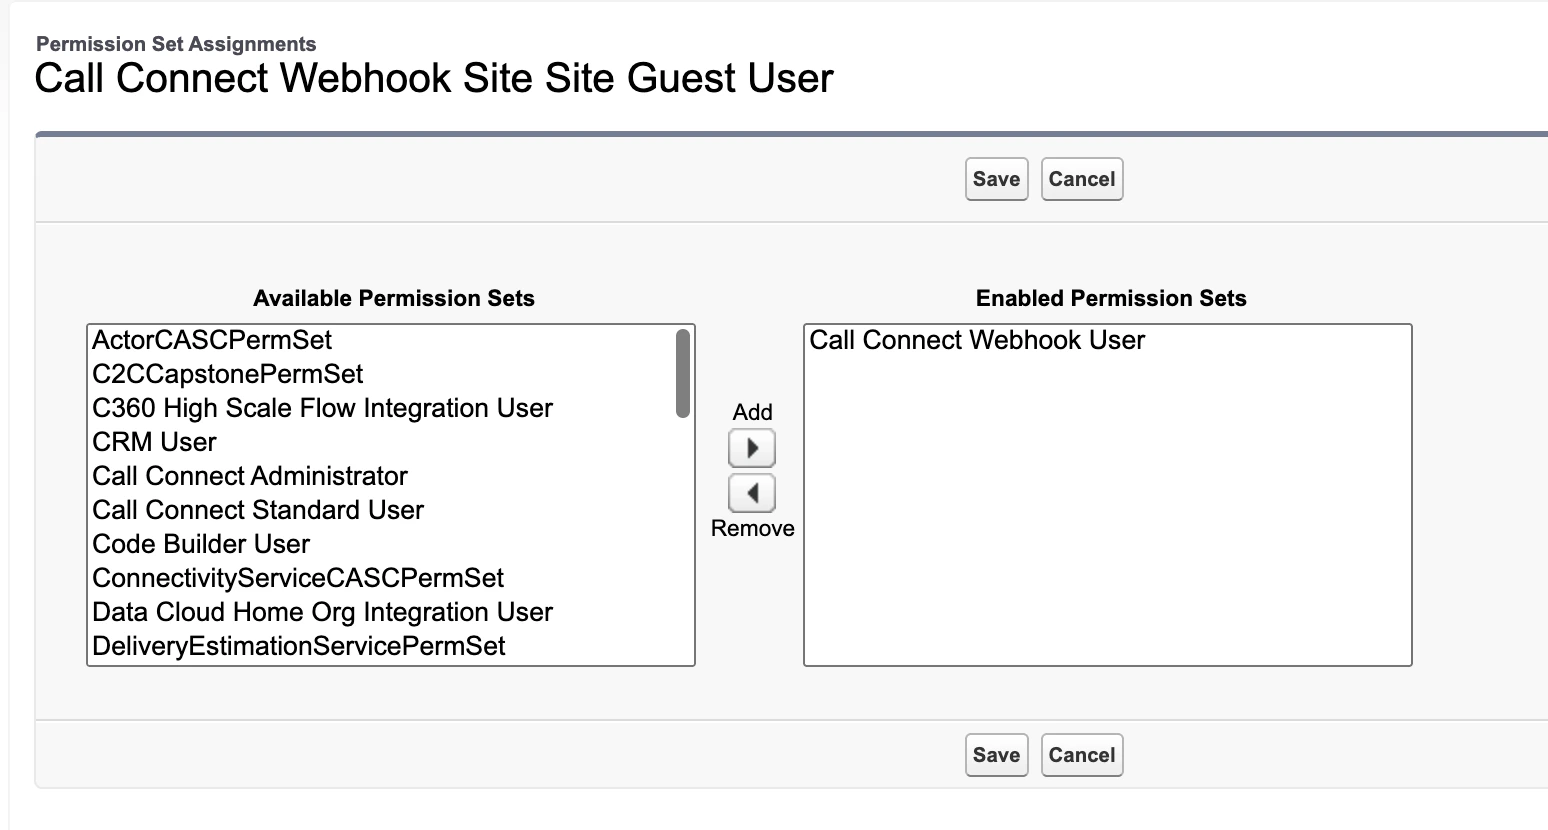 Click **Save**
Verify the webhook is accessible by calling the health check endpoint.
This varies based on organisation type:
| Organisation Type | Example Webhook URL |
| ----------------- | ------------------------------------------------------------------------------------------------------------- |
| Production | `https://[your-site-domain].my.salesforce-sites.com/services/apexrest/authsignal/callconnect/webhook` |
| Developer Edition | `https://[your-site-domain].develop.my.salesforce-sites.com/services/apexrest/authsignal/callconnect/webhook` |
| Sandbox | `https://[your-site-domain].sandbox.my.salesforce-sites.com/services/apexrest/authsignal/callconnect/webhook` |
Substitute `your-site-domain` for the domain you noted earlier.
For a healthy webhook, you should see a health check response like this:
```xml theme={null}
/services/apexrest/authsignal/callconnect/webhook
healthy
2025-11-17T10:30:15.719Z
1.0.0
```
If you see a `FORBIDDEN` error here this means the permission set what not assigned correctly to
the guest user.
## Lightning page configuration
### Step 5: Configure case record page
The included Case record page is a template and cannot be used directly. You must clone it first.
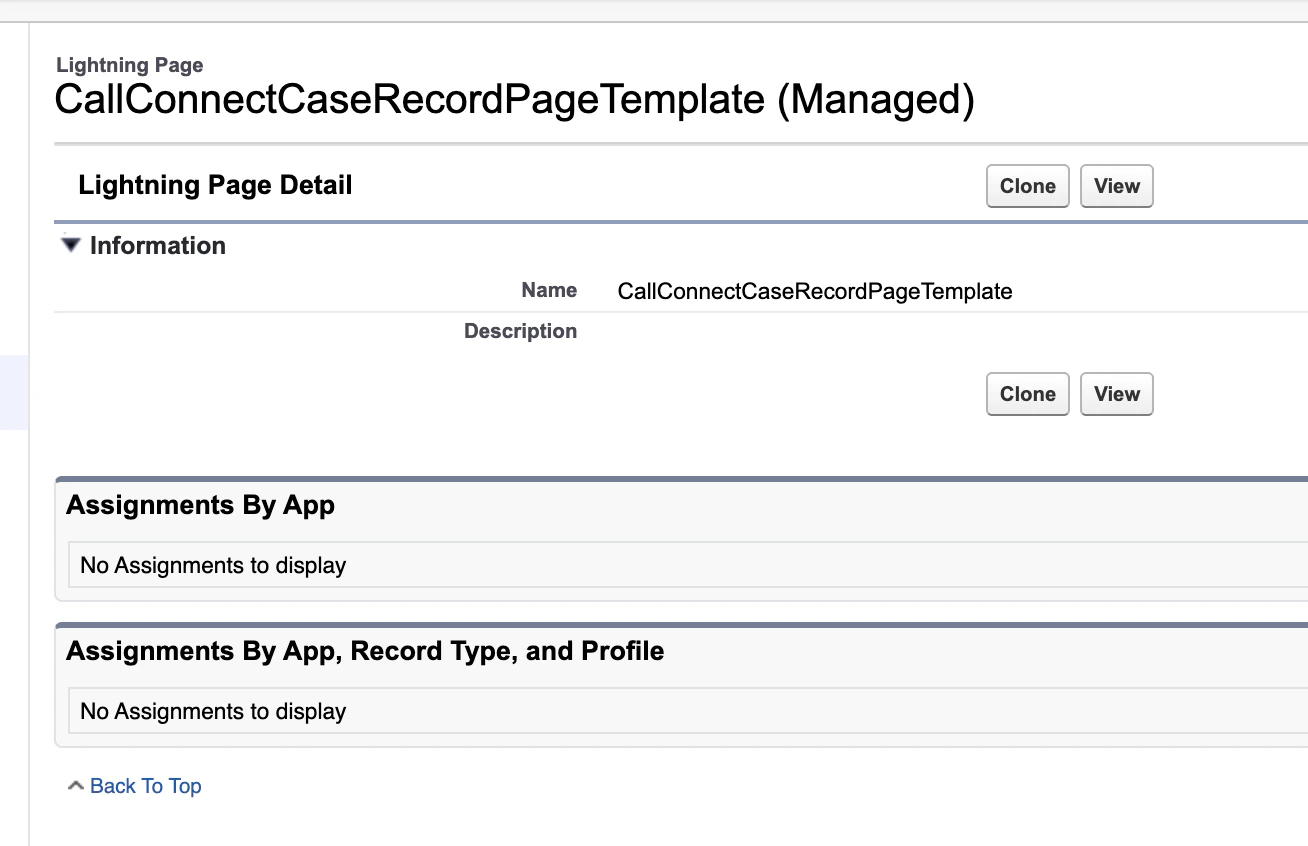
Navigate to **Setup -> Objects and Fields -> Object Manager**, and select **Case** from the list.
On the navigation bar on the left select **Lightning Record Pages**, and select **Call Connect Case Record Page Template**.
Click **Save**
Verify the webhook is accessible by calling the health check endpoint.
This varies based on organisation type:
| Organisation Type | Example Webhook URL |
| ----------------- | ------------------------------------------------------------------------------------------------------------- |
| Production | `https://[your-site-domain].my.salesforce-sites.com/services/apexrest/authsignal/callconnect/webhook` |
| Developer Edition | `https://[your-site-domain].develop.my.salesforce-sites.com/services/apexrest/authsignal/callconnect/webhook` |
| Sandbox | `https://[your-site-domain].sandbox.my.salesforce-sites.com/services/apexrest/authsignal/callconnect/webhook` |
Substitute `your-site-domain` for the domain you noted earlier.
For a healthy webhook, you should see a health check response like this:
```xml theme={null}
/services/apexrest/authsignal/callconnect/webhook
healthy
2025-11-17T10:30:15.719Z
1.0.0
```
If you see a `FORBIDDEN` error here this means the permission set what not assigned correctly to
the guest user.
## Lightning page configuration
### Step 5: Configure case record page
The included Case record page is a template and cannot be used directly. You must clone it first.
Navigate to **Setup -> Objects and Fields -> Object Manager**, and select **Case** from the list.
On the navigation bar on the left select **Lightning Record Pages**, and select **Call Connect Case Record Page Template**.
 Click **Clone**.
Be sure to rename the **Label** of the template.
Click **Clone**.
Be sure to rename the **Label** of the template.
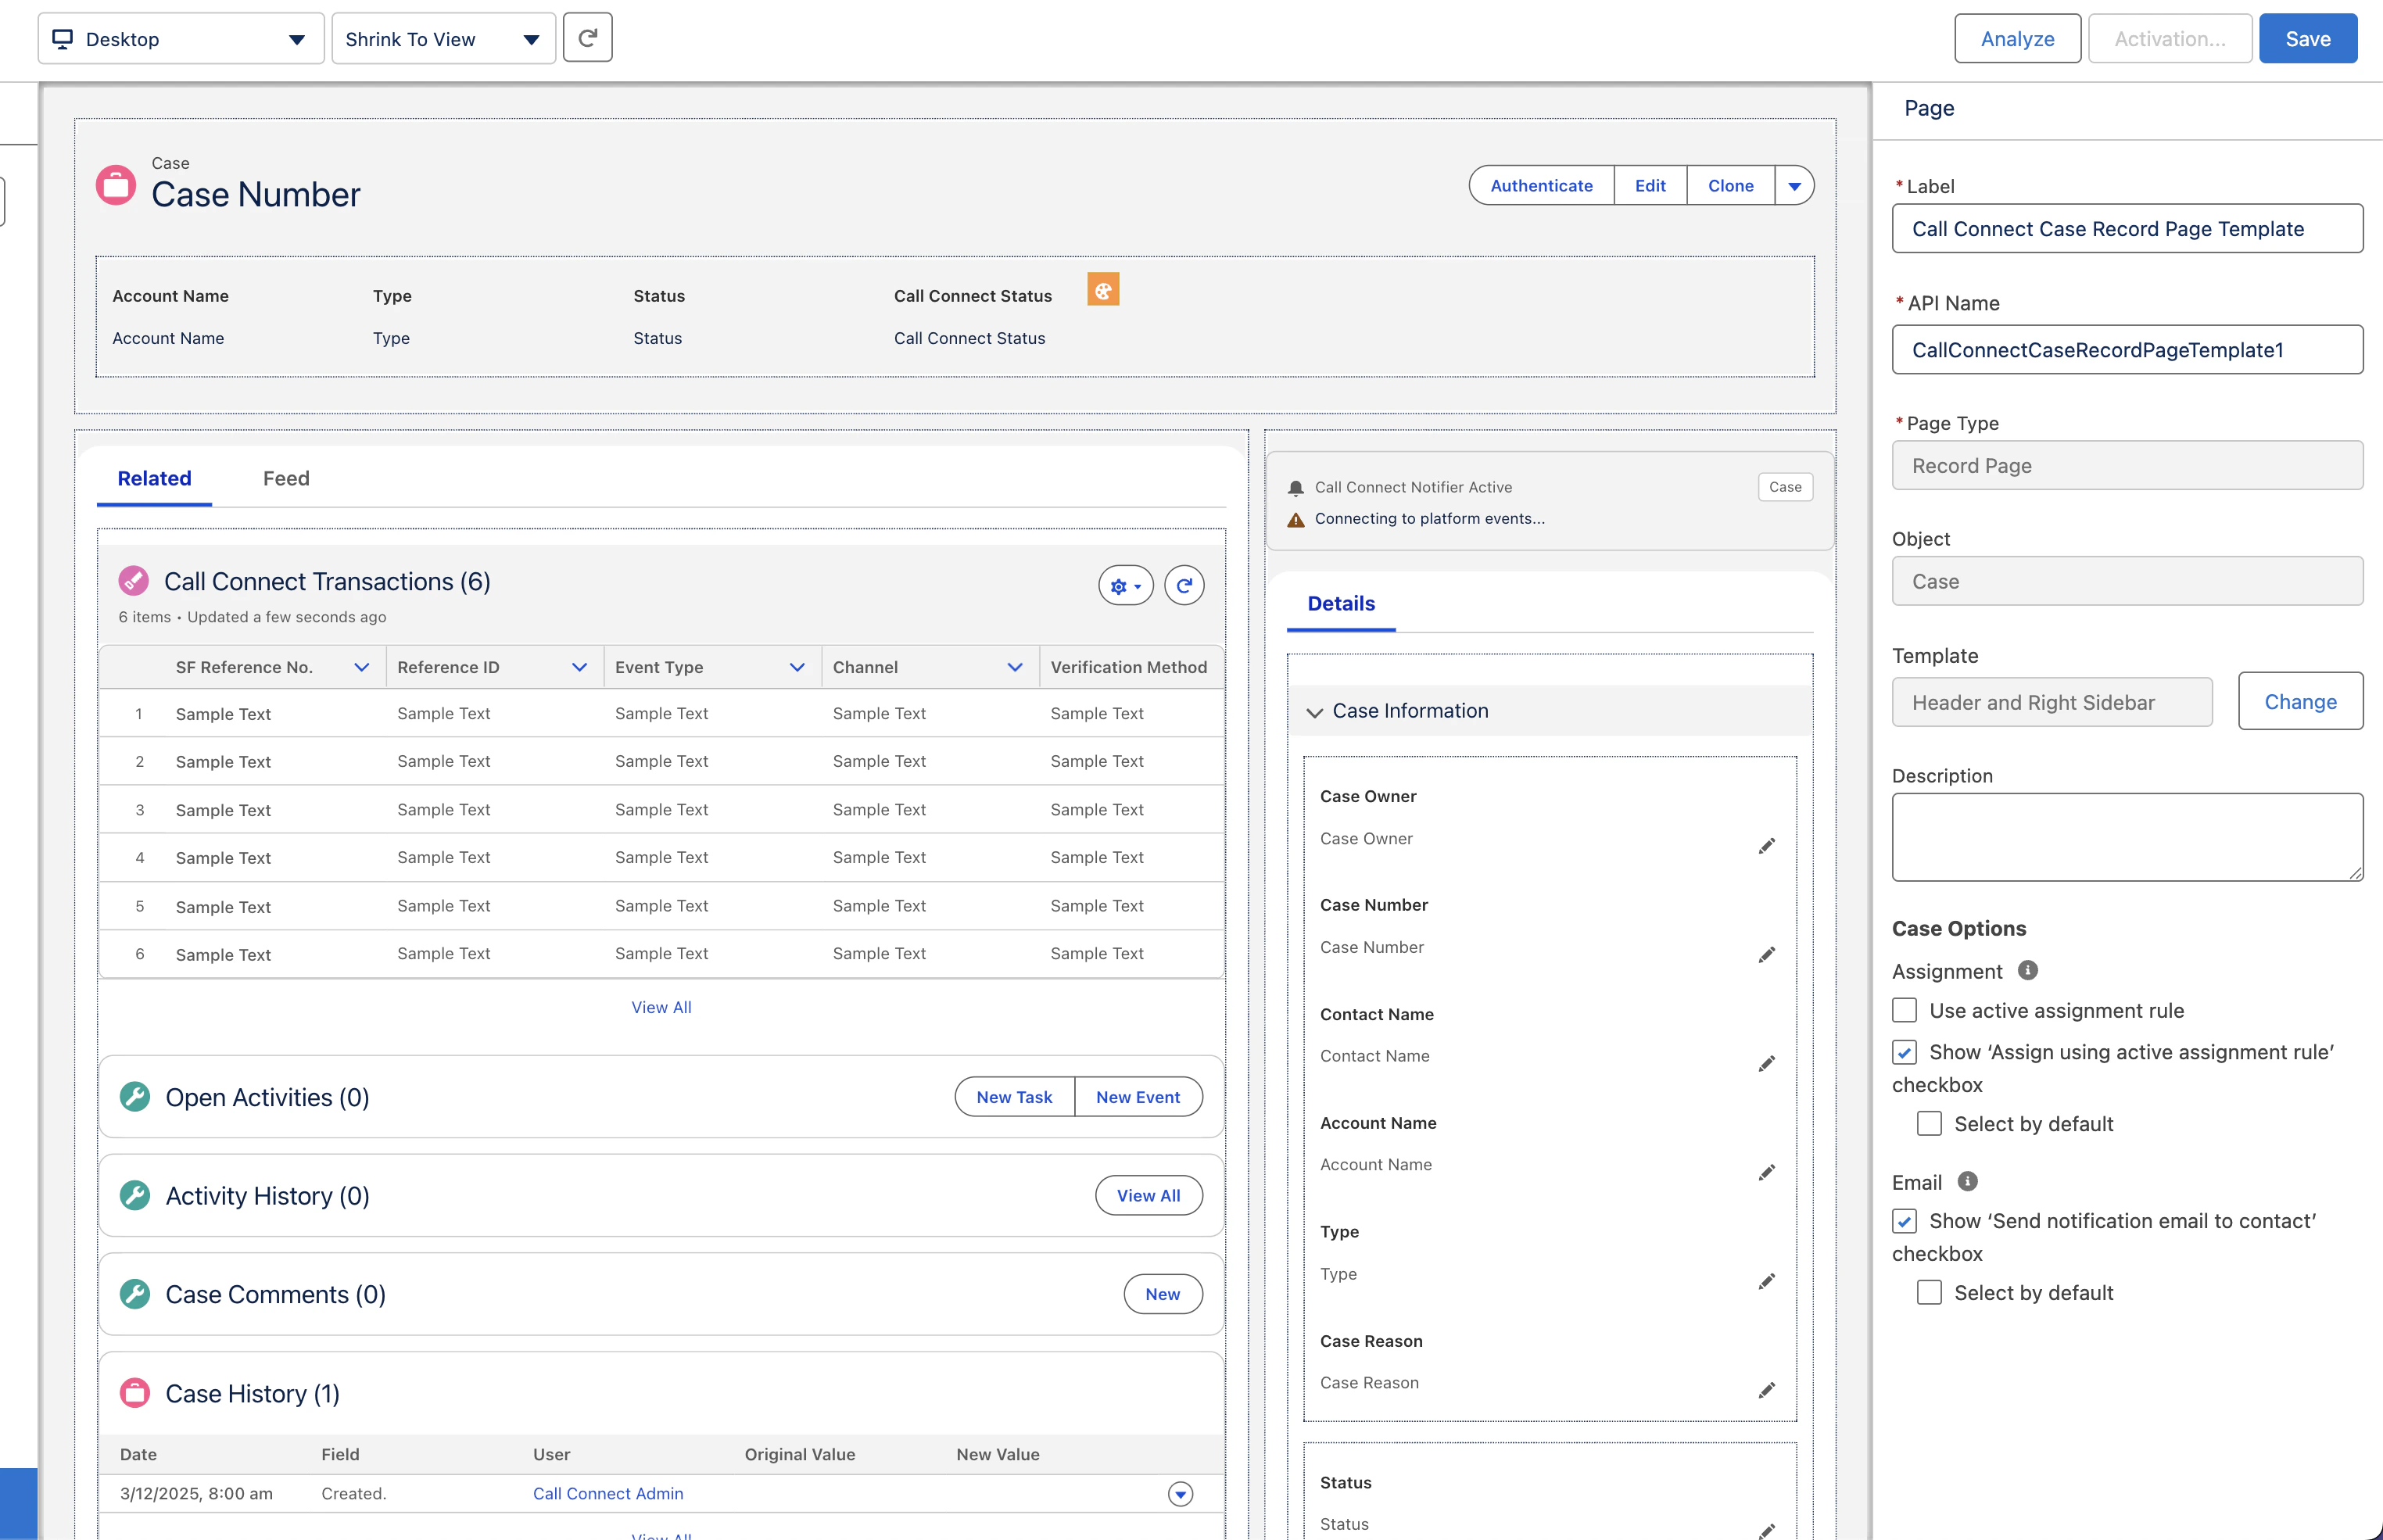 Modify the template as you wish.
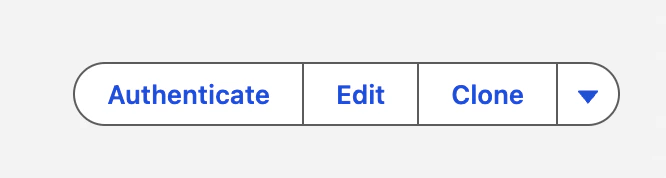
Note the **Authenticate** button on the top right of the page, this is the **Call Connect Challenge** component:
Modify the template as you wish.
Note the **Authenticate** button on the top right of the page, this is the **Call Connect Challenge** component:
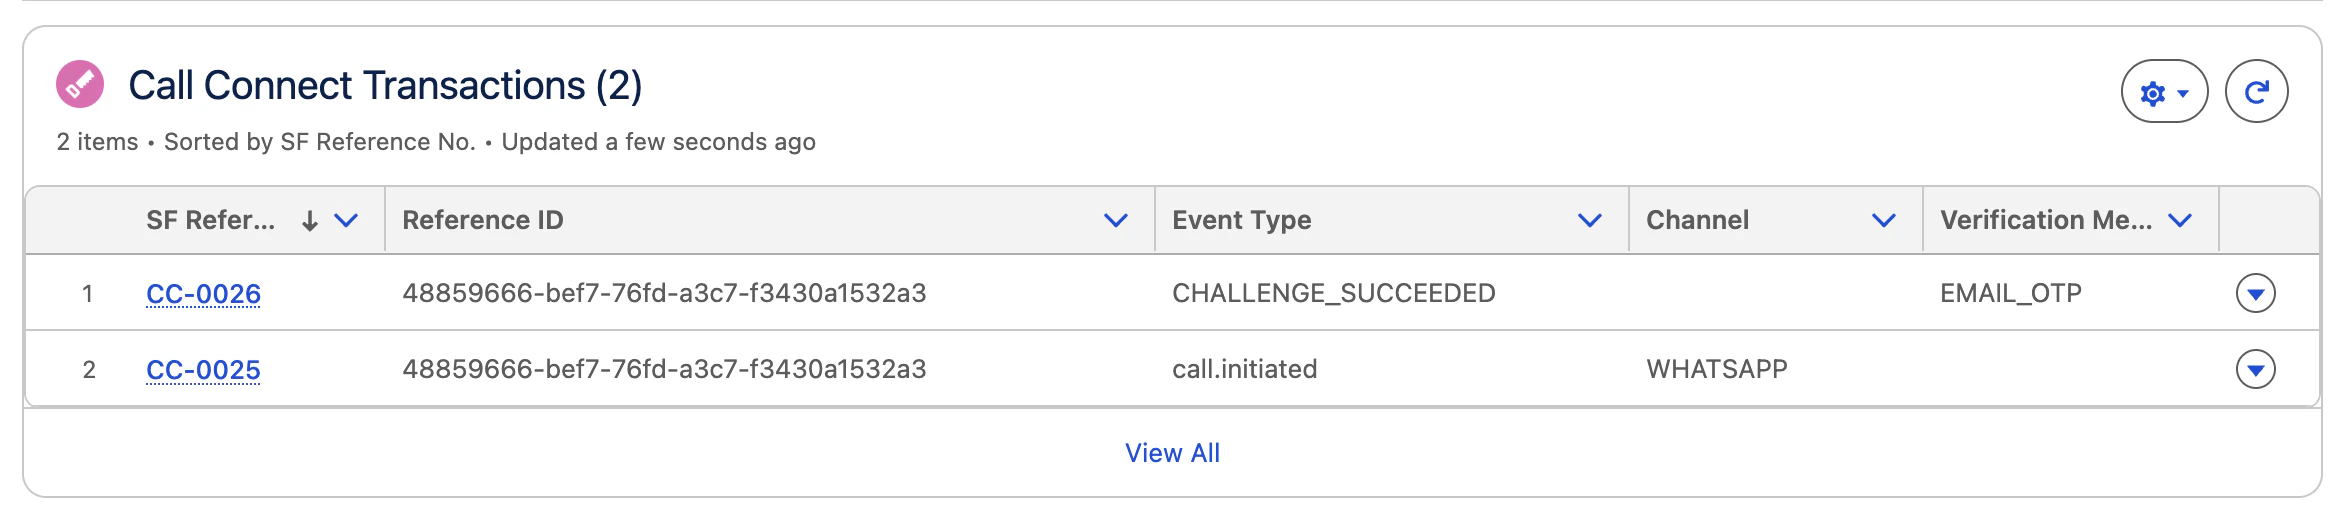
 Additionally, there is a **Call Connect Transaction Record** component for keeping a log of all Call Connect Activities:
 Click **Save** to save your progress.
Once saved, click **Activation** on the top right of the page.
Click **Save** to save your progress.
Once saved, click **Activation** on the top right of the page.
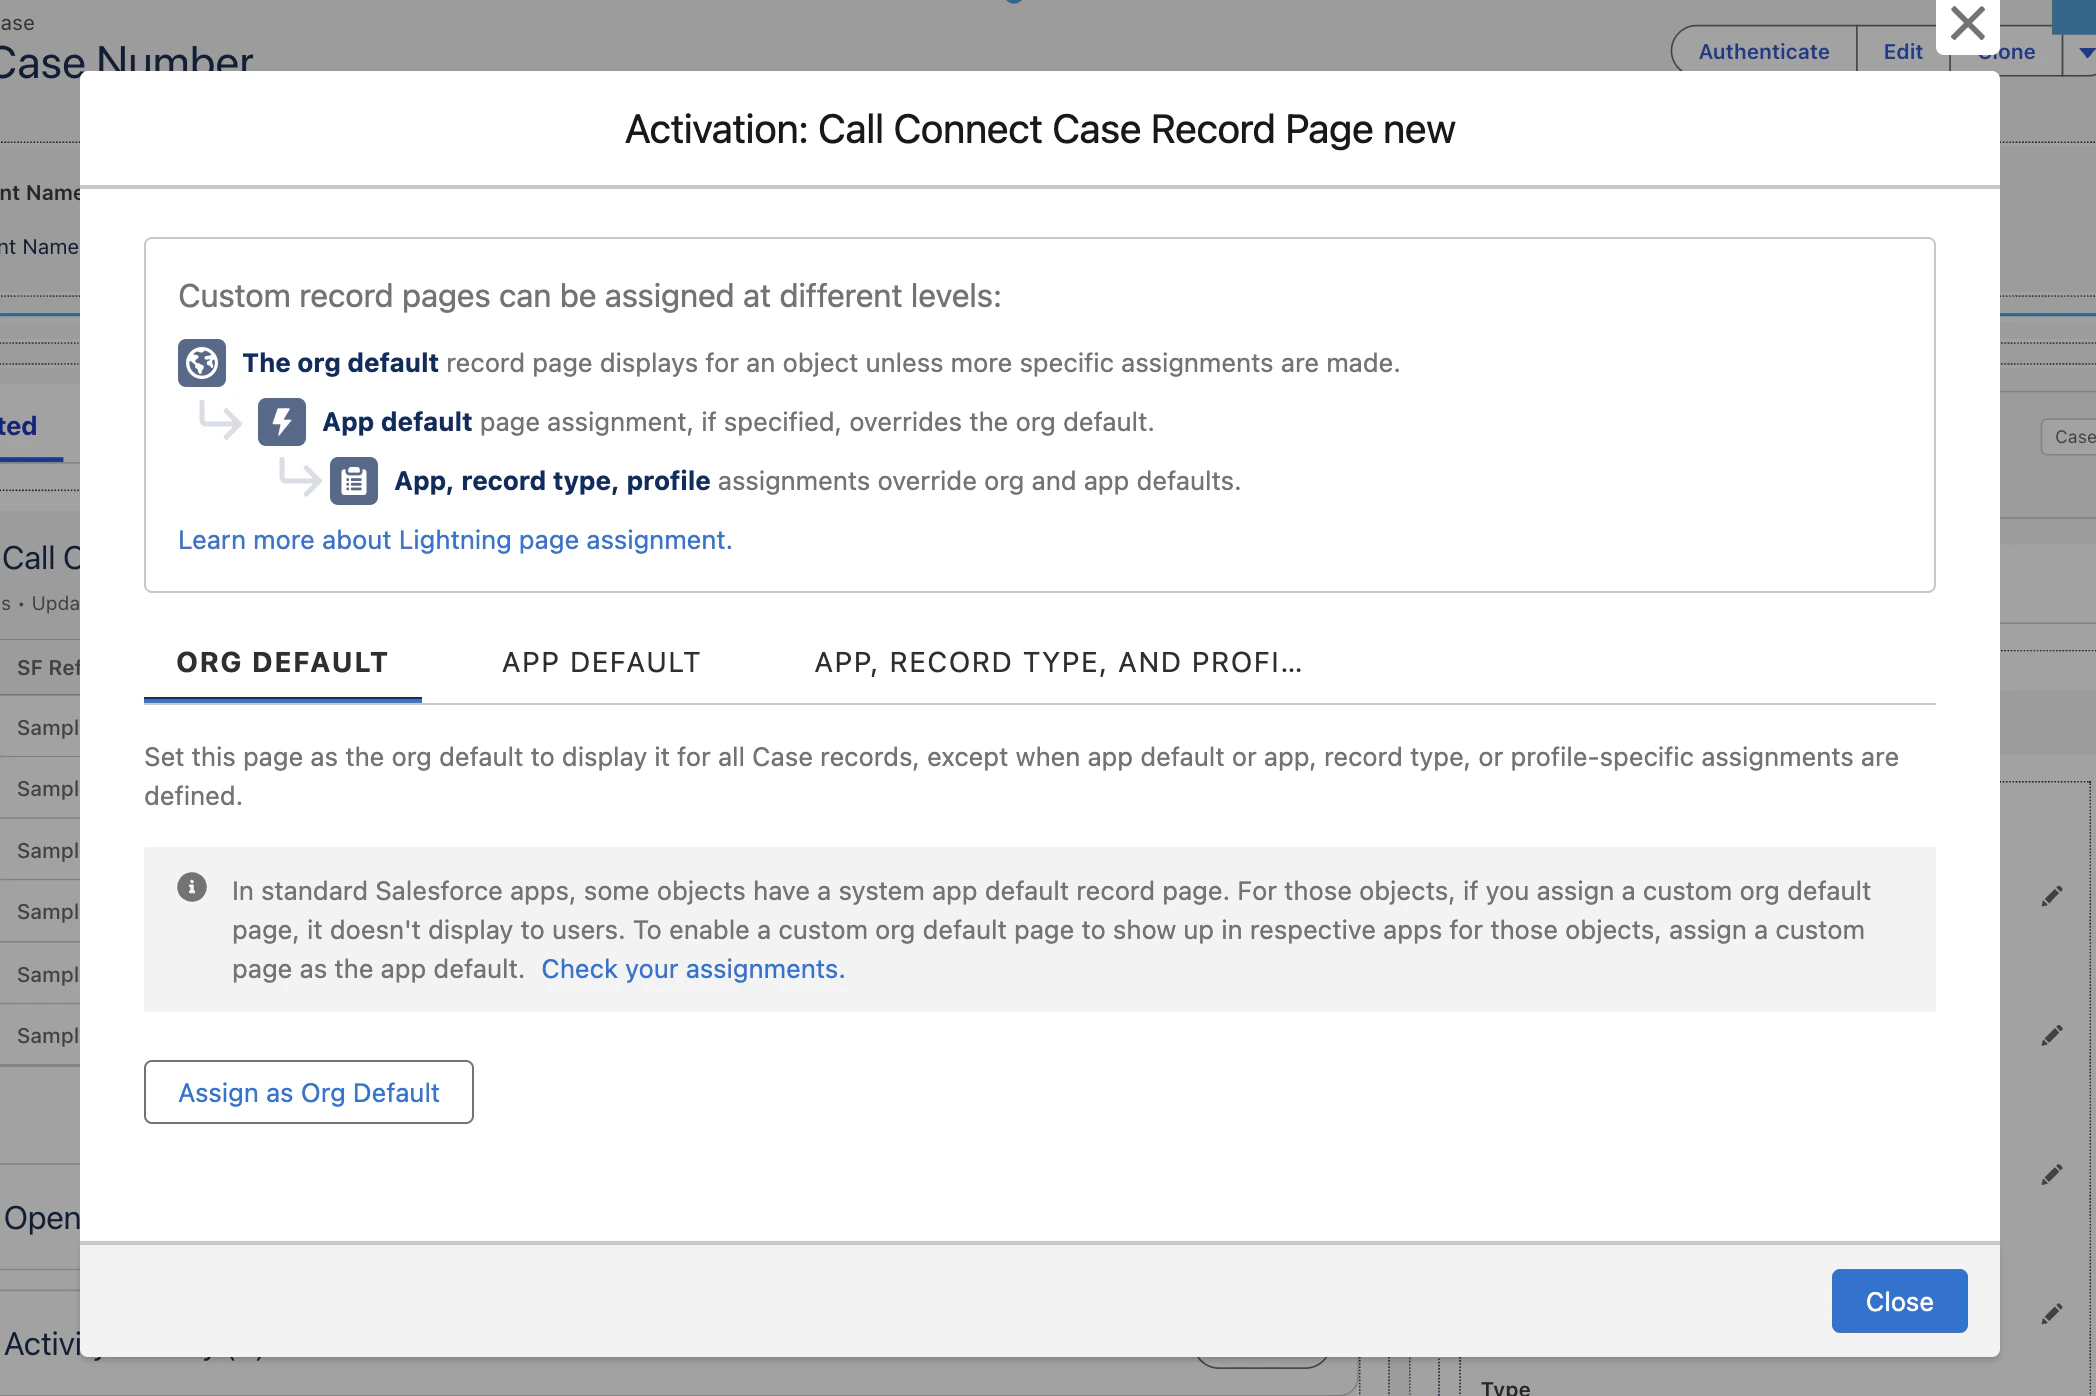 Here you can choose how far to scope this template, for example you can activate org-wide.
Click **Assign as Org Default**, select **Desktop**, click **Next** and then **Save**.
## Final configuration
### Step 6: Configure Call Connect custom metadata
You cannot edit managed package custom metadata directly. You must clone the record.{" "}
Navigate to **Setup -> Custom Code -> Custom Metadata Types**.
Next to **Call Connect Settings** click **Manage Records**.
Click **Case Settings Template (please clone)**.
Click **Clone**.
Configure as below:
| Variable | Explanation | Example |
| ------------------------------ | ------------------------------------------------------------------- | ---------------------------------- |
| Label | Give it a descriptive name | My Case Settings |
| Call Connect Settings Name | Will auto populate | My Case Settings |
| Is Active | | `true` |
| Challenge Status Field | Field API name where challenge status is stored | `authsignal__CallConnectStatus__c` |
| Challenge Time Allowed | Time in seconds for challenge | 60 |
| Email | Section of the case to be mapped to the Email Field in Call Connect | `Contact.Email` |
| Phone | Section of the case to be mapped to the Phone Field in Call Connect | `Contact.Phone` |
| Transaction Relationship Field | How to map the Call Connect Transaction to the parent record | `CaseId` |
Here you can choose how far to scope this template, for example you can activate org-wide.
Click **Assign as Org Default**, select **Desktop**, click **Next** and then **Save**.
## Final configuration
### Step 6: Configure Call Connect custom metadata
You cannot edit managed package custom metadata directly. You must clone the record.{" "}
Navigate to **Setup -> Custom Code -> Custom Metadata Types**.
Next to **Call Connect Settings** click **Manage Records**.
Click **Case Settings Template (please clone)**.
Click **Clone**.
Configure as below:
| Variable | Explanation | Example |
| ------------------------------ | ------------------------------------------------------------------- | ---------------------------------- |
| Label | Give it a descriptive name | My Case Settings |
| Call Connect Settings Name | Will auto populate | My Case Settings |
| Is Active | | `true` |
| Challenge Status Field | Field API name where challenge status is stored | `authsignal__CallConnectStatus__c` |
| Challenge Time Allowed | Time in seconds for challenge | 60 |
| Email | Section of the case to be mapped to the Email Field in Call Connect | `Contact.Email` |
| Phone | Section of the case to be mapped to the Phone Field in Call Connect | `Contact.Phone` |
| Transaction Relationship Field | How to map the Call Connect Transaction to the parent record | `CaseId` |
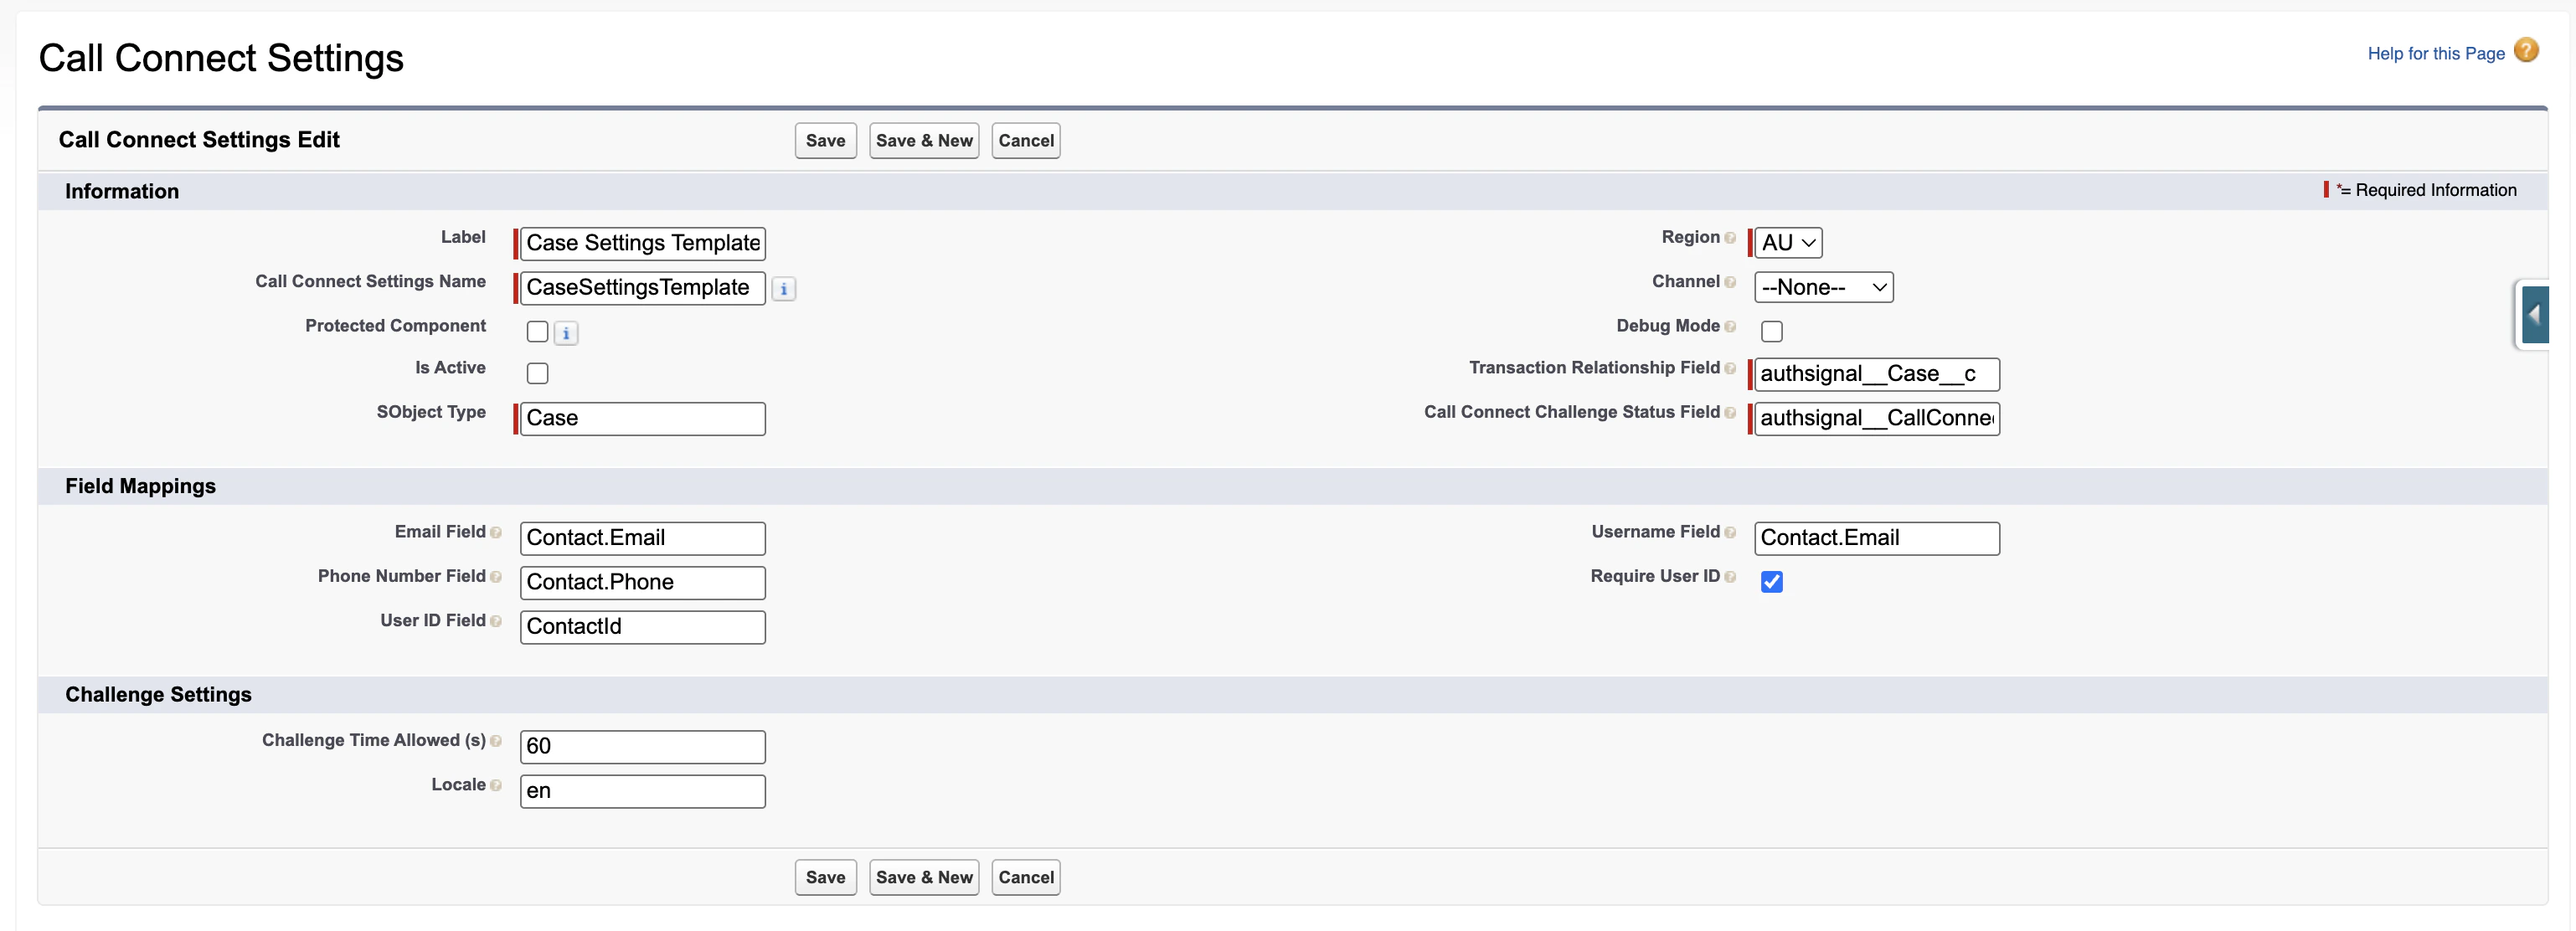 **Save** the record.
The original managed package metadata is already deactivated, so your new cloned record with "Is Active" = `true` becomes the active configuration
### Step 7: Authsignal Call Connect portal configuration
In the Authsignal Portal, navigate to **Settings -> Call Connect**. Select **Salesforce**.
Enter the following information, which can be found from the Authsignal Salesforce Site configuration page:
* Salesforce Organization ID
* Organization Type
* Site ID
* Site Domain Name
**Save** the record.
The original managed package metadata is already deactivated, so your new cloned record with "Is Active" = `true` becomes the active configuration
### Step 7: Authsignal Call Connect portal configuration
In the Authsignal Portal, navigate to **Settings -> Call Connect**. Select **Salesforce**.
Enter the following information, which can be found from the Authsignal Salesforce Site configuration page:
* Salesforce Organization ID
* Organization Type
* Site ID
* Site Domain Name
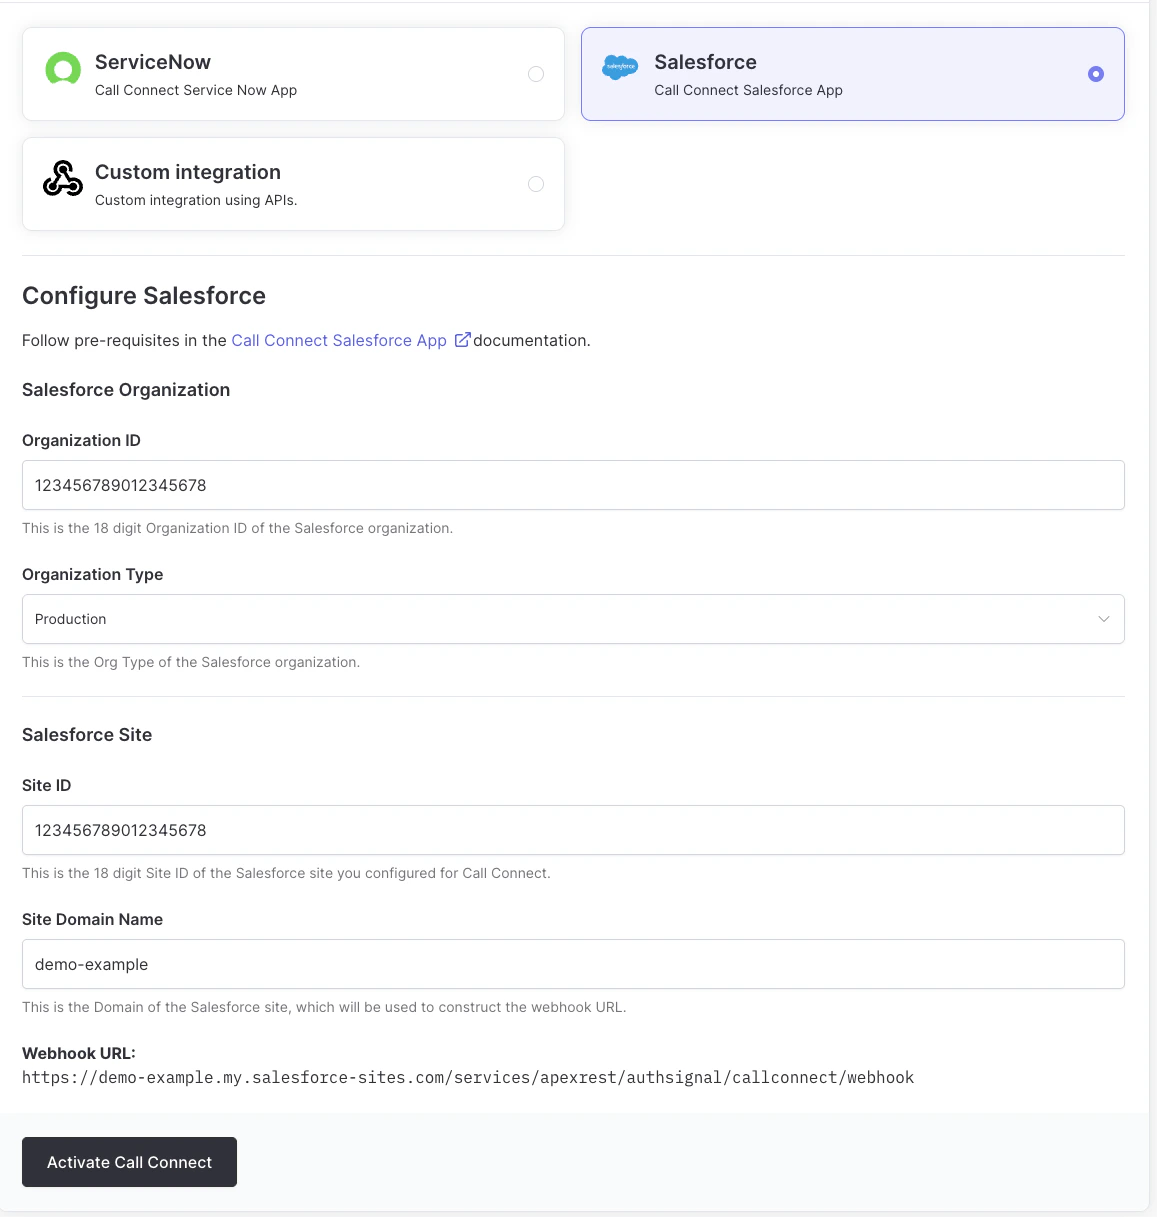 Select **Activate Call Connect**
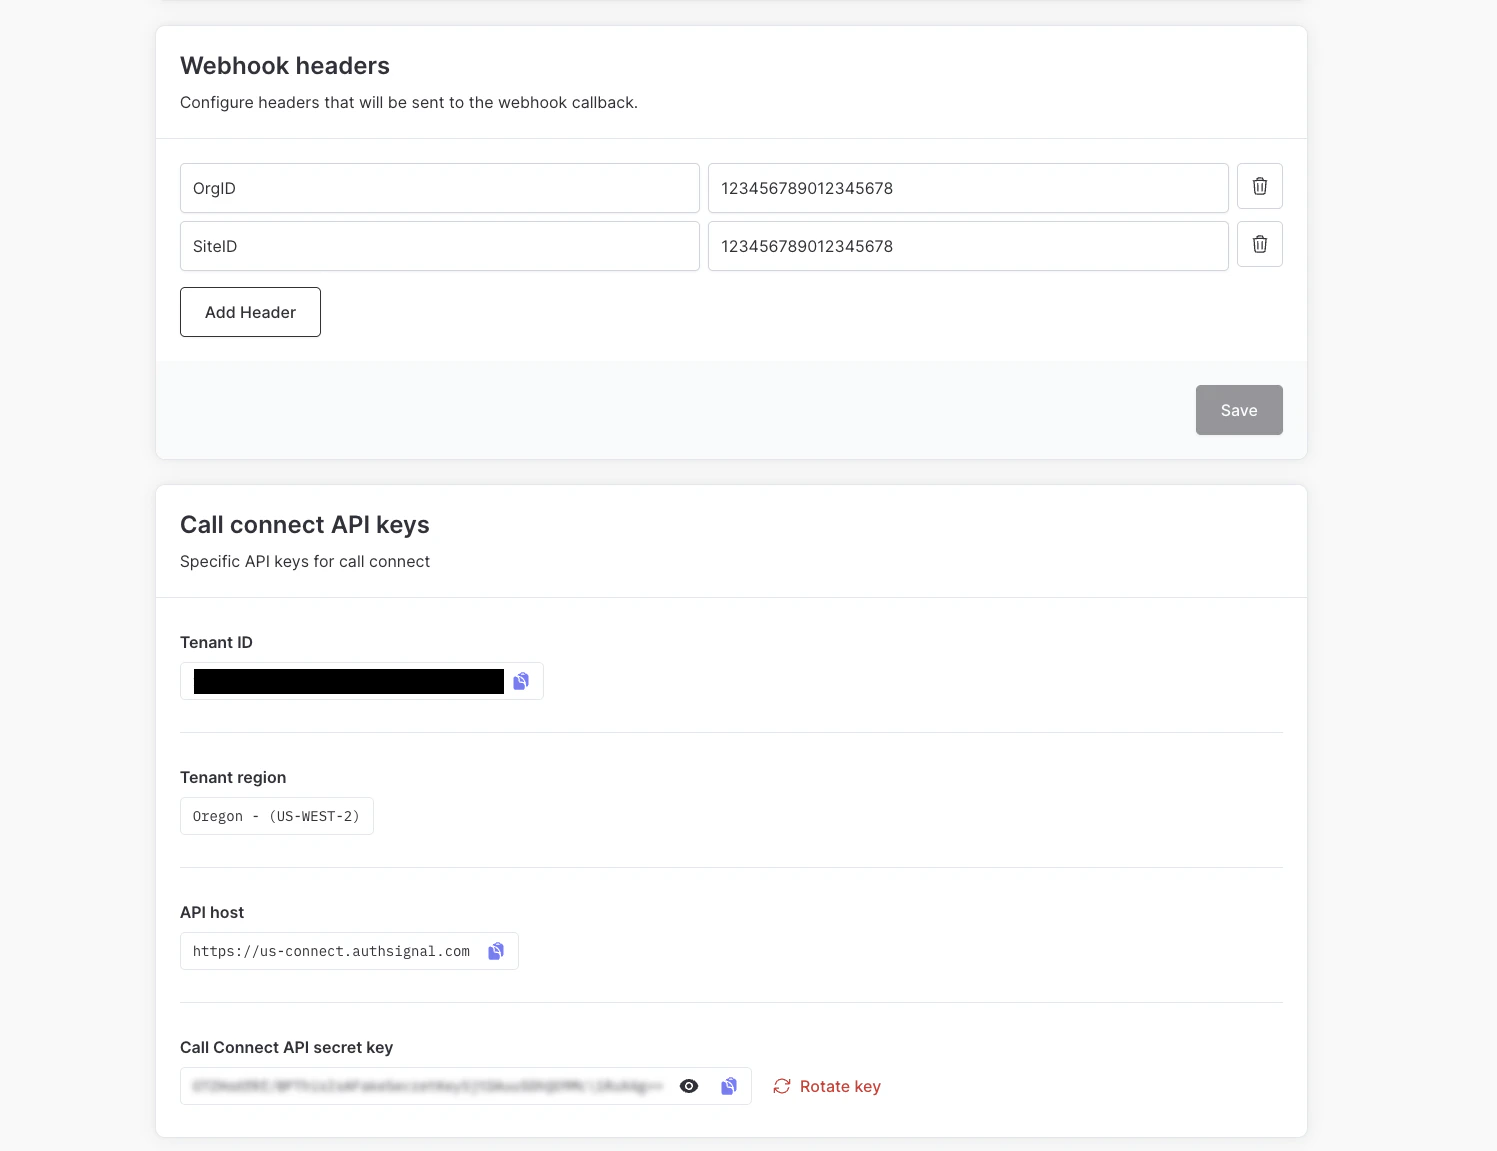
You are presented with the Call Connect Settings Page. Scroll to the **Call Connect API Keys** section at the bottom of the page.
Select to copy the **API secret key**. Keep this handy for the next step.
Select **Activate Call Connect**
You are presented with the Call Connect Settings Page. Scroll to the **Call Connect API Keys** section at the bottom of the page.
Select to copy the **API secret key**. Keep this handy for the next step.
 ### Step 8: Configure API key in Salesforce
In Salesforce navigate to **Setup -> Security -> Named Credentials**. Click on the **External
Credentials** tab, and select the **CallConnectExtCredentials** named credential.
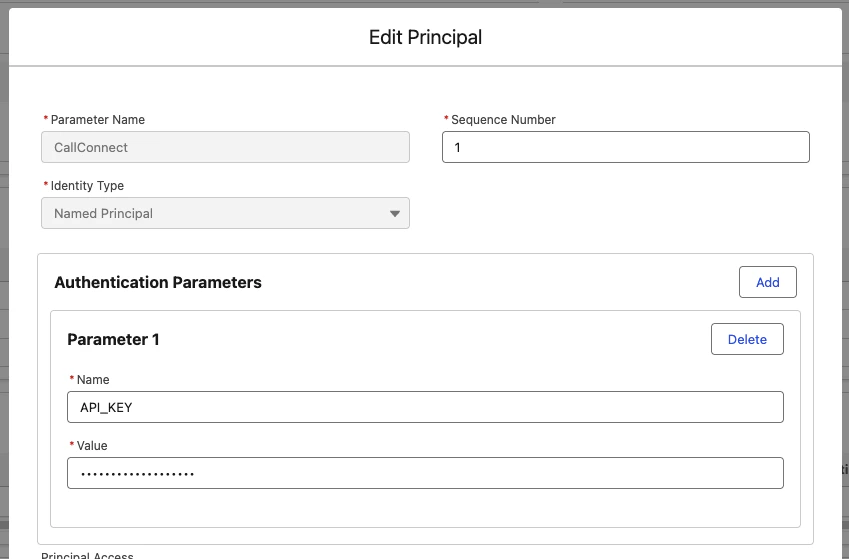
Under **Principal**, select the dropdown on the right and select **Edit**.
Enter the following as a Parameter:
| Parameter Name | Value |
| -------------- | ------------------------------------------------------------- |
| `API_KEY` | Authsignal Call Connect API Key copied from the previous step |
### Step 8: Configure API key in Salesforce
In Salesforce navigate to **Setup -> Security -> Named Credentials**. Click on the **External
Credentials** tab, and select the **CallConnectExtCredentials** named credential.
Under **Principal**, select the dropdown on the right and select **Edit**.
Enter the following as a Parameter:
| Parameter Name | Value |
| -------------- | ------------------------------------------------------------- |
| `API_KEY` | Authsignal Call Connect API Key copied from the previous step |
 Select **Save**