> ## Documentation Index
> Fetch the complete documentation index at: https://docs.authsignal.com/llms.txt
> Use this file to discover all available pages before exploring further.

# Adding MFA to your Keycloak login flow

> Learn how to add MFA to your Keycloak login flow with Authsignal.

## Overview

In this guide, we will demonstrate how to leverage a Keycloak
provider to seamlessly integrate MFA into a traditional username and password login flow using Authsignal's [pre-built UI](/implementation-options/prebuilt-ui/overview),
enhancing security with minimal disruption to the user experience.

<Frame caption="MFA challenge via Authsignal pre-built UI.">
  <iframe width="100%" height="400" src="https://www.youtube.com/embed/MUUBlnVyLqc" title="MFA challenge via Authsignal pre-built UI" frameBorder="0" allow="accelerometer; autoplay; clipboard-write; encrypted-media; gyroscope; picture-in-picture" allowFullScreen />
</Frame>

<Card icon="github" horizontal title="Keycloak provider code example" href="https://github.com/authsignal/authsignal-keycloak-providers" />

<Note>The above example can be extended to meet your specific requirements.</Note>

## Prerequisites

This guide assumes you have a basic understanding of Keycloak and Authsignal.

If you are new to Keycloak, we recommend you follow the [Keycloak Quickstart](https://www.keycloak.org/getting-started/getting-started-zip)
guide to get up and running.

## Authsignal configuration

<Steps>
  <Step title="Enable authenticators">
    Head to the [Authenticators section in the Authsignal Portal](https://portal.authsignal.com/organisations/tenants/authenticators) to configure authenticators.

    For this example, we have enabled Authenticator App.
  </Step>

  <Step title="Get API keys">
    Head to the [API Keys section in the Authsignal Portal](https://portal.authsignal.com/organisations/tenants/api) to get your API keys.
  </Step>
</Steps>

## Keycloak configuration

### Creating a new provider

<Steps>
  <Step title="Download the provider JAR files">
    Download the pre-built
    [authsignal-keycloak-\*.jar](https://github.com/authsignal/authsignal-keycloak-providers/packages/2329169)
    JAR file. Alternatively, you can build the JAR file yourself using the [GitHub
    repository](https://github.com/authsignal/authsignal-keycloak-providers).
  </Step>

  <Step title="Download the Authsignal Java SDK JAR file">
    Download the [Authsignal (version 2.0+) Java SDK (dependency) JAR
    file](https://mvnrepository.com/artifact/com.authsignal/authsignal-java) from Maven.
  </Step>

  <Step
    title={
  <>
    Copy the JAR files to the <code>/providers/</code> directory
  </>
}
  />
</Steps>

### Configuring the Authsignal Authentication flow

<Info>
  If you have not already created a Keycloak realm, do this by clicking the **Create realm** button
  in the Keycloak admin UI (within the Keycloak drop-down menu top left).
</Info>

After installing the provider JAR files, you'll need to configure Keycloak to use Authsignal for MFA. This section walks through setting up a custom authentication flow that incorporates the Authsignal Authenticator.

To configure the authentication flow:

<Steps>
  <Step title="Access your Keycloak Admin panel" />

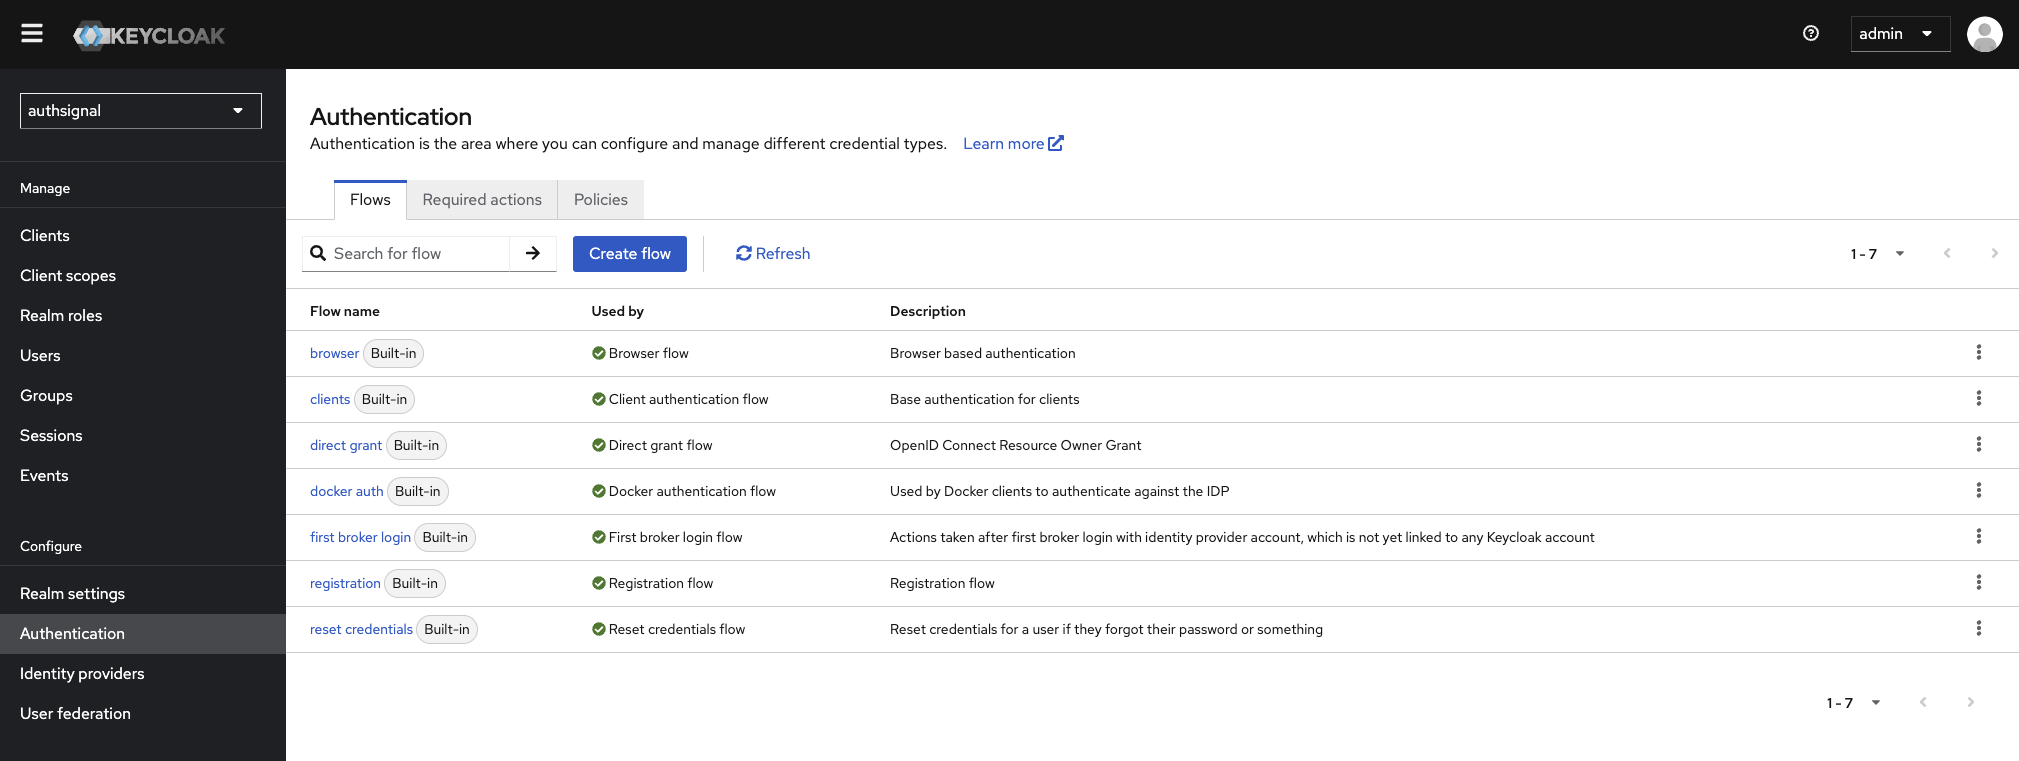
  <Step title="Navigate to your project's Realm, and then to the 'Authentication' section" />

  <Step title="Select the 'browser' flow">
    <Frame caption="Accessing the browser flow">
      <img src="https://mintcdn.com/authsignal-23/8bvDamO56aVu-Ay2/images/docs/integrations/keycloak/keycloak-authentication-page.png?fit=max&auto=format&n=8bvDamO56aVu-Ay2&q=85&s=20d3056d904d49696028c830046535ca" alt="" width="2019" height="761" data-path="images/docs/integrations/keycloak/keycloak-authentication-page.png" />
    </Frame>
  </Step>

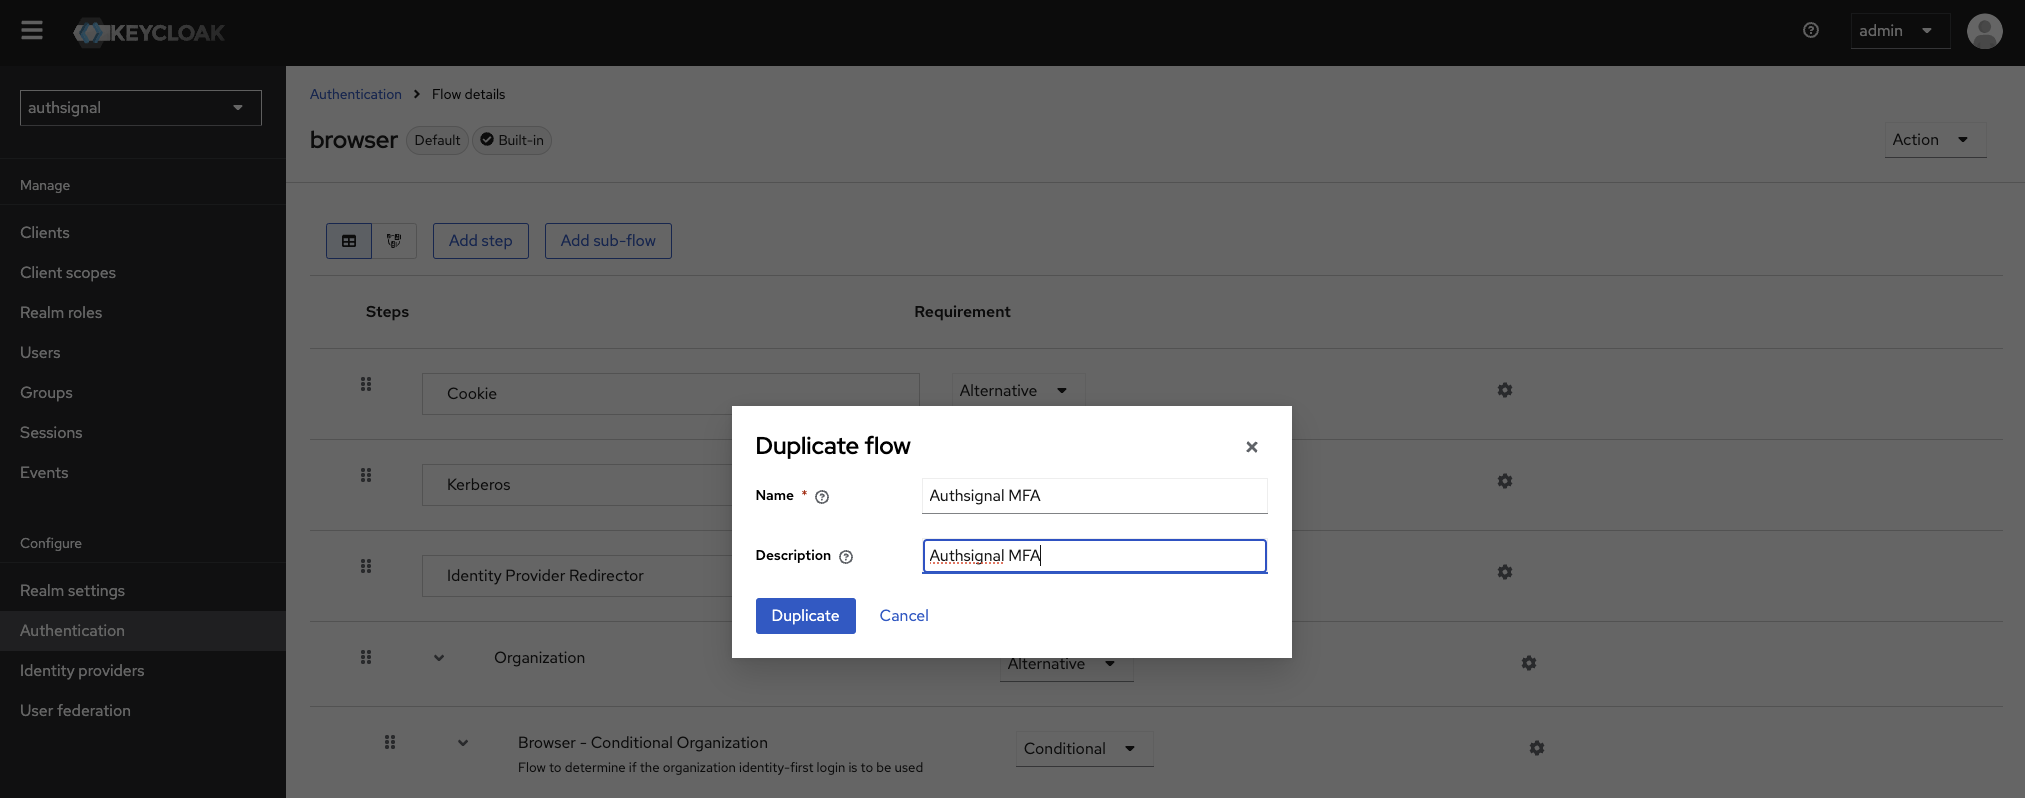
  <Step title="Create a copy of this flow using the 'Action' dropdown in the top-right">
    <Frame caption="Creating a copy of the browser flow">
      <img src="https://mintcdn.com/authsignal-23/8bvDamO56aVu-Ay2/images/docs/integrations/keycloak/keycloak-create-authsignal-authenticator.png?fit=max&auto=format&n=8bvDamO56aVu-Ay2&q=85&s=474bd771d03689f6cfd65eb4e5b4d00c" alt="" width="2025" height="798" data-path="images/docs/integrations/keycloak/keycloak-create-authsignal-authenticator.png" />
    </Frame>
  </Step>

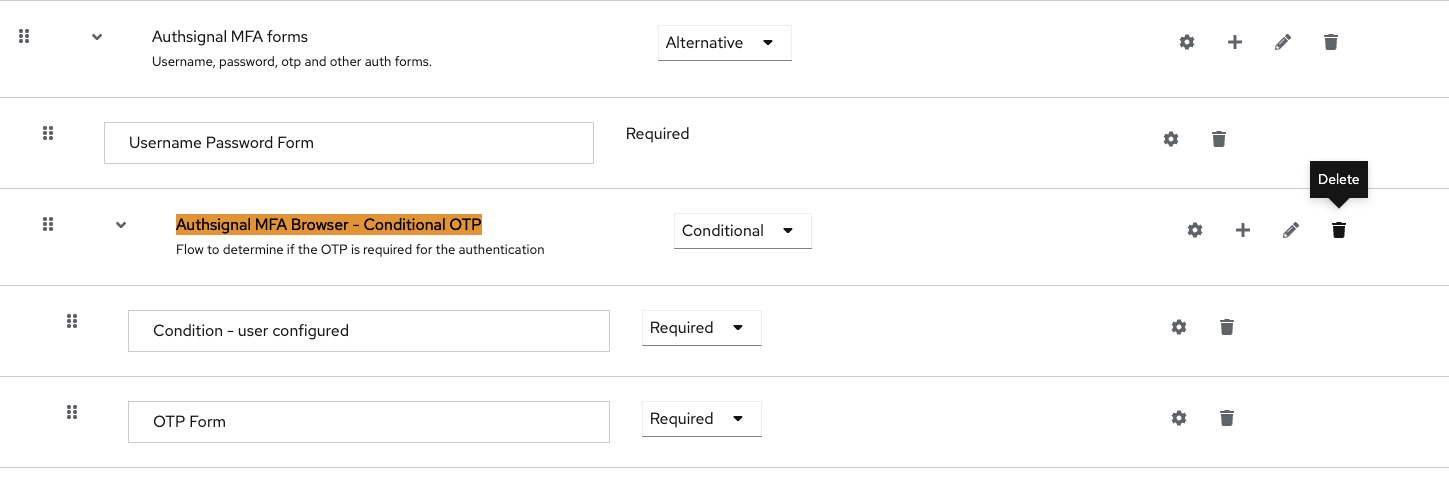
  <Step title="In your new copied flow, remove the existing 'Conditional OTP' authentication step.">
    <Frame caption="Removing the existing Conditional OTP step">
      <img src="https://mintcdn.com/authsignal-23/8bvDamO56aVu-Ay2/images/docs/integrations/keycloak/keycloak-delete-conditional-OTP.png?fit=max&auto=format&n=8bvDamO56aVu-Ay2&q=85&s=4d76a7d0c8c193e240fb2dccfb879457" alt="" width="1449" height="483" data-path="images/docs/integrations/keycloak/keycloak-delete-conditional-OTP.png" />
    </Frame>
  </Step>

  <Step title="Add the Authsignal provider to the flow.">
    Inside the subflow which already contains the ‘Username Password Form’, we need to add the Authsignal provider as a step.

    <Frame caption="Adding the Authsignal provider step">
      <img src="https://mintcdn.com/authsignal-23/8bvDamO56aVu-Ay2/images/docs/integrations/keycloak/keycloak-add-authsignal-step.png?fit=max&auto=format&n=8bvDamO56aVu-Ay2&q=85&s=5db50b306447f08852346035bfcc9d3b" alt="" width="1484" height="198" data-path="images/docs/integrations/keycloak/keycloak-add-authsignal-step.png" />
    </Frame>
  </Step>

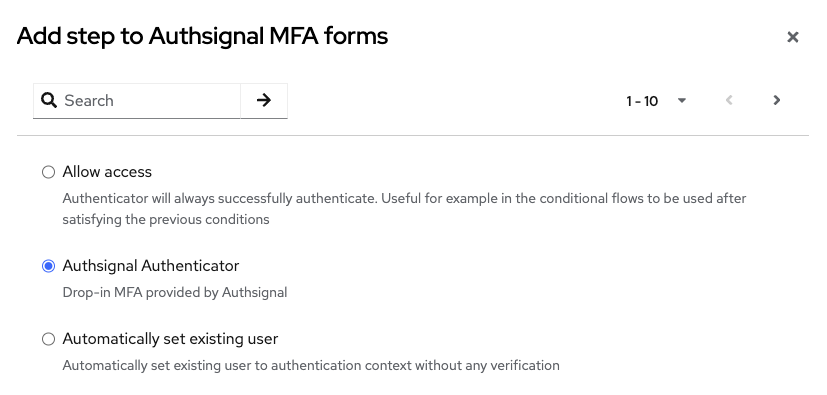
  <Step title="Select the Authsignal Authenticator.">
    If you successfully added the Authsignal .JAR files to the `/providers/` folder in the previous steps, you will see the Authsignal Authenticator listed in the menu - select it to add it to your flow.

    <Frame caption="Adding the Authsignal provider step">
      <img src="https://mintcdn.com/authsignal-23/8bvDamO56aVu-Ay2/images/docs/integrations/keycloak/keycloak-select-authsignal-authenticator.png?fit=max&auto=format&n=8bvDamO56aVu-Ay2&q=85&s=6a0c594789b5facaf72129e070bfdf4e" alt="" width="827" height="395" data-path="images/docs/integrations/keycloak/keycloak-select-authsignal-authenticator.png" />
    </Frame>

    <br />

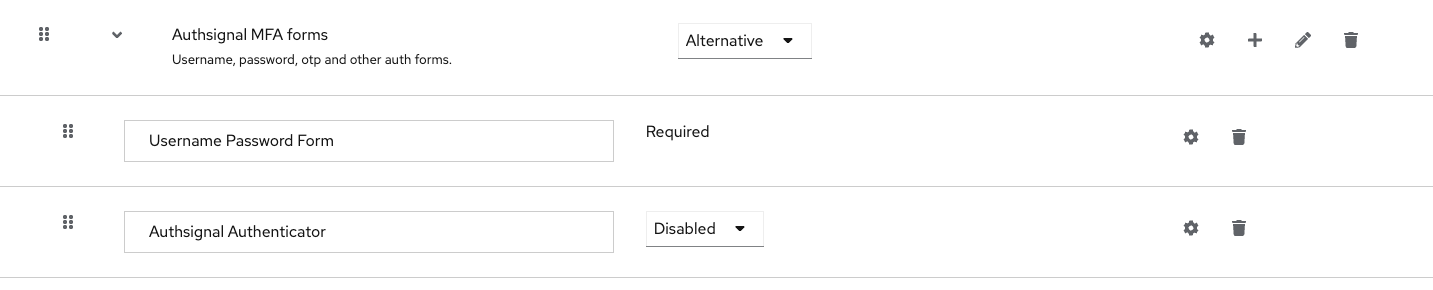
    <Frame caption="After adding the Authsignal Authenticator step">
      <img src="https://mintcdn.com/authsignal-23/8bvDamO56aVu-Ay2/images/docs/integrations/keycloak/keycloak-authsignal-step-added.png?fit=max&auto=format&n=8bvDamO56aVu-Ay2&q=85&s=4464545b0553a73d41bfa53388d61951" alt="" width="1433" height="290" data-path="images/docs/integrations/keycloak/keycloak-authsignal-step-added.png" />
    </Frame>
  </Step>

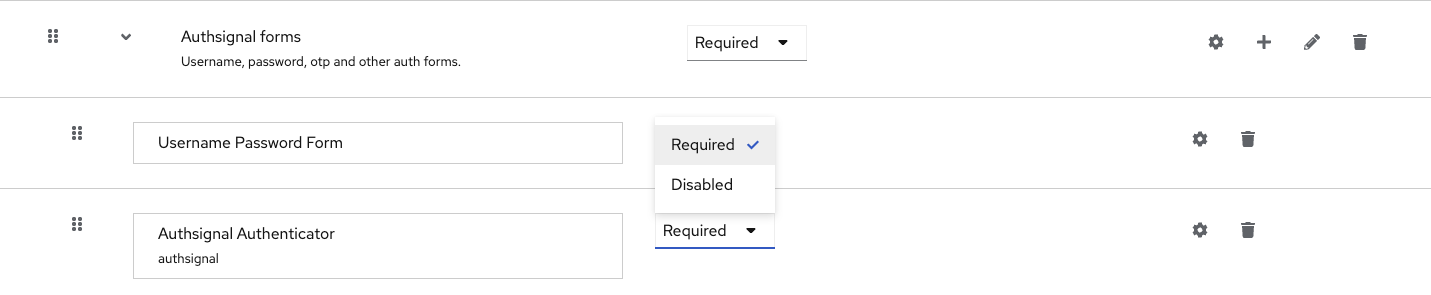
  <Step title="Ensure the Authsignal Authenticator step is required.">
    <Frame caption="Ensuring the Authsignal Authenticator step is required">
      <img src="https://mintcdn.com/authsignal-23/8bvDamO56aVu-Ay2/images/docs/integrations/keycloak/keycloak-authsignal-required.png?fit=max&auto=format&n=8bvDamO56aVu-Ay2&q=85&s=5455b6d0089be6e25b06f891f6c28395" alt="" width="1431" height="295" data-path="images/docs/integrations/keycloak/keycloak-authsignal-required.png" />
    </Frame>
  </Step>

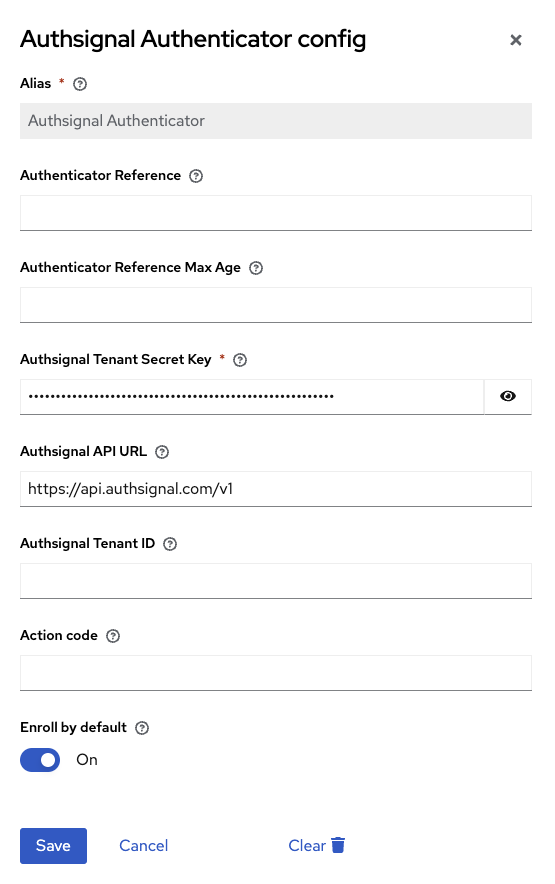
  <Step title="Click the settings cog on the Authsignal Authenticator step.">
    Add your Server API secret key and API host.

    <Frame caption="Configuring the Authsignal Authenticator">
      <img src="https://mintcdn.com/authsignal-23/8bvDamO56aVu-Ay2/images/docs/integrations/keycloak/keycloak-authsignal-authenticator-config.png?fit=max&auto=format&n=8bvDamO56aVu-Ay2&q=85&s=26ee76409339aa7190a9d61ba73cc0bc" alt="" width="555" height="884" data-path="images/docs/integrations/keycloak/keycloak-authsignal-authenticator-config.png" />
    </Frame>

    When **Enroll by default** is toggled on, users will be prompted to enroll an authenticator when they first log in.
    If toggled off, the user will not be prompted to enroll an authenticator, and you will need to handle [enrollment
    programmatically](/advanced-usage/programmatic-authenticator-management).
  </Step>

  <Step title="Enable the new Authsignal flow">
    Finally, click the Action -> Bind flow button. Select the `browser` flow to enable the new Authsignal flow.
  </Step>
</Steps>

## Conclusion

That's it! You've successfully added MFA to your Keycloak login flow using Authsignal.

To test the flow, log in and you will be prompted to enroll an authenticator.
The next time you log in, you will be prompted to complete an MFA challenge.

<Info>
  Want to use Keycloak groups and roles in your authentication rules? See the [Groups and Roles
  guide](./keycloak-groups-roles) for instructions on setting this up.
</Info>