> ## Documentation Index
> Fetch the complete documentation index at: https://docs.authsignal.com/llms.txt
> Use this file to discover all available pages before exploring further.
# Adding passkeys to Duende IdentityServer
> Learn how to add passkeys to Duende IdentityServer using Authsignal.
The [previous guide](/integrations/identityserver/getting-started) showed how to integrate IdentityServer with Authsignal in order to add MFA after a traditional username & password sign-in.
In this guide, we'll demonstrate how to let the user create a passkey and use it instead of their password the next time they sign in.
## Configuring passkeys
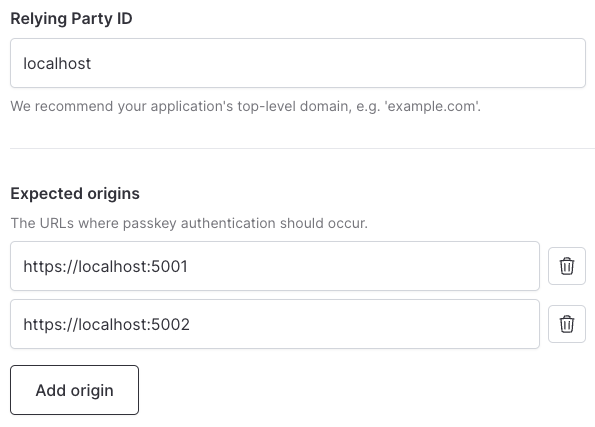
In the Authsignal Portal we have configured `localhost` as the Relying Party for the purposes of [local development](/authentication-methods/passkey/web-sdk#local-development).
We also whitelist both the login server and the application server as **expected origins**.
This means the user can enroll a passkey directly from our web app running on `https://localhost:5002`, then reauthenticate with the same passkey when signing in to IdentityServer running on `https://localhost:5001`.
## Enrolling a passkey
Once the user has logged in with MFA, we can use the [Authsignal Web SDK](/sdks/client/web/setup) to allow the user to add a passkey.
This can be done by adding a button to the application server (i.e. the [WebClient](https://github.com/authsignal/identity-server-example/tree/main/src/WebClient)).
To implement this we add a new page [/src/WebClient/Pages/Passkeys.cshtml](https://github.com/authsignal/identity-server-example/blob/main/src/WebClient/Pages/Passkeys.cshtml).
```csharp theme={null}
@page
@model PasskeysModel
@Html.HiddenFor(m => m.enrollmentToken)
```
The `enrollmentToken` here is fetched server-side in [/src/WebClient/Pages/Passkeys.cshtml.cs](https://github.com/authsignal/identity-server-example/blob/main/src/WebClient/Pages/Passkeys.cshtml.cs) when the page loads.
```csharp theme={null}
public async Task OnGet()
{
var trackRequest = new TrackRequest(
UserId: User.Claims.First(x => x.Type == "sub").Value!,
Action: "add-passkey",
Attributes: new TrackAttributes(
Scope: "add:authenticators"
)
);
var trackResponse = await _authsignal.Track(trackRequest);
this.enrollmentToken = trackResponse.Token;
return Page();
}
```
Finally, we need to add the client-side JS implementation for the [addPasskey](https://github.com/authsignal/identity-server-example/blob/main/src/WebClient/wwwroot/js/passkeys.js) function which uses the [Authsignal Web SDK](/sdks/client/web/setup).
```csharp theme={null}
function addPasskey() {
var client = new window.authsignal.Authsignal({
tenantId: "YOUR_TENANT_ID",
baseUrl: "https://api.authsignal.com/v1", // Update for your region
});
var token = document.getElementById("enrollmentToken").value;
client.passkey.signUp({ token }).then((resultToken) => {
if (resultToken) {
alert("Passkey added");
}
});
}
```
## Signing in with a passkey
Now that the user has enrolled a passkey, there are two ways to offer passkey sign-in on the IdentityServer login page.
### Passkey autofill
Passkey autofill is an unobtrusive approach where the user's available passkeys are suggested automatically when they focus the username field.
First we need to ensure that the input field has the value `username webauthn` in the [autocomplete attribute](https://github.com/authsignal/identity-server-example/blob/main/src/IdentityServer/Pages/Account/Login/Index.cshtml#L28C33-L28C175).
```html theme={null}
```
Then we add some [JavaScript](https://github.com/authsignal/identity-server-example/blob/main/src/IdentityServer/wwwroot/js/login.js) to run when the page loads.
```csharp theme={null}
function initPasskeyAutofill() {
var client = new window.authsignal.Authsignal({
tenantId: "YOUR_TENANT_ID",
baseUrl: "https://api.authsignal.com/v1", // Update for your region
});
client.passkey.signIn({ autofill: true }).then((token) => {
if (token) {
var returnUrl = document.getElementById("Input_ReturnUrl").value;
window.location = `https://localhost:5001/Account/Login/Callback?returnUrl=${returnUrl}&token=${token}`;
}
});
}
if (document.readyState === "loading") {
document.addEventListener("DOMContentLoaded", initPasskeyAutofill);
} else {
initPasskeyAutofill();
}
```
When a user focuses the input field and selects their passkey, the method resolves with a token.
### Sign-in button
A dedicated sign-in button launches the passkey prompt immediately when clicked, making passkeys a clearly visible option on your login page.
Add a button to your IdentityServer login page:
```html theme={null}
```
Then add the click handler, calling `signIn()` without the `autofill` flag:
```csharp theme={null}
function signInWithPasskey() {
var client = new window.authsignal.Authsignal({
tenantId: "YOUR_TENANT_ID",
baseUrl: "https://api.authsignal.com/v1", // Update for your region
});
client.passkey.signIn().then((token) => {
if (token) {
var returnUrl = document.getElementById("Input_ReturnUrl").value;
window.location = `https://localhost:5001/Account/Login/Callback?returnUrl=${returnUrl}&token=${token}`;
}
});
}
```
In both cases, the validation process is the same as for signing in with MFA in the [previous guide](/integrations/identityserver/getting-started#validating-the-mfa-challenge). The token returned from the [Authsignal Web SDK](/sdks/client/web/setup) is passed to the [callback page](https://github.com/authsignal/identity-server-example/blob/main/src/IdentityServer/Pages/Account/Login/Callback.cshtml.cs), which validates the result of the challenge server-side and logs the user in.
 This means the user can enroll a passkey directly from our web app running on `https://localhost:5002`, then reauthenticate with the same passkey when signing in to IdentityServer running on `https://localhost:5001`.
## Enrolling a passkey
Once the user has logged in with MFA, we can use the [Authsignal Web SDK](/sdks/client/web/setup) to allow the user to add a passkey.
This can be done by adding a button to the application server (i.e. the [WebClient](https://github.com/authsignal/identity-server-example/tree/main/src/WebClient)).
This means the user can enroll a passkey directly from our web app running on `https://localhost:5002`, then reauthenticate with the same passkey when signing in to IdentityServer running on `https://localhost:5001`.
## Enrolling a passkey
Once the user has logged in with MFA, we can use the [Authsignal Web SDK](/sdks/client/web/setup) to allow the user to add a passkey.
This can be done by adding a button to the application server (i.e. the [WebClient](https://github.com/authsignal/identity-server-example/tree/main/src/WebClient)).
 To implement this we add a new page [/src/WebClient/Pages/Passkeys.cshtml](https://github.com/authsignal/identity-server-example/blob/main/src/WebClient/Pages/Passkeys.cshtml).
```csharp theme={null}
@page
@model PasskeysModel
@Html.HiddenFor(m => m.enrollmentToken)
```
The `enrollmentToken` here is fetched server-side in [/src/WebClient/Pages/Passkeys.cshtml.cs](https://github.com/authsignal/identity-server-example/blob/main/src/WebClient/Pages/Passkeys.cshtml.cs) when the page loads.
```csharp theme={null}
public async Task
To implement this we add a new page [/src/WebClient/Pages/Passkeys.cshtml](https://github.com/authsignal/identity-server-example/blob/main/src/WebClient/Pages/Passkeys.cshtml).
```csharp theme={null}
@page
@model PasskeysModel
@Html.HiddenFor(m => m.enrollmentToken)
```
The `enrollmentToken` here is fetched server-side in [/src/WebClient/Pages/Passkeys.cshtml.cs](https://github.com/authsignal/identity-server-example/blob/main/src/WebClient/Pages/Passkeys.cshtml.cs) when the page loads.
```csharp theme={null}
public async Task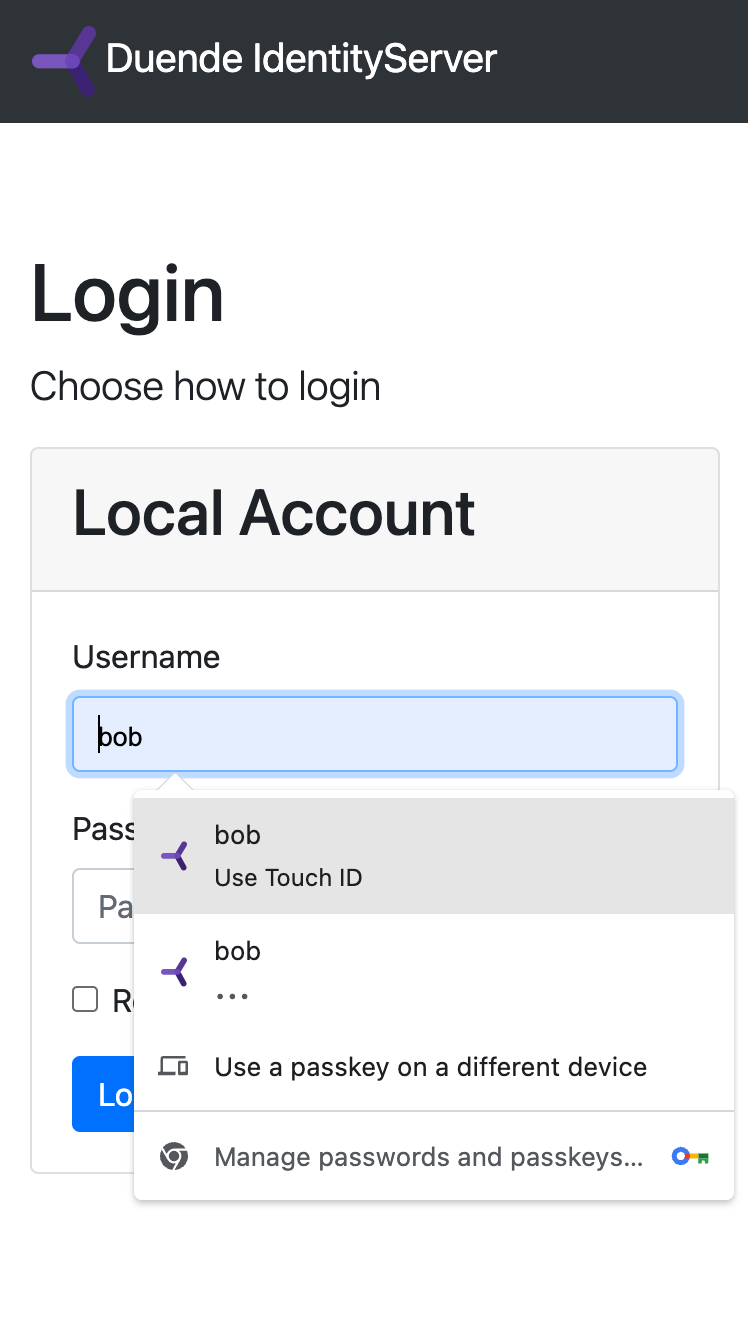 ### Sign-in button
A dedicated sign-in button launches the passkey prompt immediately when clicked, making passkeys a clearly visible option on your login page.
Add a button to your IdentityServer login page:
```html theme={null}
```
Then add the click handler, calling `signIn()` without the `autofill` flag:
```csharp theme={null}
function signInWithPasskey() {
var client = new window.authsignal.Authsignal({
tenantId: "YOUR_TENANT_ID",
baseUrl: "https://api.authsignal.com/v1", // Update for your region
});
client.passkey.signIn().then((token) => {
if (token) {
var returnUrl = document.getElementById("Input_ReturnUrl").value;
window.location = `https://localhost:5001/Account/Login/Callback?returnUrl=${returnUrl}&token=${token}`;
}
});
}
```
In both cases, the validation process is the same as for signing in with MFA in the [previous guide](/integrations/identityserver/getting-started#validating-the-mfa-challenge). The token returned from the [Authsignal Web SDK](/sdks/client/web/setup) is passed to the [callback page](https://github.com/authsignal/identity-server-example/blob/main/src/IdentityServer/Pages/Account/Login/Callback.cshtml.cs), which validates the result of the challenge server-side and logs the user in.
### Sign-in button
A dedicated sign-in button launches the passkey prompt immediately when clicked, making passkeys a clearly visible option on your login page.
Add a button to your IdentityServer login page:
```html theme={null}
```
Then add the click handler, calling `signIn()` without the `autofill` flag:
```csharp theme={null}
function signInWithPasskey() {
var client = new window.authsignal.Authsignal({
tenantId: "YOUR_TENANT_ID",
baseUrl: "https://api.authsignal.com/v1", // Update for your region
});
client.passkey.signIn().then((token) => {
if (token) {
var returnUrl = document.getElementById("Input_ReturnUrl").value;
window.location = `https://localhost:5001/Account/Login/Callback?returnUrl=${returnUrl}&token=${token}`;
}
});
}
```
In both cases, the validation process is the same as for signing in with MFA in the [previous guide](/integrations/identityserver/getting-started#validating-the-mfa-challenge). The token returned from the [Authsignal Web SDK](/sdks/client/web/setup) is passed to the [callback page](https://github.com/authsignal/identity-server-example/blob/main/src/IdentityServer/Pages/Account/Login/Callback.cshtml.cs), which validates the result of the challenge server-side and logs the user in.