> ## Documentation Index
> Fetch the complete documentation index at: https://docs.authsignal.com/llms.txt
> Use this file to discover all available pages before exploring further.

# Using Passkeys with Microsoft Azure AD B2C

> Learn how to add passkey autofill to your Microsoft Azure AD B2C login page with Authsignal.

This guide extends our previous guides where we showed you how to integrate Authsignal into Microsoft Azure AD B2C for [multi-factor authentication (MFA)](/integrations/azure-ad-b2c/azure-ad-b2c-mfa) and [passwordless login](/integrations/azure-ad-b2c/azure-ad-b2c-passwordless)

In this guide, we will show you how to add passkey autofill into your Microsoft Azure AD B2C login page.

<Note>
  You can use this guide to add passkey autofill if you are using Authsignal for MFA or passwordless
  login.
</Note>

<CardGroup cols={2}>
  <Card title="Try a live demo!" icon="link" href="https://as-azure-ad-b2c-passkey-example.vercel.app/" horizontal>
    Note that the live demo is using the same underlying Azure B2C Tenant as our previous guides.
    You can use the same email address to sign in.
  </Card>
</CardGroup>

## Prerequisites

Before continuing with this guide, you should first complete the following:

* Replace your login screen with [custom html templates](https://learn.microsoft.com/en-us/azure/active-directory-b2c/customize-ui-with-html?pivots=b2c-custom-policy). In our example, we have made a copy of the [sample templates](https://learn.microsoft.com/en-us/azure/active-directory-b2c/customize-ui-with-html?pivots=b2c-custom-policy#sample-templates) provided by Microsoft. This is required as we will need to add custom javascript to the login page.
* Set
  up custom domains on your Azure AD B2C tenant. You can follow the [official documentation](https://docs.microsoft.com/en-us/azure/active-directory-b2c/custom-domain?pivots=b2c-custom-policy)
  to set up custom domains. This is required as we will need to replace the default
  `b2clogin.com` domain with the domain where we will register our passkeys, so that
  the browser is able to detect available passkeys.
  <Note>
    We recommend setting your b2c domain to `identity.yourdomain.com`, and Authsignal [custom
    domain](/implementation-options/prebuilt-ui/custom-domains) to `auth.yourdomain.com`
  </Note>

## Code example

A [full code example and starter template](https://github.com/authsignal/azure-ad-b2c-passkey-example) referenced in this guide can be found on Github.

You can also refer to the [code diff between the previous guide](https://github.com/authsignal/azure-ad-b2c-passwordless-example/compare/main...authsignal:azure-ad-b2c-passkey-example:main?expand=1) if you only want to see the changes.

## Step by step guide

### Step 1: Configure the custom domain of your Authsignal tenant

Navigate to [Authsignal portal > Settings > Custom domains](https://portal.authsignal.com/organisations/tenants/custom_domains) to configure the custom domain of your Authsignal tenant. We recommend this be a distinct subdomain from your Azure AD B2C tenant domain.

### Step 2: Enable and configure the passkey authentication method on your Authsignal tenant

Enable passkeys on your tenant by following the [passkey setup steps](/authentication-methods/passkey/web-sdk#portal-setup).

After passkeys have been enabled, add your Azure AD B2C domain and Authsignal custom domain to the **Expected origins** settings e.g. `https://identity.yourdomain.com` and `https://auth.yourdomain.com`.

### Step 3: Add JavaScript to the login page html template

In order to enable passkey autofill in our B2C login page, we need add custom JavaScript into our html template.

In the `<head>` tag, add the following script which will:

* Wait for Azure AD B2C to dynamically populate the `api` element with the login from
* Load the Authsignal Browser SDK
* Set the `autocomplete` attribute of the login input to `username webauthn`
* Set the `autocomplete` attribute of the password input to `current-password webauthn`

```js theme={null}
<script>
  function setWebauthnAttribute() {
    var signInInput = document.getElementById("signInName");
    var passwordInput = document.getElementById("password");
    const nextButton = document.getElementById("next");

    if (signInInput && passwordInput) {
      // NOTE: `webauthn` must be the last value in the autocomplete attribute
      signInInput.setAttribute("autocomplete", "username webauthn");
      passwordInput.setAttribute("autocomplete", "current-password webauthn");

      // NOTE: Replace the following values with your Authsignal tenant ID and server URL
      var client = new window.authsignal.Authsignal({
        tenantId: "AUTHSIGNAL_TENANT_ID",
        baseUrl: "AUTHSIGNAL_SERVER_URL",
      });

      passwordInput.value = "placeholder";

      client.passkey
        .signIn({ autofill: true, action: "signInWithPasskey" })
        .then((response) => {
          if (response) {
            signInInput.value = response.data.username;
            passwordInput.value = "token-" + response.data.token;
            nextButton.click();
          }
        })
        .catch((error) => {
          console.log("error", error);
        });
    }
  }

  function loadAuthsignalSdk() {
    var script = document.createElement("script");
    script.onload = setWebauthnAttribute;
    script.src =
      "https://unpkg.com/@authsignal/browser@1.17.0/dist/index.min.js";
    document.head.appendChild(script);
  }

  var observer = new MutationObserver(() => {
    var apiElement = document.getElementById("api");
    if (apiElement) {
      loadAuthsignalSdk();
      observer.disconnect();
    }
  });

  observer.observe(document, {
    attributes: false,
    childList: true,
    characterData: false,
    subtree: true,
  });
</script>
```

### Step 5 (Optional): Hide the password input

This step is optional, and only required if you have a passwordless login flow. If you still allow users to login with their password, skip this step.

Add the following `<style>` tag to your html template to hide the password input:

```html theme={null}
<style>
  div:has(> #password) {
    position: absolute !important;
    visibility: hidden;
  }
</style>
```

### Step 6: Enable javascript in your html templates

Add the following `<ScriptExecution>` element to our Relying Party policy under the `<UserJourneyBehaviors>` element

```xml theme={null}
<ScriptExecution>Allow</ScriptExecution>
```

[See the official Microsoft guide](https://learn.microsoft.com/en-us/azure/active-directory-b2c/javascript-and-page-layout?pivots=b2c-custom-policy#enable-javascript)

### Step 7: Add the required claim types

```xml theme={null}
<ClaimType Id="isPasskeyChallengeSuccessful">
    <DataType>boolean</DataType>
</ClaimType>

<ClaimType Id="isPasskeyAutofill">
    <DataType>boolean</DataType>
</ClaimType>

<ClaimType Id="passkeyToken">
    <DataType>string</DataType>
</ClaimType>
```

### Step 8: Add the claims transformations

```xml theme={null}
<ClaimsTransformation Id="AuthsignalCreateValidateChallengeRequestBody" TransformationMethod="GenerateJson">
    <InputClaims>
        <InputClaim ClaimTypeReferenceId="passkeyToken" TransformationClaimType="token" />
    </InputClaims>
    <InputParameters>
        <InputParameter Id="action" DataType="string" Value="passkey-verify" />
    </InputParameters>
    <OutputClaims>
        <OutputClaim ClaimTypeReferenceId="requestBody" TransformationClaimType="outputClaim" />
    </OutputClaims>
</ClaimsTransformation>

<ClaimsTransformation Id="CheckIsPasskeyAutofillToken" TransformationMethod="StringContains">
    <InputClaims>
        <InputClaim ClaimTypeReferenceId="password" TransformationClaimType="inputClaim" />
    </InputClaims>
    <InputParameters>
        <InputParameter Id="contains" DataType="string" Value="token-" />
        <InputParameter Id="ignoreCase" DataType="string" Value="true" />
    </InputParameters>
    <OutputClaims>
        <OutputClaim ClaimTypeReferenceId="isPasskeyAutofill" TransformationClaimType="outputClaim" />
    </OutputClaims>
</ClaimsTransformation>

<ClaimsTransformation Id="ExtractPasskeyToken" TransformationMethod="StringReplace">
    <InputClaims>
        <InputClaim ClaimTypeReferenceId="password" TransformationClaimType="inputClaim" />
    </InputClaims>
    <InputParameters>
        <InputParameter Id="oldValue" DataType="string" Value="token-" />
        <InputParameter Id="newValue" DataType="string" Value="" />
    </InputParameters>
    <OutputClaims>
        <OutputClaim ClaimTypeReferenceId="passkeyToken" TransformationClaimType="outputClaim" />
    </OutputClaims>
</ClaimsTransformation>
```

### Step 9: Add new technical profiles to check and validate passkey autofill challenges

```xml theme={null}
<TechnicalProfile Id="CheckIsPasskeyAutofill">
    <DisplayName>Check is passkey autofill</DisplayName>
    <Protocol Name="Proprietary" Handler="Web.TPEngine.Providers.ClaimsTransformationProtocolProvider, Web.TPEngine, Version=1.0.0.0, Culture=neutral, PublicKeyToken=null" />
    <InputClaimsTransformations>
        <InputClaimsTransformation ReferenceId="CheckIsPasskeyAutofillToken" />
        <InputClaimsTransformation ReferenceId="ExtractPasskeyToken" />
    </InputClaimsTransformations>
    <OutputClaims>
        <OutputClaim ClaimTypeReferenceId="isPasskeyAutofill" />
        <OutputClaim ClaimTypeReferenceId="passkeyToken" />
    </OutputClaims>
</TechnicalProfile>

<TechnicalProfile Id="ValidatePasskeyChallenge">
    <DisplayName>Validate passkey challenge</DisplayName>
    <Protocol Name="Proprietary" Handler="Web.TPEngine.Providers.RestfulProvider, Web.TPEngine, Version=1.0.0.0, Culture=neutral, PublicKeyToken=null"/>
    <!-- NOTE: Change the url below - this is different to our connect endpoints used for oidc. Instead, it is our server api (https://docs.authsignal.com/api-reference/server-api/overview) -->
    <Metadata>
        <Item Key="ServiceUrl">{Settings:AuthsignalServerUrl}/validate</Item>
    </Metadata>
    <InputClaimsTransformations>
        <InputClaimsTransformation ReferenceId="AuthsignalCreateValidateChallengeRequestBody"/>
    </InputClaimsTransformations>
    <InputClaims>
        <InputClaim ClaimTypeReferenceId="requestBody"/>
    </InputClaims>
    <OutputClaims>
        <OutputClaim ClaimTypeReferenceId="isPasskeyChallengeSuccessful" PartnerClaimType="isValid"/>
        <OutputClaim ClaimTypeReferenceId="objectId" PartnerClaimType="userId"/>
    </OutputClaims>
    <IncludeTechnicalProfile ReferenceId="AuthsignalConnectApiBase"/>
</TechnicalProfile>
```

### Step 10: Adjust the technical profile used in our CombinedSignInAndSignUp orchestration step

Add the following claims to the `OutputClaims` element:

```xml theme={null}
 <!-- NOTE: If you have a passwordless login flow, we add the password claim back, but hidden - this is used to transmit the passkey token from the signin page -->
<OutputClaim ClaimTypeReferenceId="password" Required="true" />
<OutputClaim ClaimTypeReferenceId="isPasskeyAutofill" />
<OutputClaim ClaimTypeReferenceId="isPasskeyChallengeSuccessful" />
```

Add the following validation technical profiles:

```xml theme={null}
<ValidationTechnicalProfile ReferenceId="CheckIsPasskeyAutofill" />
<ValidationTechnicalProfile ReferenceId="ValidatePasskeyChallenge">
    <Preconditions>
        <Precondition Type="ClaimsExist" ExecuteActionsIf="false">
            <Value>isPasskeyAutofill</Value>
            <Action>SkipThisValidationTechnicalProfile</Action>
        </Precondition>
        <Precondition Type="ClaimEquals" ExecuteActionsIf="false">
            <Value>isPasskeyAutofill</Value>
            <Value>True</Value>
            <Action>SkipThisValidationTechnicalProfile</Action>
        </Precondition>
        <Precondition Type="ClaimsExist" ExecuteActionsIf="false">
            <Value>passkeyToken</Value>
            <Action>SkipThisValidationTechnicalProfile</Action>
        </Precondition>
    </Preconditions>
</ValidationTechnicalProfile>
<!-- This is our standard login validation technical profile, which we will skip if doing a passkey autofill -->
<ValidationTechnicalProfile ReferenceId="AAD-UserReadUsingEmailAddress_Passwordless">
    <Preconditions>
        <Precondition Type="ClaimEquals" ExecuteActionsIf="true">
            <Value>isPasskeyAutofill</Value>
            <Value>True</Value>
            <Action>SkipThisValidationTechnicalProfile</Action>
        </Precondition>
    </Preconditions>
</ValidationTechnicalProfile>
```

### Step 11: Add a precondition to the orchestration step which shows an error page if the passkey autofill challenge is not successful

```xml theme={null}
<Precondition Type="ClaimEquals" ExecuteActionsIf="true">
    <Value>isPasskeyChallengeSuccessful</Value>
    <Value>true</Value>
    <Action>SkipThisOrchestrationStep</Action>
</Precondition>
```

### Step 12: Add a precondition to orchestration steps that should be skipped if passkey autofill is successful

```xml theme={null}
<Precondition Type="ClaimEquals" ExecuteActionsIf="true">
    <Value>isPasskeyAutofill</Value>
    <Value>True</Value>
    <Action>SkipThisOrchestrationStep</Action>
</Precondition>
```

### Step 13: Upload the updated html template and custom policies, and test the changes

You can now test your integration by navigating to your custom policy in the Azure AD B2C portal and clicking “Run now”, ensuring that you change the API URL to your custom domain.

Once you sign up a new user and register a passkey, when the user next lands on the login screen they will be prompted to sign in with their passkey.
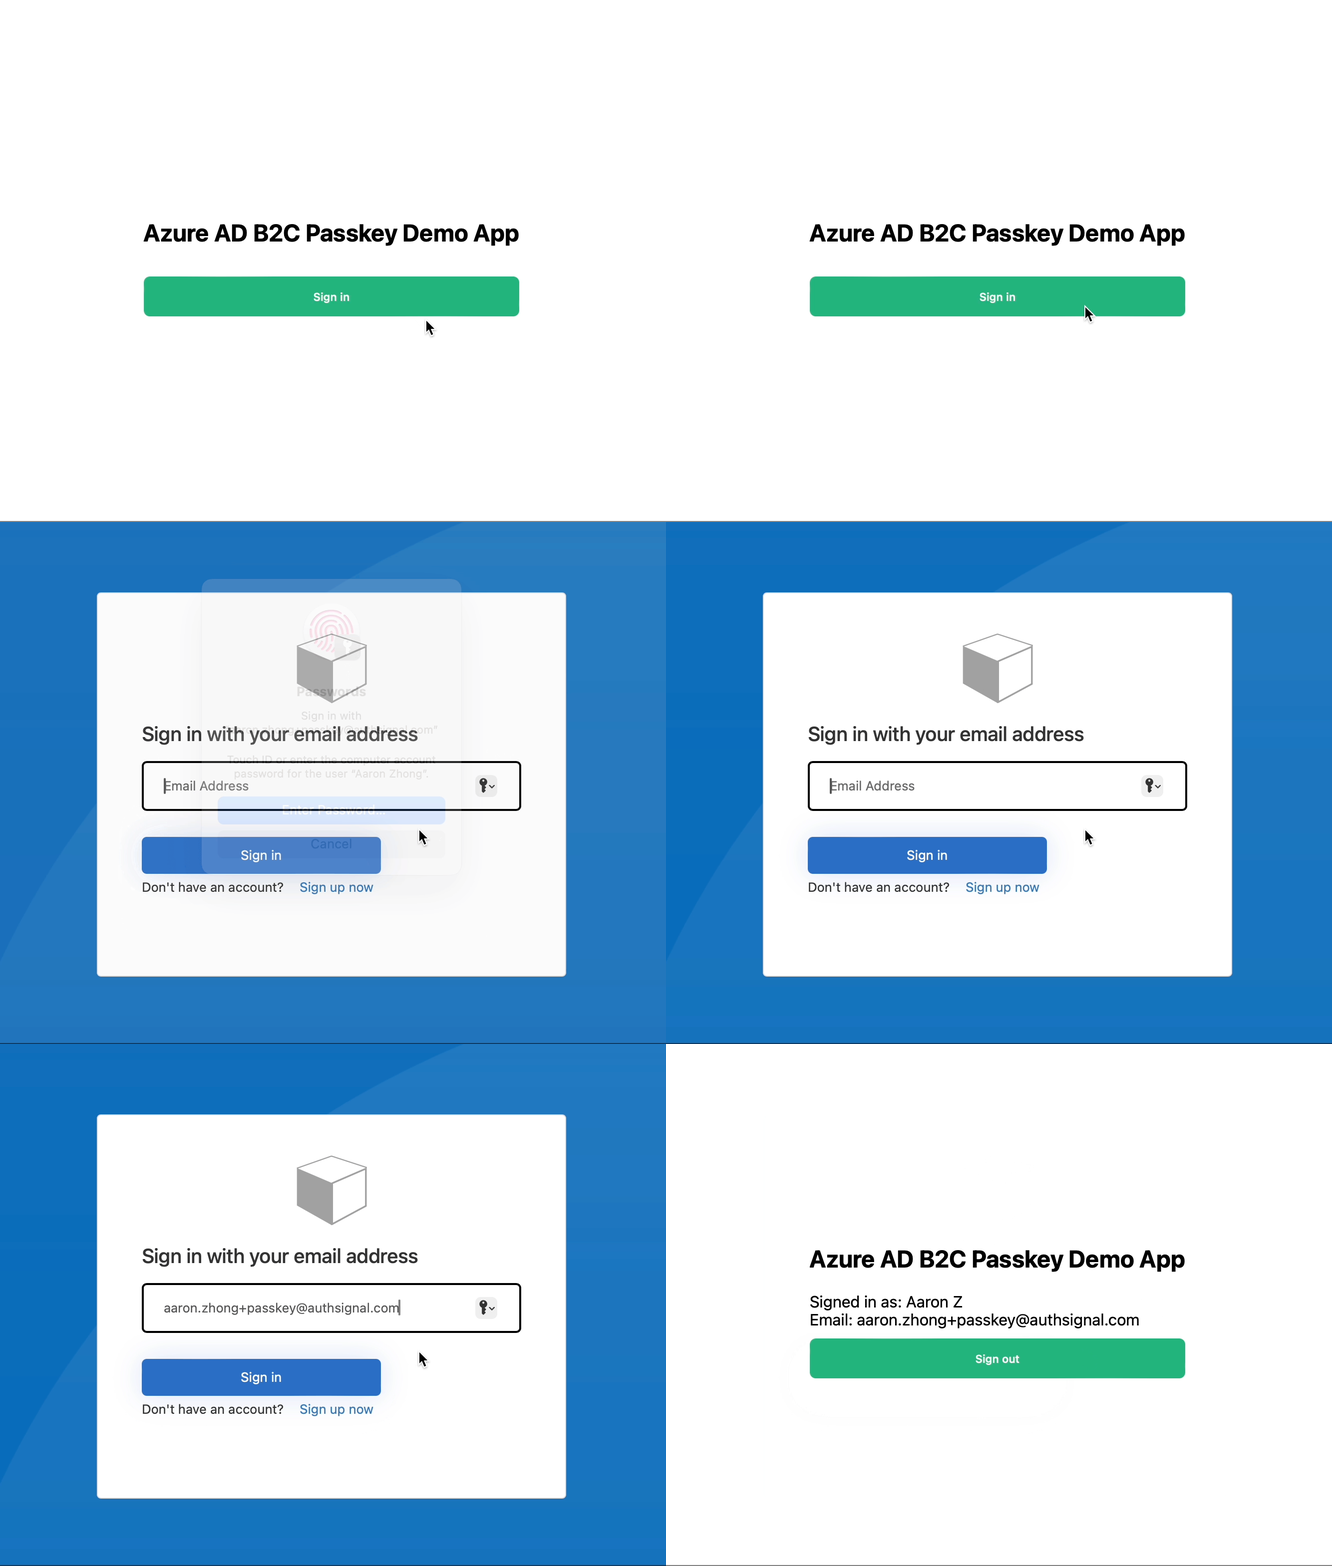
<Frame>
  <img
    src="https://mintcdn.com/authsignal-23/8bvDamO56aVu-Ay2/images/docs/azure-ad-b2c/b2c-passkey-autofill.gif?s=4b9889590814aa9c164bcb784970319d"
    alt="Azure AD B2C login page with passkey
autofill"
    width="1334"
    height="1046"
    data-path="images/docs/azure-ad-b2c/b2c-passkey-autofill.gif"
  />
</Frame>

## Congratulations!

You have successfully added passkey autofill to your Microsoft Azure AD B2C login page.
