> ## Documentation Index
> Fetch the complete documentation index at: https://docs.authsignal.com/llms.txt
> Use this file to discover all available pages before exploring further.
# Auth0 Native Bridge
> Learn how to use issue an Auth0 access token during authsignal flows like passkey auto-fill
In this guide we will show you how to complete authentication with Auth0 in a native mobile app, when using Authsignal's passkey implementation.
The integration requires configuring a new custom database connection, configuring your Application in Auth0, and finally implementing a back-end API to validate the Authsignal challenge and issue an Auth0 access token.
## Integration steps
### Create a new custom database connection
Click on the **Create DB Connection** button.
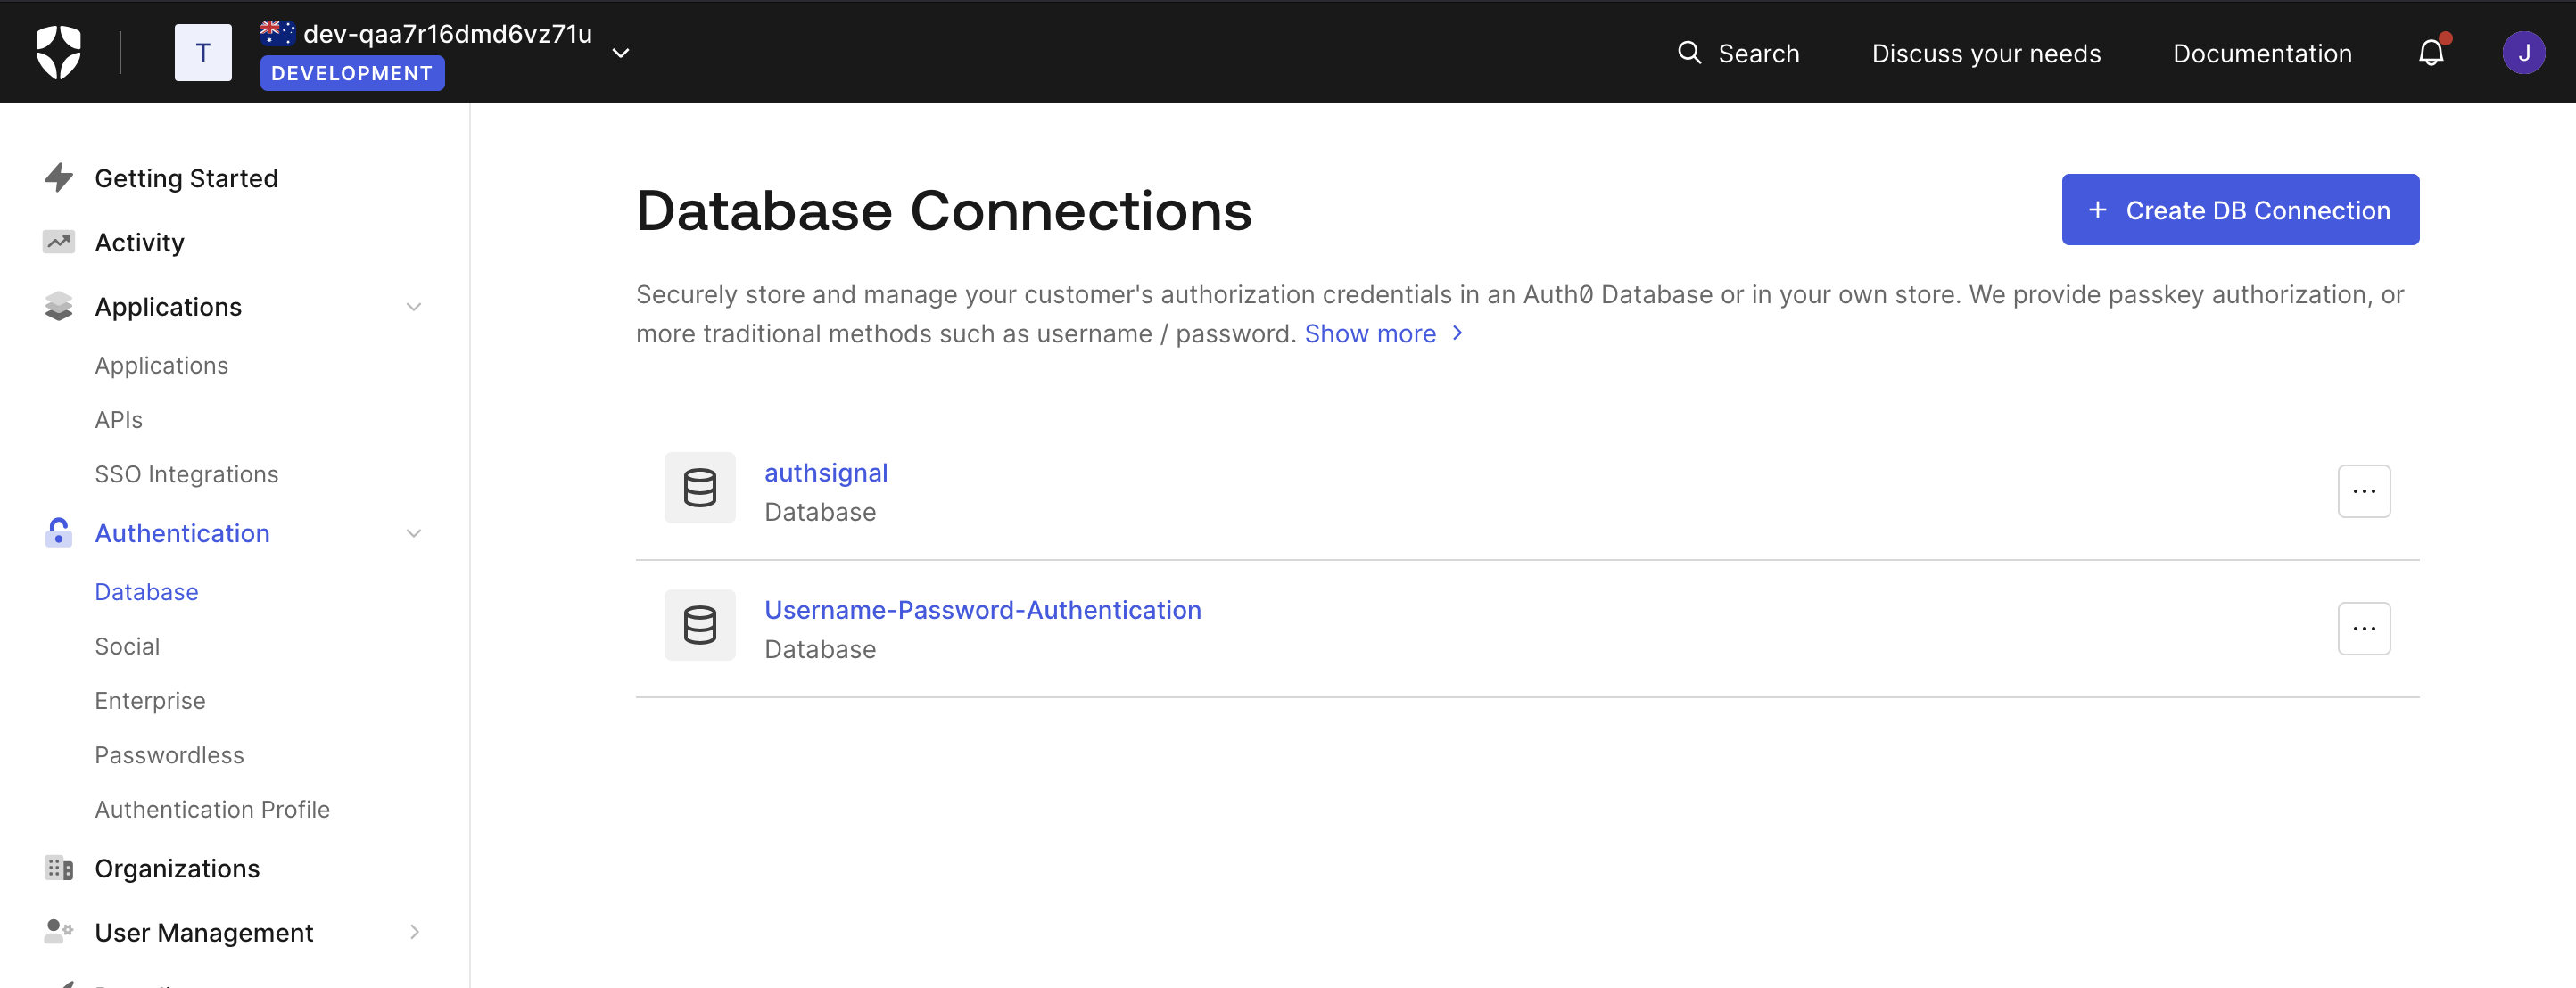
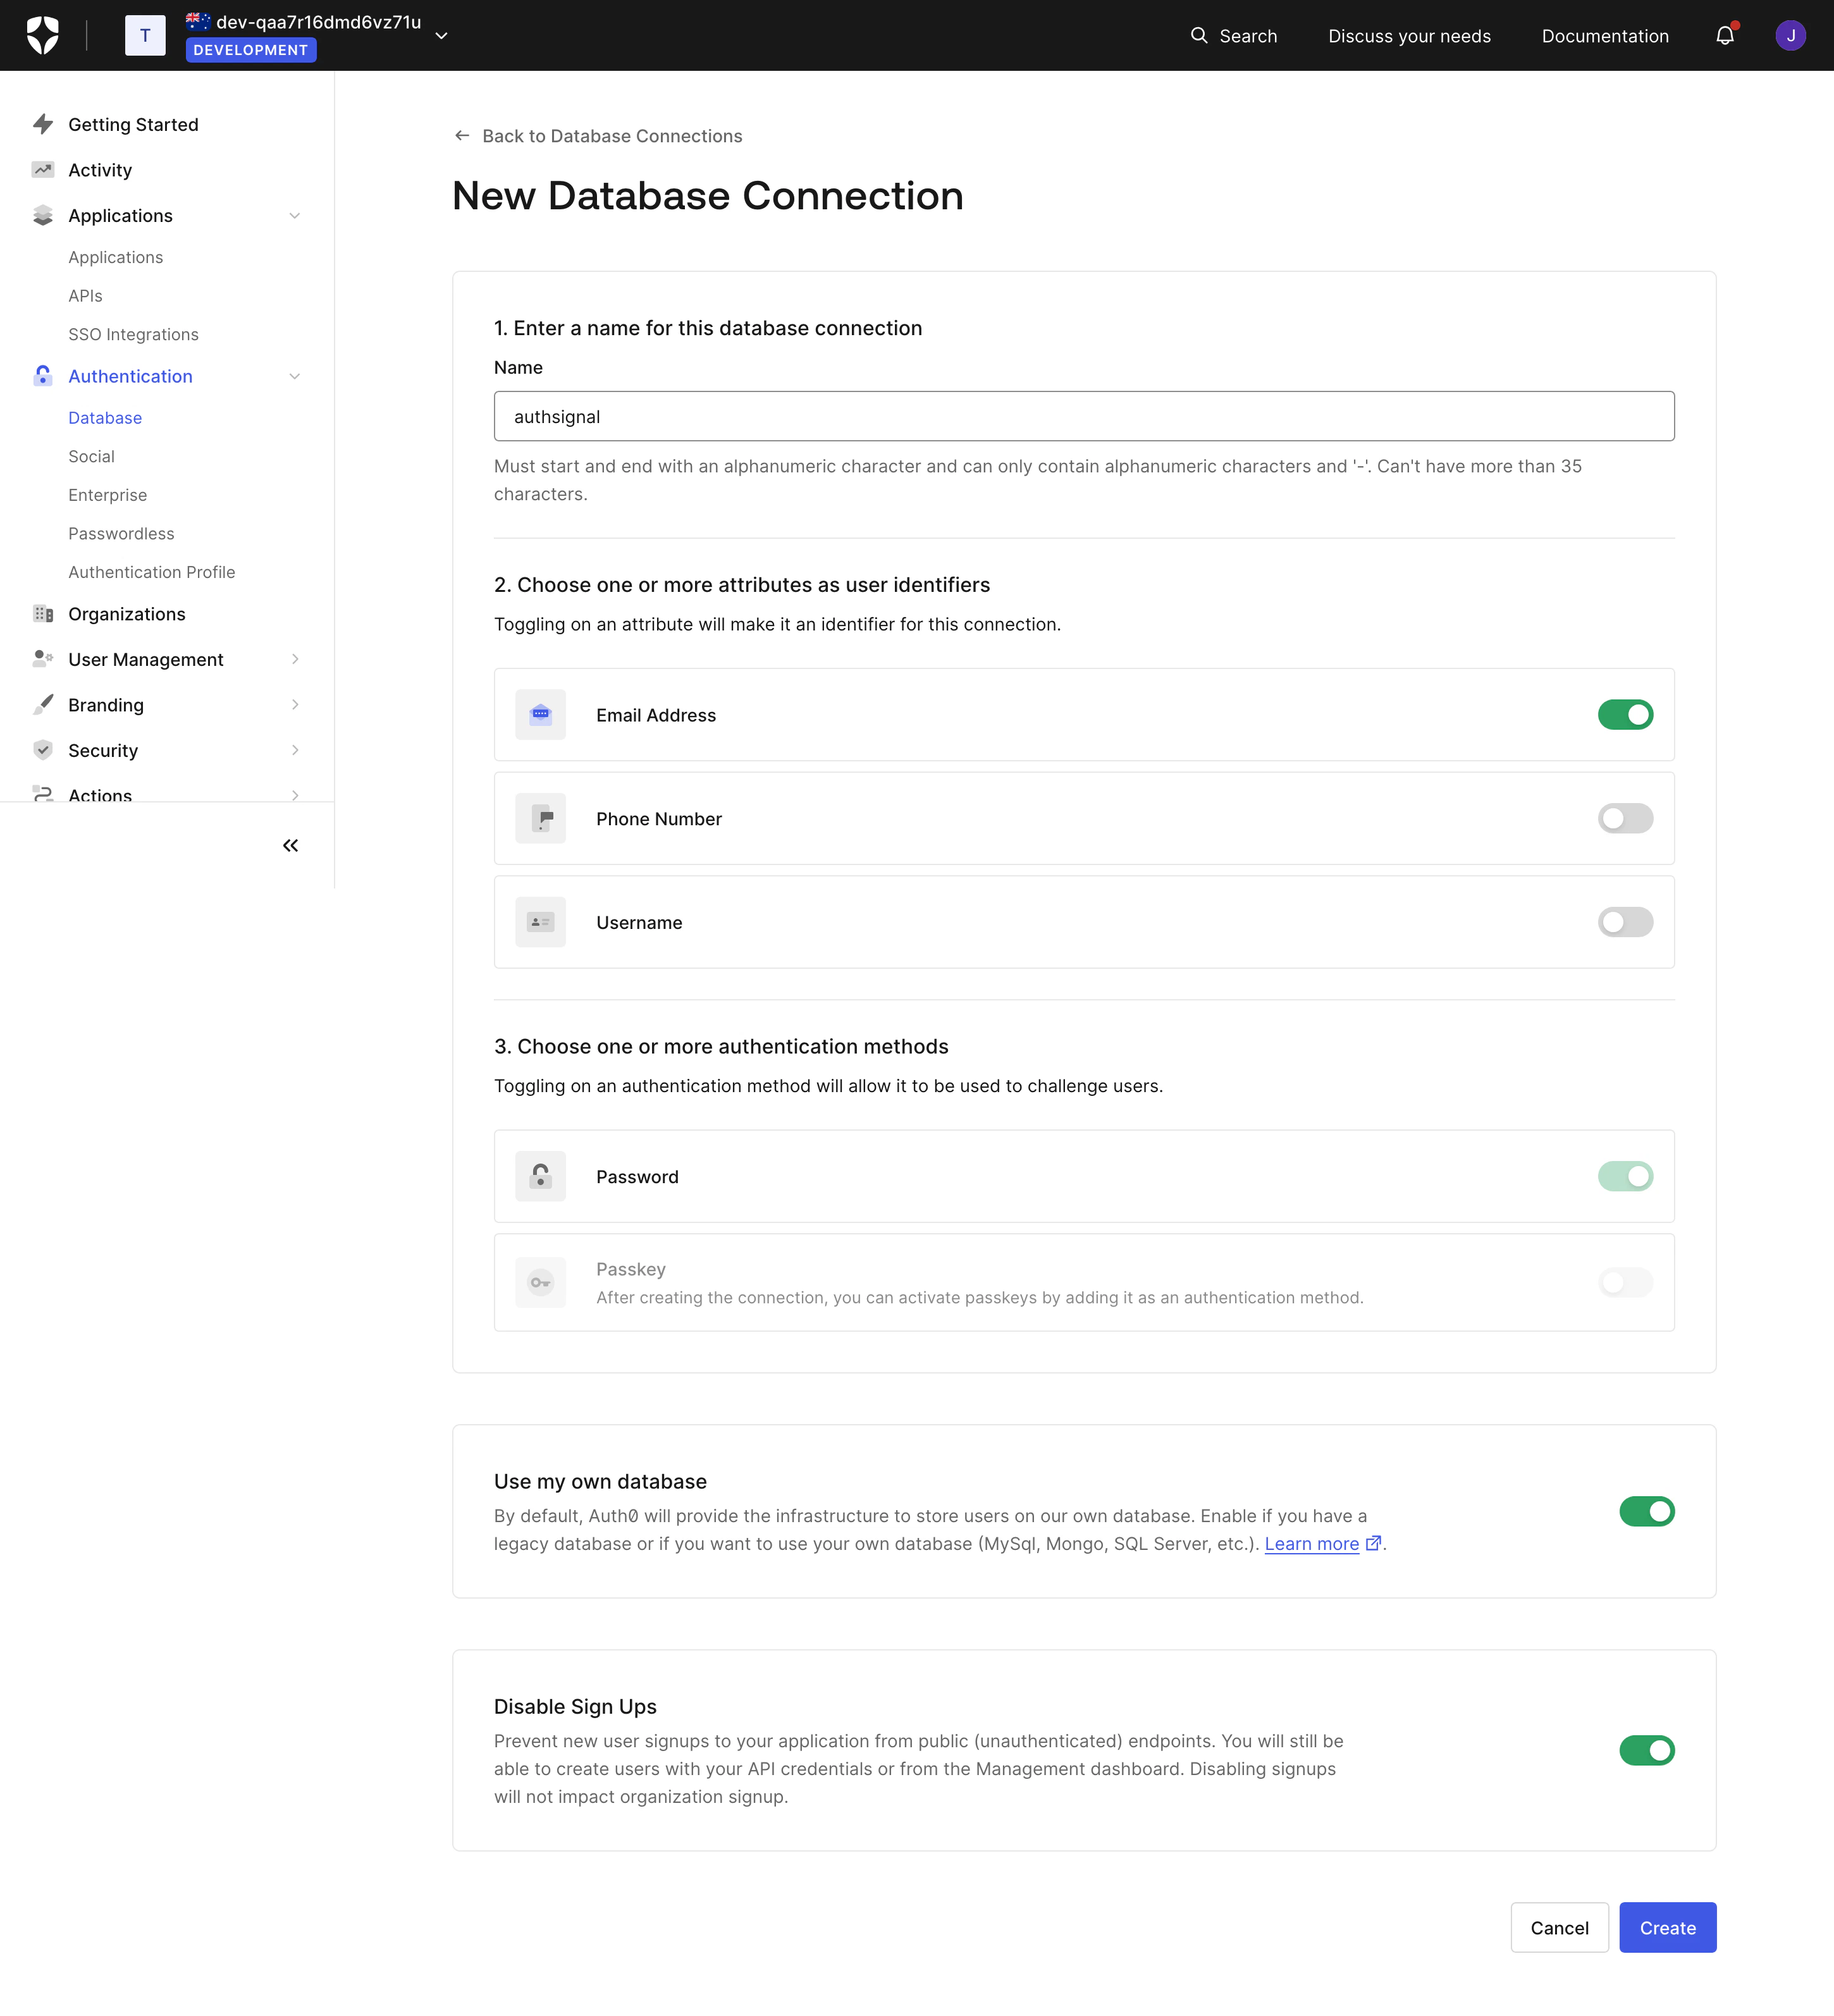
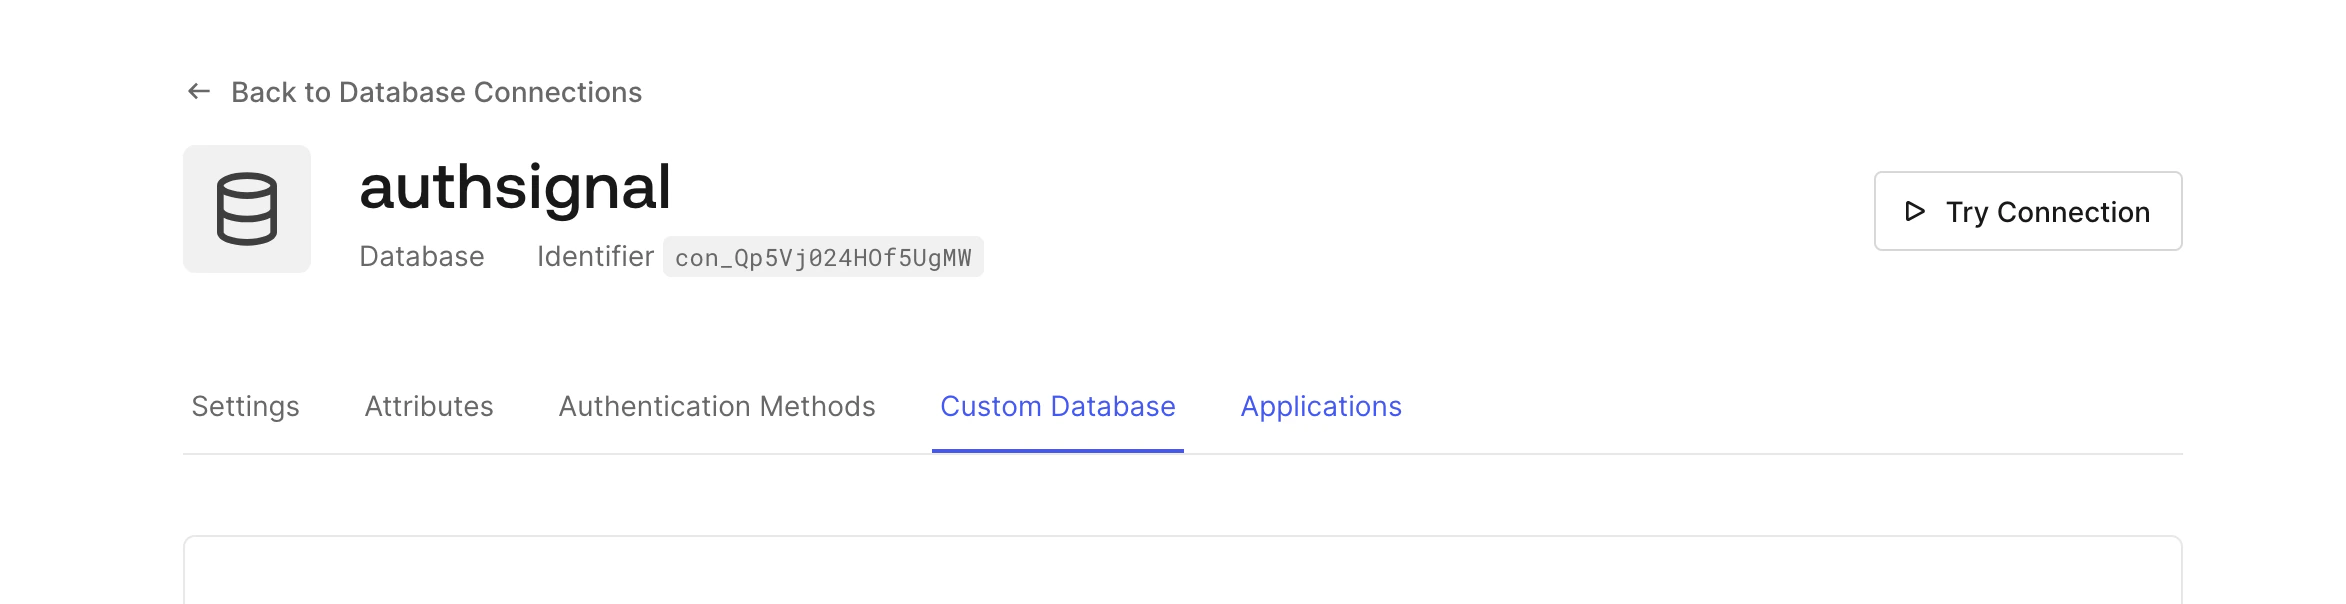 Scroll down to **Database Action Scripts**, copy and paste the following database action script for "Login"
```javascript theme={null}
function login(identifierValue, password, context, callback) {
const request = require("request");
// Ensure that the Authsignal API host name is pointing to the correct region
// For example, if you're using the US region, the host name should be https://us.connect.authsignal.com
// If you're using the EU region, the host name should be https://eu.connect.authsignal.com
request.post(
{
url: "https://us.connect.authsignal.com/get-user",
auth: {
user: configuration.AUTHSIGNAL_SECRET,
sendImmedaiately: true,
},
json: {
token: password,
},
},
function (err, response, body) {
if (err) return callback(err);
if (response.statusCode >= 400) return callback();
const user = body;
if (user.userId) {
const profile = {
email: user.email,
email_verified: true,
user_id: user.userId.split("|")[1],
};
return callback(null, profile);
}
}
);
}
```
Scroll down to the **Database Settings** section and add your Authsignal Server API secret key to database settings.
Scroll down to **Database Action Scripts**, copy and paste the following database action script for "Login"
```javascript theme={null}
function login(identifierValue, password, context, callback) {
const request = require("request");
// Ensure that the Authsignal API host name is pointing to the correct region
// For example, if you're using the US region, the host name should be https://us.connect.authsignal.com
// If you're using the EU region, the host name should be https://eu.connect.authsignal.com
request.post(
{
url: "https://us.connect.authsignal.com/get-user",
auth: {
user: configuration.AUTHSIGNAL_SECRET,
sendImmedaiately: true,
},
json: {
token: password,
},
},
function (err, response, body) {
if (err) return callback(err);
if (response.statusCode >= 400) return callback();
const user = body;
if (user.userId) {
const profile = {
email: user.email,
email_verified: true,
user_id: user.userId.split("|")[1],
};
return callback(null, profile);
}
}
);
}
```
Scroll down to the **Database Settings** section and add your Authsignal Server API secret key to database settings.
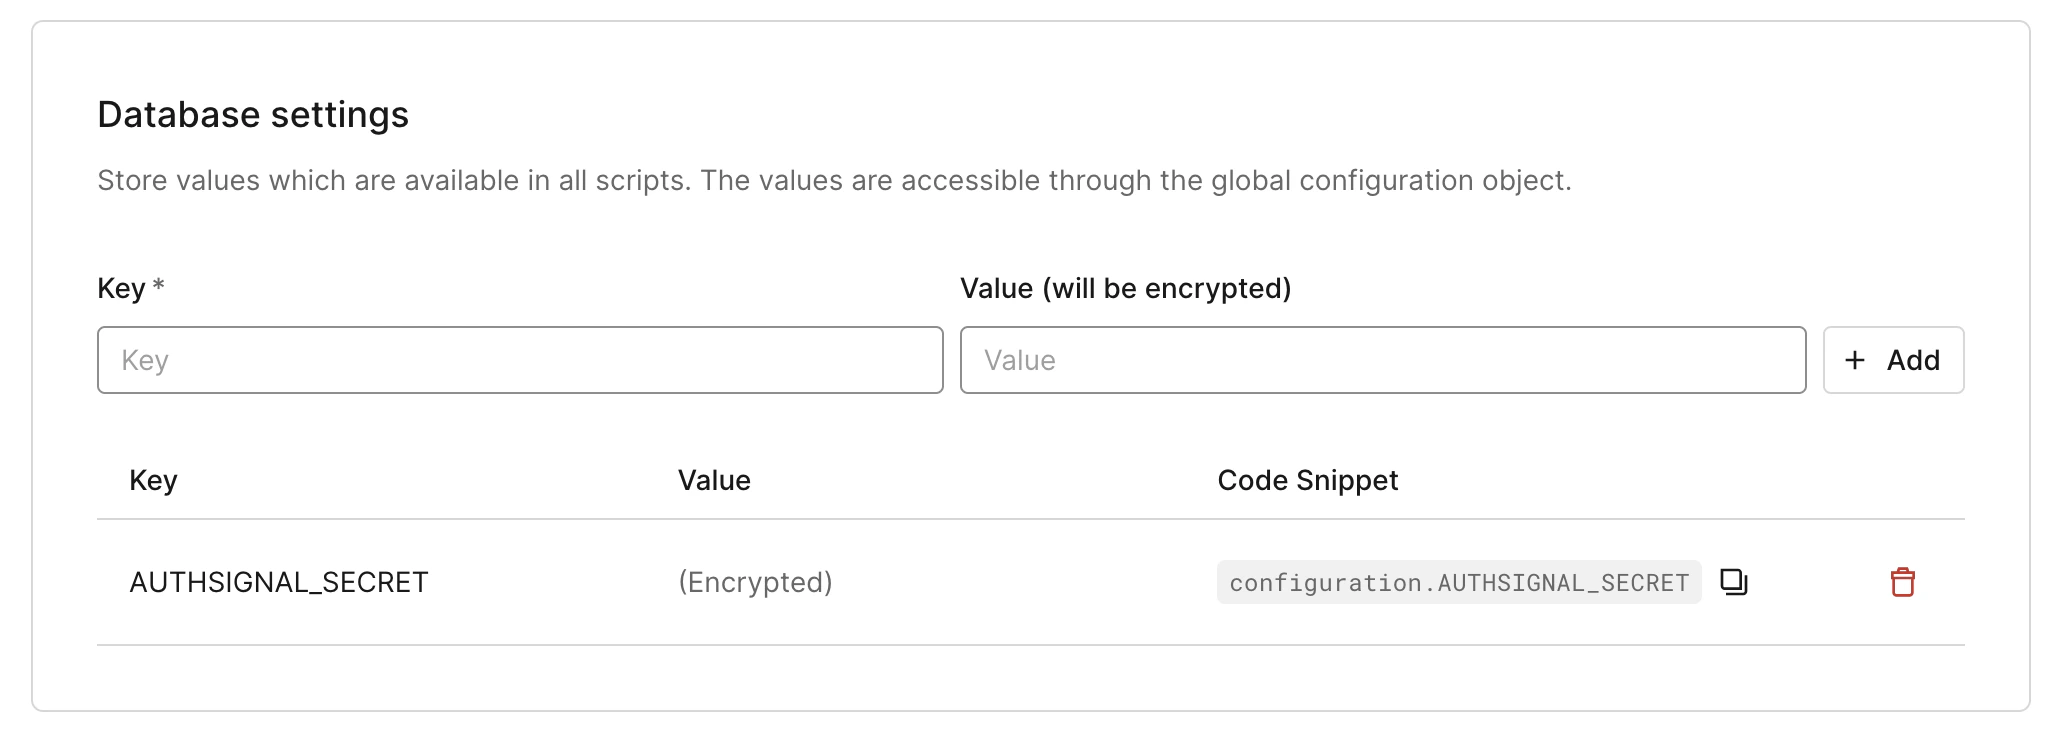 That's it, we've created a new custom database connection, which will allow us to use Authsignal as an external authentication source.
### Configure your Auth0 Application
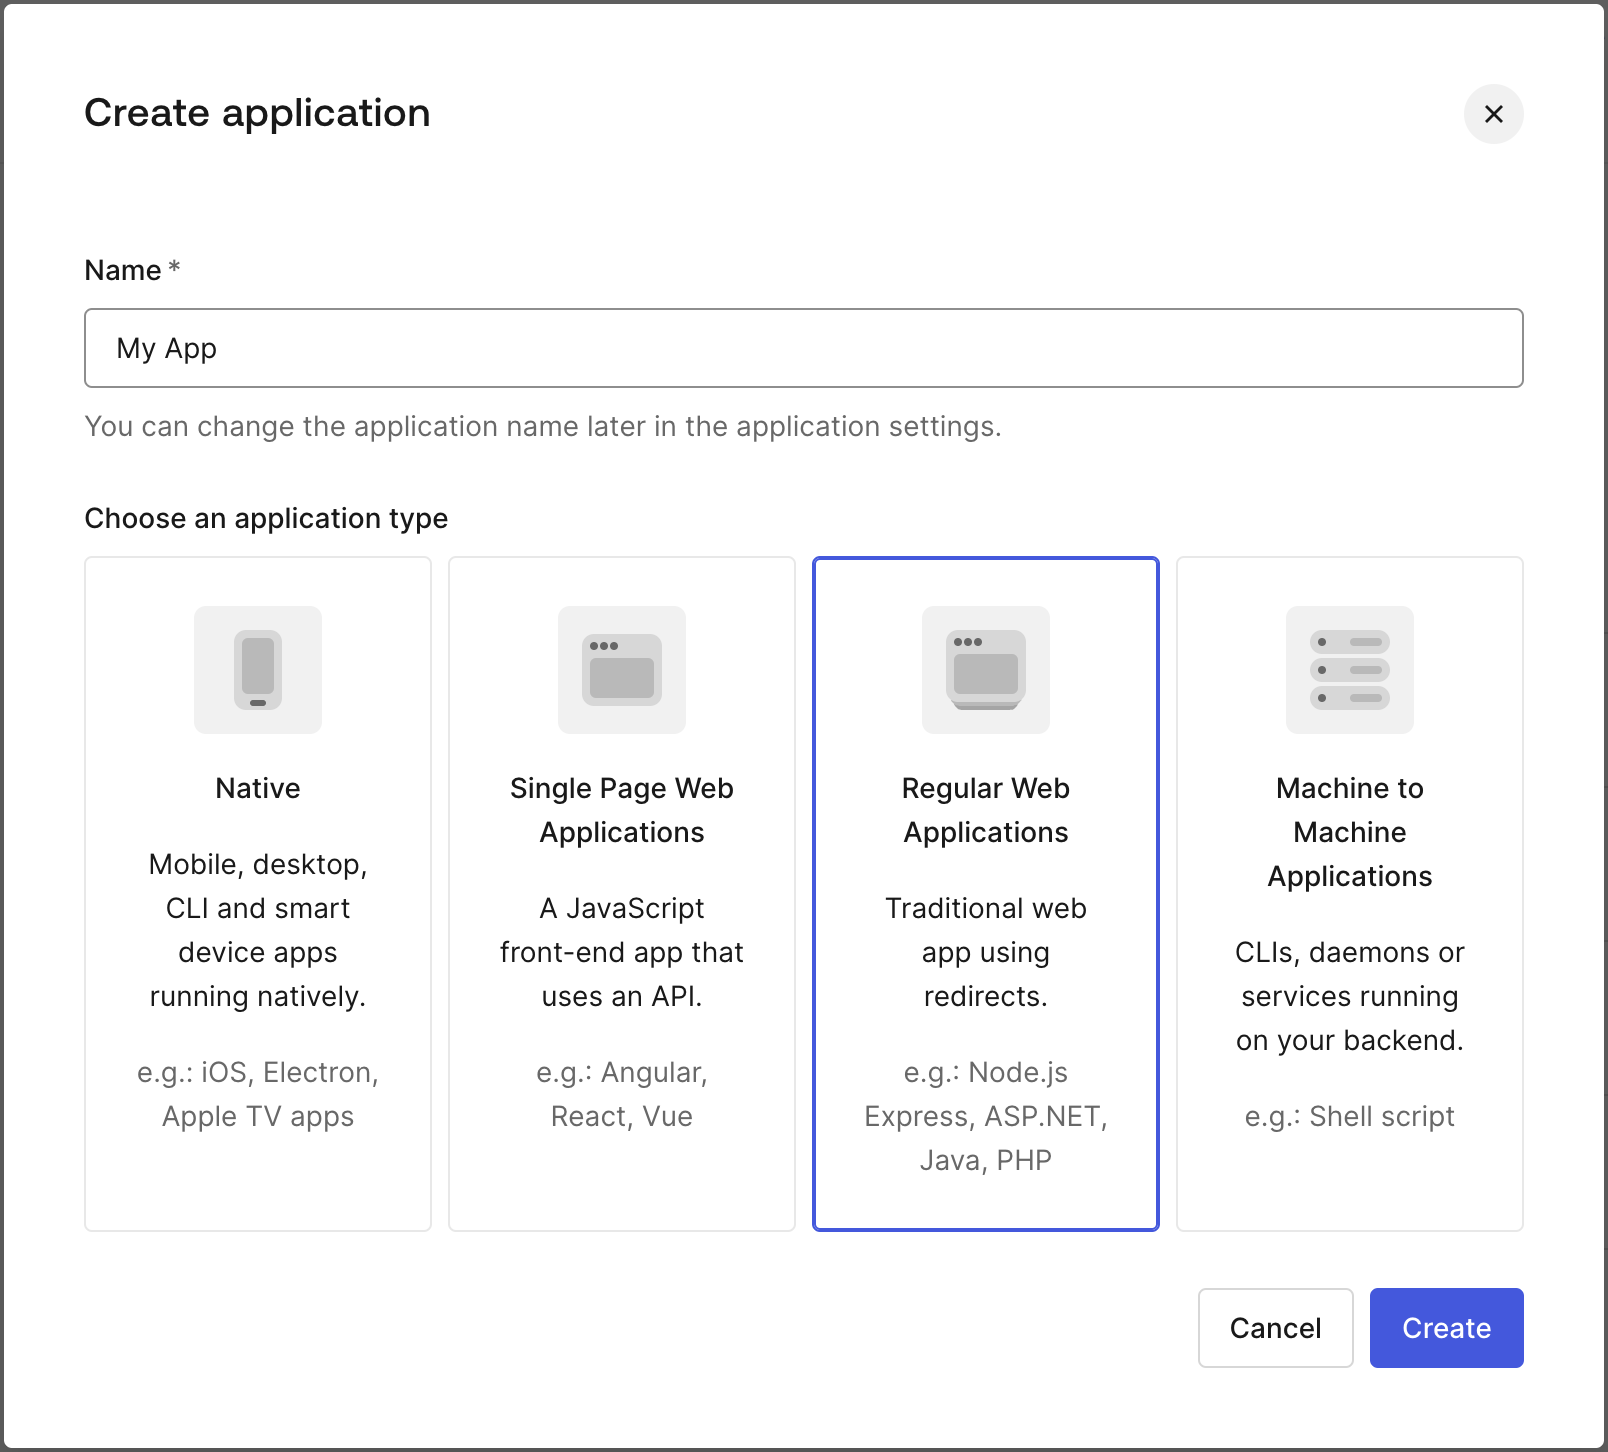
In this guide we are using the "Default App" as an example, in order for your integration work
ensure that the application you're using is created as a **Regular Web Application**.
That's it, we've created a new custom database connection, which will allow us to use Authsignal as an external authentication source.
### Configure your Auth0 Application
In this guide we are using the "Default App" as an example, in order for your integration work
ensure that the application you're using is created as a **Regular Web Application**.
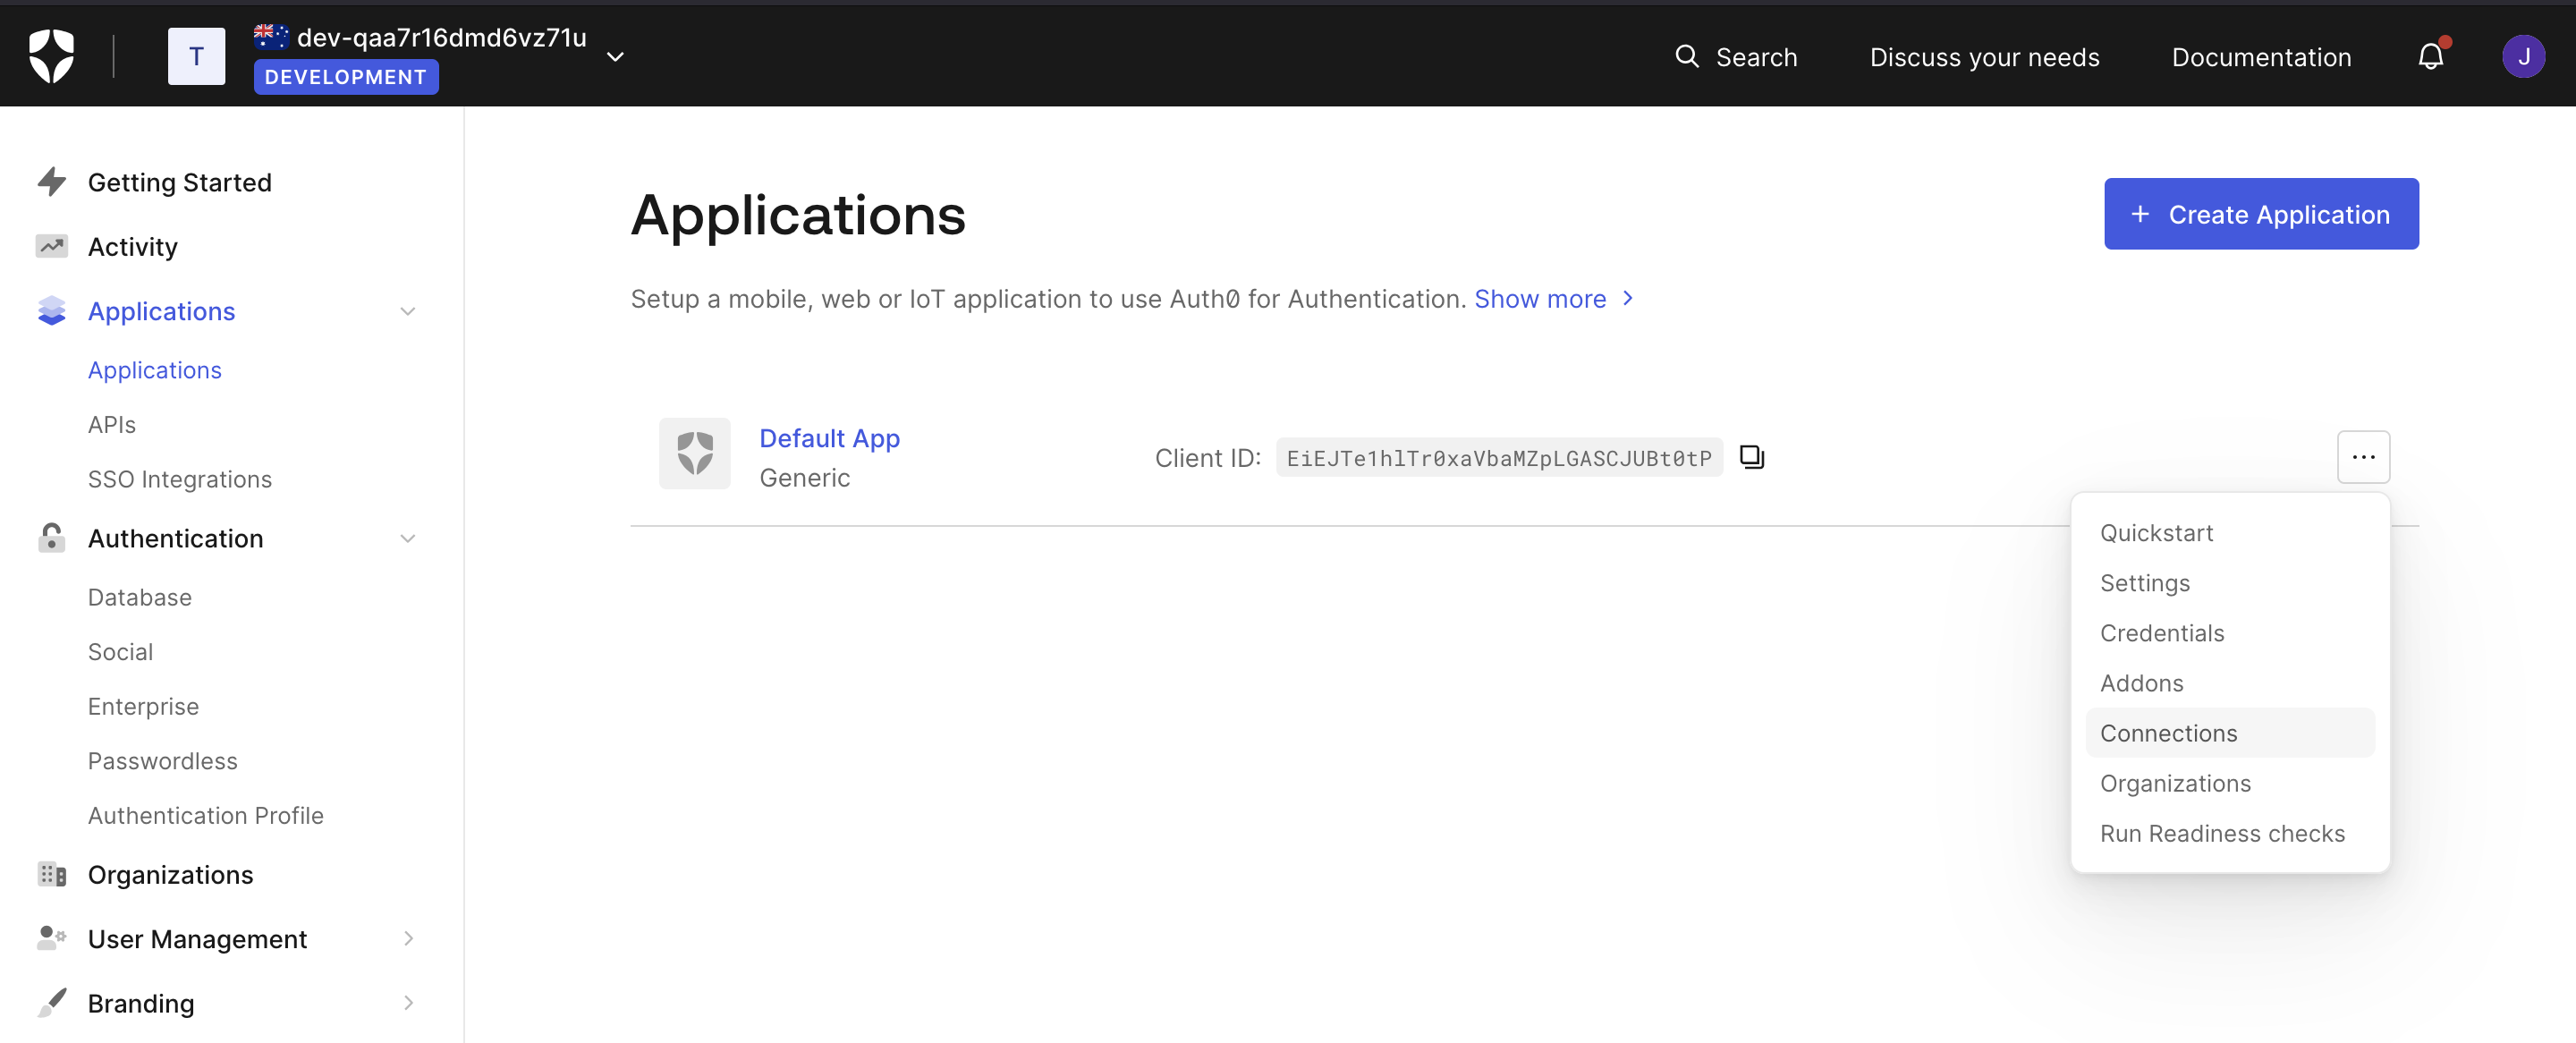
 Navigate to the Auth0 Application section and click menu for on the application you want to configure, and select **Connections**
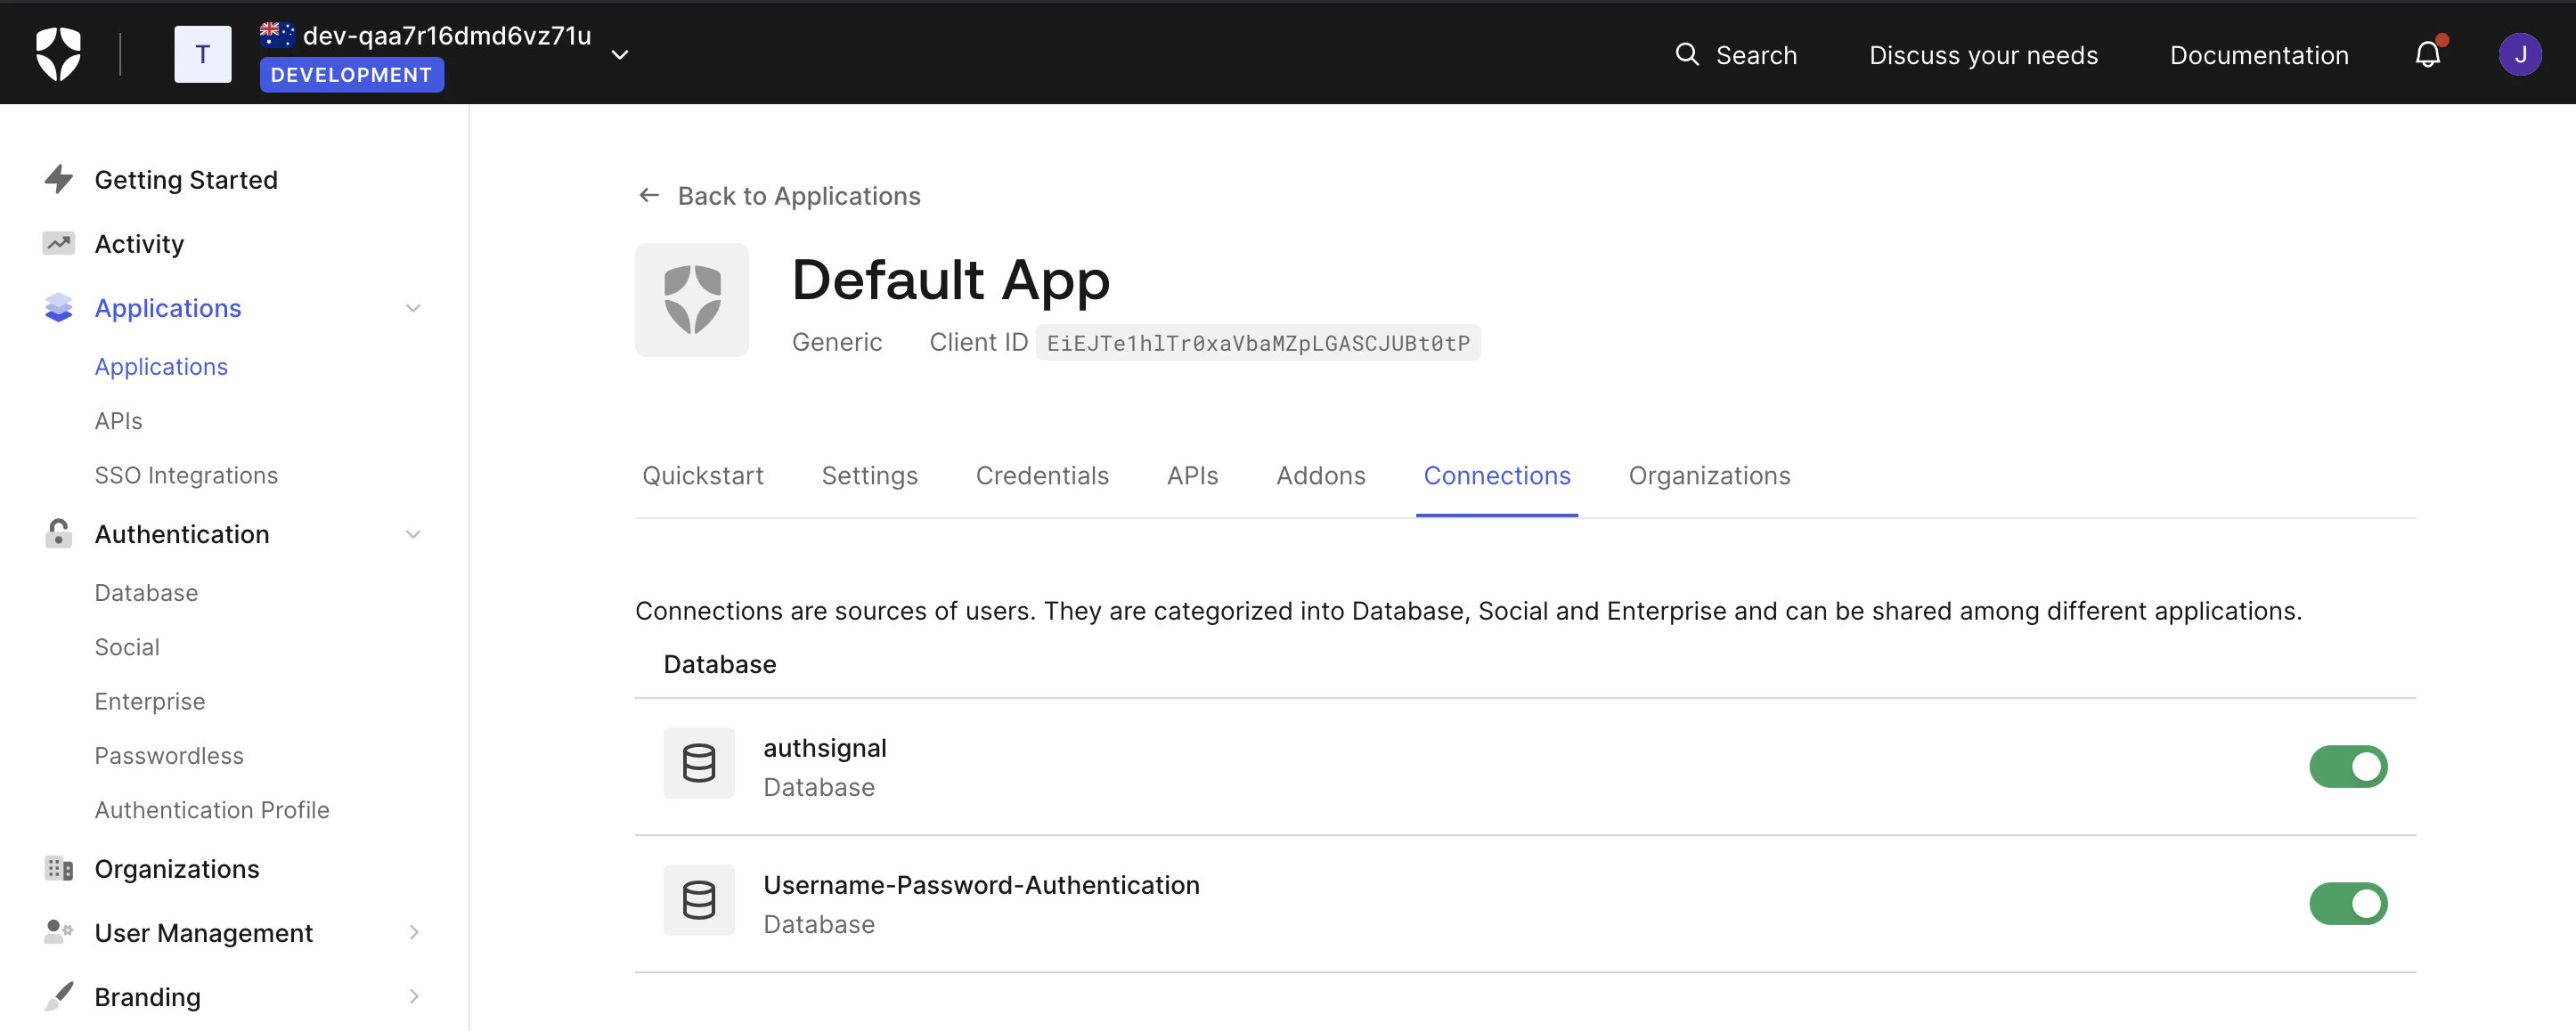
 Ensure that the **"authsignal"** (the name of the custom database connection we created in the
previous step) database connection is turned on.
Ensure that the **"authsignal"** (the name of the custom database connection we created in the
previous step) database connection is turned on.
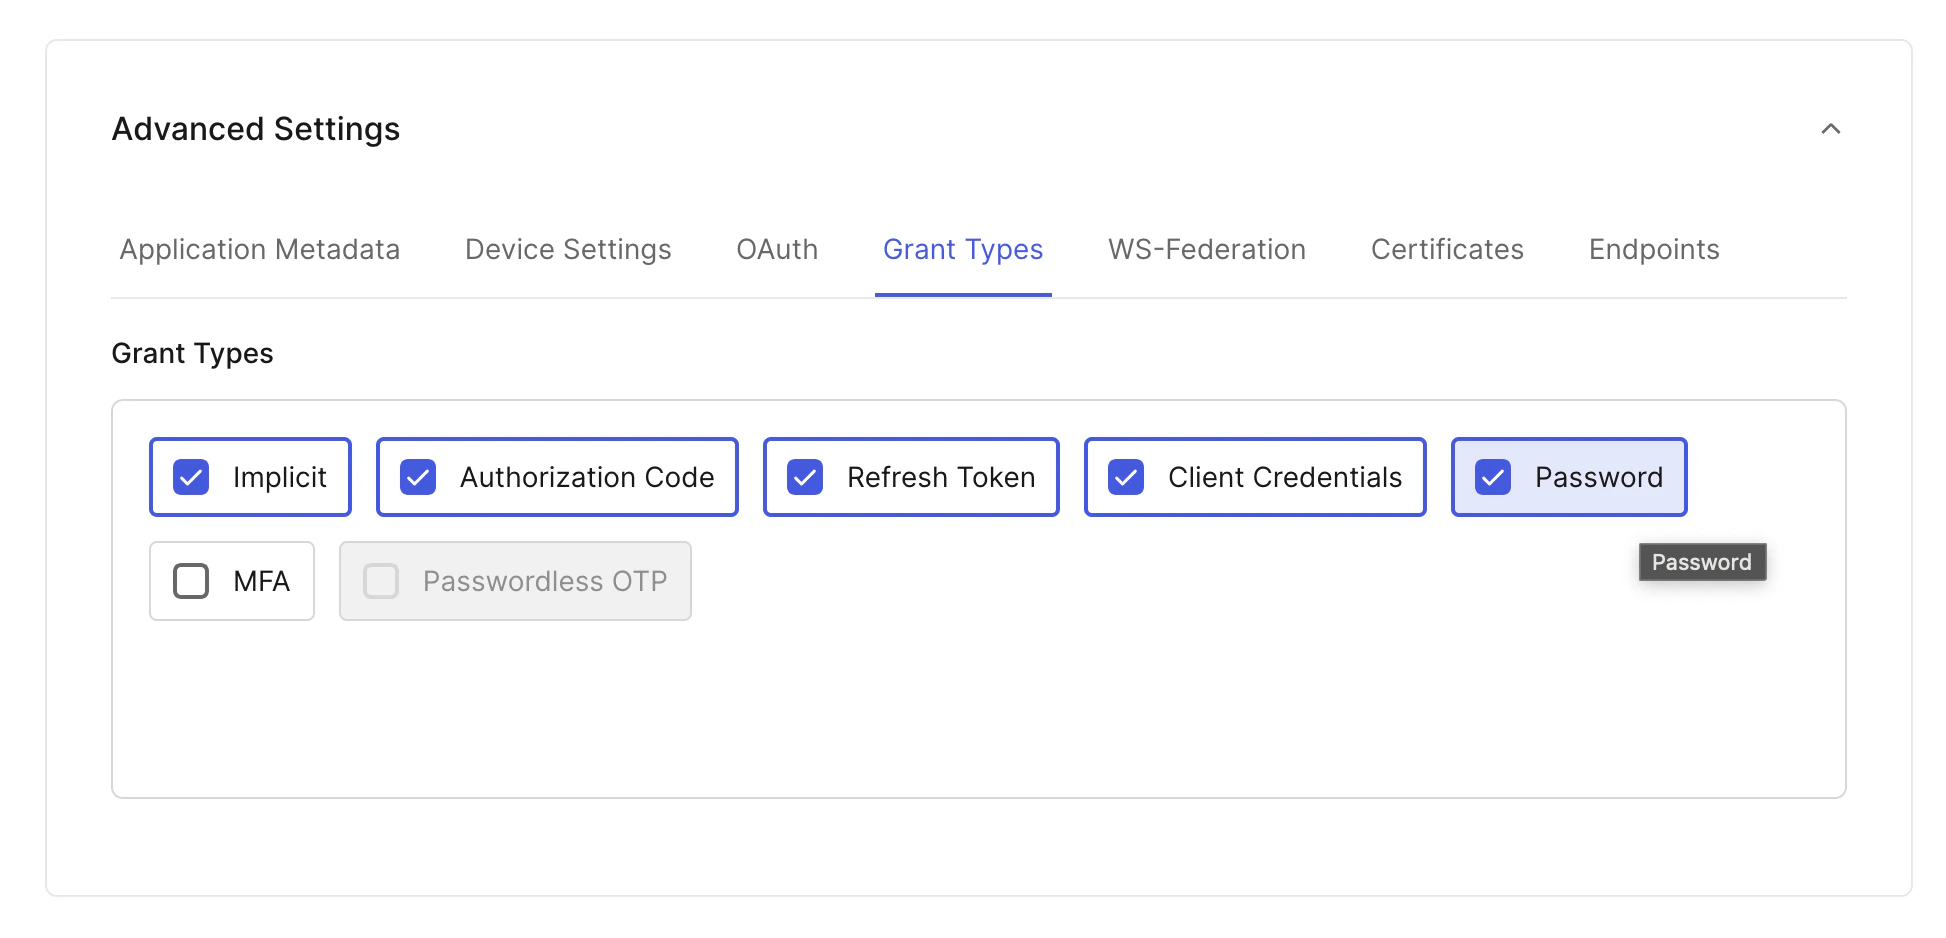
 Click to check the **Password** grant type.
 ### Implement a back-end API for validation
Once the above steps are completed, you'll be able to complete the final step of the integration, the back-end API implementation takes care of validating the Authsignal challenge token (for example when a user completes a passkey [sign-in](/sdks/client/mobile/passkeys#using-a-passkey)) and issues an Auth0 access token.
The following steps will guide you through the two critical steps that you need to implement in your back-end API. In this guide we will use a Node.js implementation, but you can use any language you prefer.
Initiate Passkey on your mobile client, see [documentation](/sdks/client/mobile/passkeys#using-a-passkey).
Pass client side token to the implemented back-end API. In your implementation you are doing the following:
* Authsignal [Validate Challenge](/sdks/server/challenges#validate-challenge)
* Auth0 [Resource Owner Password Grant API](https://auth0.com/docs/get-started/authentication-and-authorization-flow/resource-owner-password-flow/call-your-api-using-resource-owner-password-flow).
In this guide we've used the `scope` values of `openid profile email`, and had a placeholder for the `audience` value, but you'll have to configure the appropriate values for your application.
```ts Node.js theme={null}
const request = {
token: "eyJhbGciOiJ...",
};
// Step 1. Validate the Authsignal challenge token
const response = await authsignal.validateChallenge(request);
if (response.state === "CHALLENGE_SUCCEEDED") {
// Step 2. Call Auth0 Resource Owner Password Grant API to issue an access token
const user = await authsignal.getUser({userId: response.userId});
const response = await fetch(`https://{yourAuth0Domain}/oauth/token`, {
method: 'POST',
headers: {
'content-type': 'application/x-www-form-urlencoded',
},
body: new URLSearchParams({
grant_type: 'http://auth0.com/oauth/grant-type/password-realm',
username: user.email,
password: request.token,
scope: 'openid profile email',
audience: '{yourApiIdentifier}',
client_id: '{yourClientId}',
client_secret: '{yourClientSecret}',
realm: 'authsignal'
})
});
try {
const data = await response.json();
const accessToken = data.access_token;
const idToken = data.id_token;
} catch (error) {
// The Auth0 custom database login script failed to validate
}
} else {
// The user did not complete the challenge successfully
}
```
```curl cURL theme={null}
curl -X POST \
'https://{yourAuth0Domain}/oauth/token' \
-H 'content-type: application/x-www-form-urlencoded' \
-d 'grant_type=http://auth0.com/oauth/grant-type/password-realm' \
-d 'username={yourUsersEmailAddress}' \
-d 'password={authsignalToken}' \
-d 'scope=openid profile email' \
-d 'audience={yourApiIdentifier}' \
-d 'client_id={yourClientId}' \
-d 'client_secret={yourClientSecret}' \
-d 'realm=authsignal'
```
We've now completed the integration, please do reach out to us if you have any questions or need any assistance.
### Implement a back-end API for validation
Once the above steps are completed, you'll be able to complete the final step of the integration, the back-end API implementation takes care of validating the Authsignal challenge token (for example when a user completes a passkey [sign-in](/sdks/client/mobile/passkeys#using-a-passkey)) and issues an Auth0 access token.
The following steps will guide you through the two critical steps that you need to implement in your back-end API. In this guide we will use a Node.js implementation, but you can use any language you prefer.
Initiate Passkey on your mobile client, see [documentation](/sdks/client/mobile/passkeys#using-a-passkey).
Pass client side token to the implemented back-end API. In your implementation you are doing the following:
* Authsignal [Validate Challenge](/sdks/server/challenges#validate-challenge)
* Auth0 [Resource Owner Password Grant API](https://auth0.com/docs/get-started/authentication-and-authorization-flow/resource-owner-password-flow/call-your-api-using-resource-owner-password-flow).
In this guide we've used the `scope` values of `openid profile email`, and had a placeholder for the `audience` value, but you'll have to configure the appropriate values for your application.
```ts Node.js theme={null}
const request = {
token: "eyJhbGciOiJ...",
};
// Step 1. Validate the Authsignal challenge token
const response = await authsignal.validateChallenge(request);
if (response.state === "CHALLENGE_SUCCEEDED") {
// Step 2. Call Auth0 Resource Owner Password Grant API to issue an access token
const user = await authsignal.getUser({userId: response.userId});
const response = await fetch(`https://{yourAuth0Domain}/oauth/token`, {
method: 'POST',
headers: {
'content-type': 'application/x-www-form-urlencoded',
},
body: new URLSearchParams({
grant_type: 'http://auth0.com/oauth/grant-type/password-realm',
username: user.email,
password: request.token,
scope: 'openid profile email',
audience: '{yourApiIdentifier}',
client_id: '{yourClientId}',
client_secret: '{yourClientSecret}',
realm: 'authsignal'
})
});
try {
const data = await response.json();
const accessToken = data.access_token;
const idToken = data.id_token;
} catch (error) {
// The Auth0 custom database login script failed to validate
}
} else {
// The user did not complete the challenge successfully
}
```
```curl cURL theme={null}
curl -X POST \
'https://{yourAuth0Domain}/oauth/token' \
-H 'content-type: application/x-www-form-urlencoded' \
-d 'grant_type=http://auth0.com/oauth/grant-type/password-realm' \
-d 'username={yourUsersEmailAddress}' \
-d 'password={authsignalToken}' \
-d 'scope=openid profile email' \
-d 'audience={yourApiIdentifier}' \
-d 'client_id={yourClientId}' \
-d 'client_secret={yourClientSecret}' \
-d 'realm=authsignal'
```
We've now completed the integration, please do reach out to us if you have any questions or need any assistance.