> ## Documentation Index
> Fetch the complete documentation index at: https://docs.authsignal.com/llms.txt
> Use this file to discover all available pages before exploring further.
# Presentation modes
> Learn about the Authsignal pre-built UI's different presentation modes.
The pre-built UI can be launched using [Authsignal's Web SDK](/sdks/client/web/prebuilt-ui) in either **redirect** or **popup** mode.
Alternatively, you can handle displaying the pre-built UI (via redirect or modal) yourself for this step - using the Authsignal Web SDK is optional.
## Redirect mode
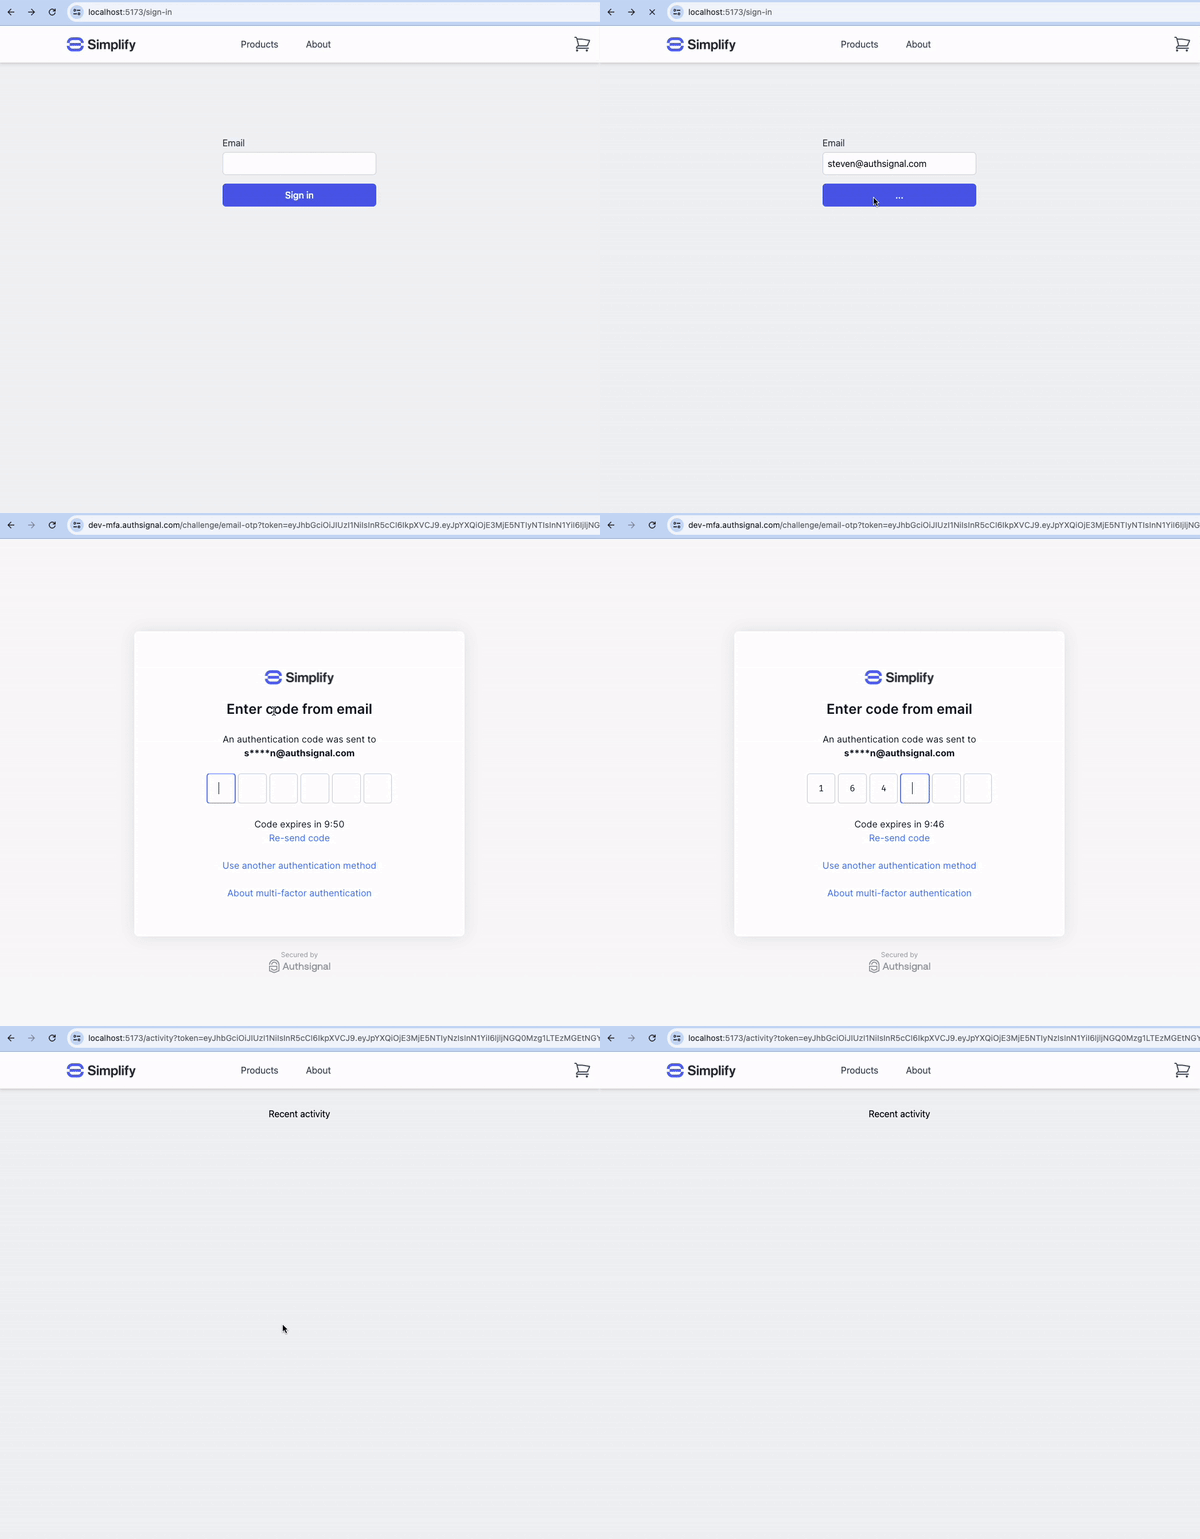 * Works with both client-side and server-side redirects.
* Typically looks better on mobile.
* Requires additional implementation to handle the redirect back to your app after the user completes the challenge, e.g. via a callback page.
* Passkey registration works seamlessly across browsers, e.g. when using the [passkey uplift prompt](/implementation-options/prebuilt-ui/passkey-uplift-prompt).
## Popup mode
* Works with both client-side and server-side redirects.
* Typically looks better on mobile.
* Requires additional implementation to handle the redirect back to your app after the user completes the challenge, e.g. via a callback page.
* Passkey registration works seamlessly across browsers, e.g. when using the [passkey uplift prompt](/implementation-options/prebuilt-ui/passkey-uplift-prompt).
## Popup mode
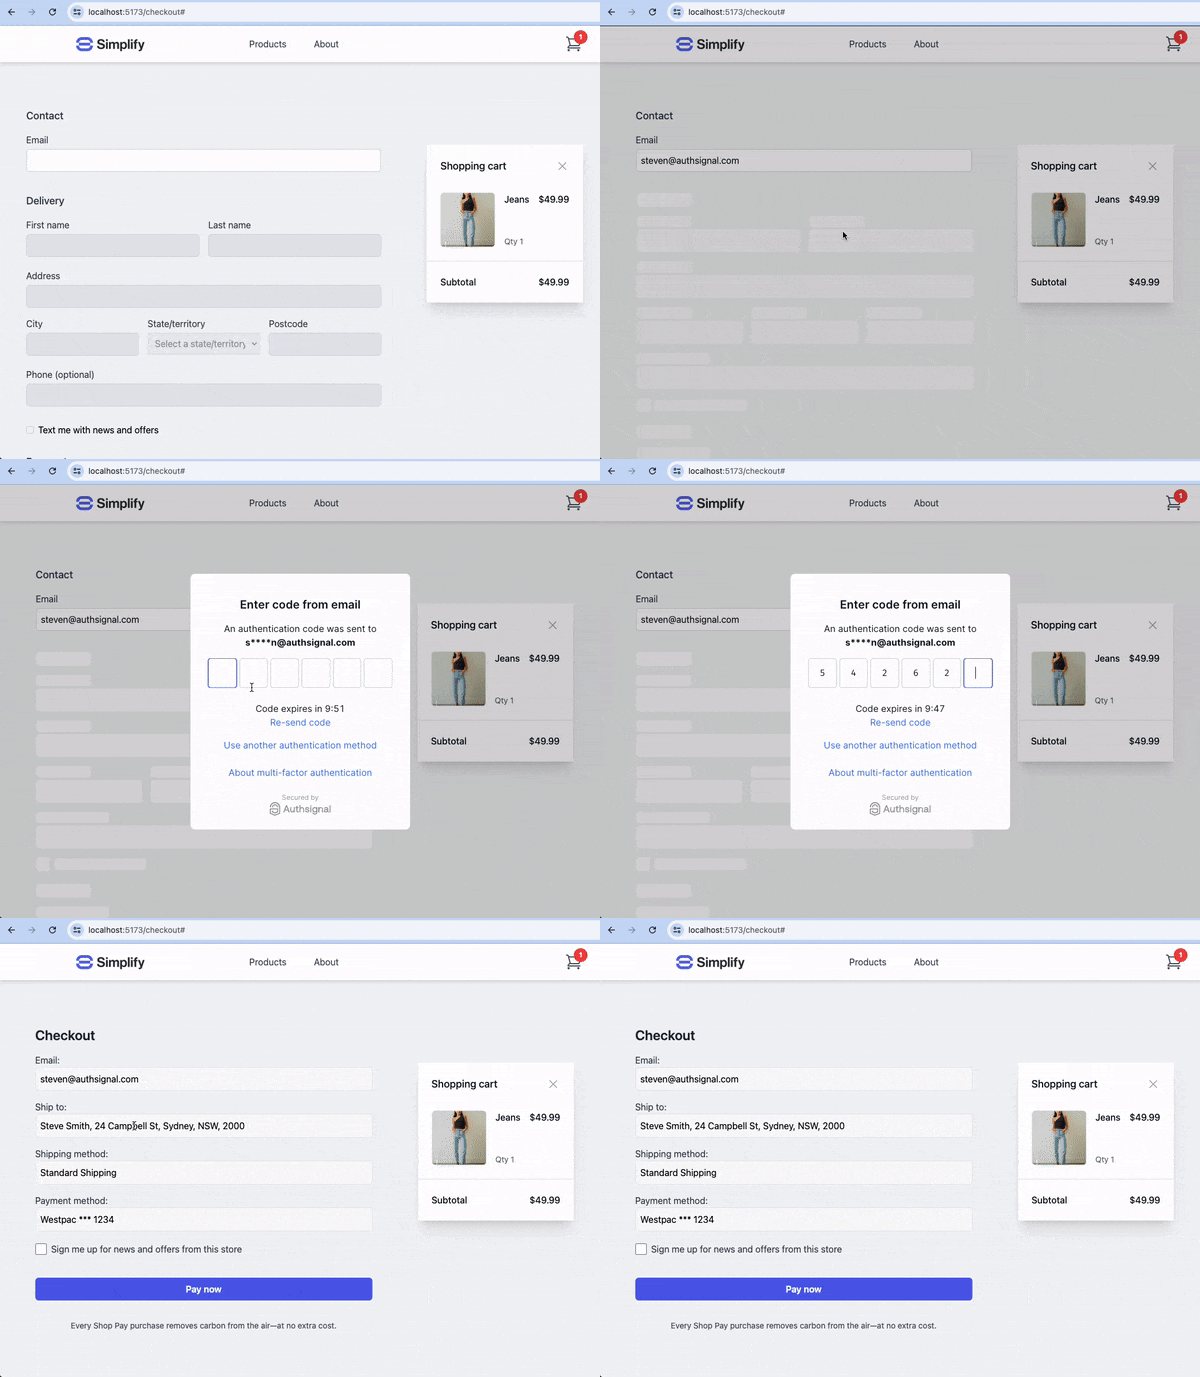 * Allows users to complete authentication without leaving the context of your application.
* Simpler to implement if you need to maintain in-memory state in the browser during the authentication process, e.g. for a shopping cart or checkout flow.
* Support for passkey registration within an iframe is inconsistent across different browsers.
Both redirect mode and popup mode can be customized with your branding using our [UI customization tool](/implementation-options/prebuilt-ui/custom-branding).
## Integration steps
### Step 1 - Backend
Obtain a URL by [tracking an action](/implementation-options/prebuilt-ui/overview#1-backend-track-action) on your backend.
### Step 2 - Frontend
#### Redirect mode
Launch an enrollment or re-authentication flow by redirecting to the URL either server-side or client-side.
The following code snippet demonstrates how to launch the pre-built UI client-side using the [Authsignal Web SDK](/sdks/client/web/prebuilt-ui).
```javascript theme={null}
authsignal.launch(url);
```
The pre-built UI will be launched on your [custom
domain](/implementation-options/prebuilt-ui/custom-domains) if you have set one up in the
[Authsignal Portal](https://portal.authsignal.com/organisations/tenants/custom_domains). If you
don't have a domain setup, the domain will be mfa.authsignal.com.
After the user completes the challenge, Authsignal will redirect them to the URL provided in your track action call, appending a token as a query parameter. You can use this token to [determine the result of the challenge server-side](/implementation-options/prebuilt-ui/overview#3-backend-validate-challenge).
#### Popup mode
Launch an enrollment or re-authentication flow. The following code snippet demonstrates how to do this with the [Authsignal Web SDK](/sdks/client/web/prebuilt-ui).
```javascript theme={null}
const { token } = await authsignal.launch(url, { mode: "popup" });
```
Once the user has completed the challenge, the token returned from Authsignal's `launch` function can be used to [determine the result of the challenge server-side](/implementation-options/prebuilt-ui/overview#3-backend-validate-challenge).
* Allows users to complete authentication without leaving the context of your application.
* Simpler to implement if you need to maintain in-memory state in the browser during the authentication process, e.g. for a shopping cart or checkout flow.
* Support for passkey registration within an iframe is inconsistent across different browsers.
Both redirect mode and popup mode can be customized with your branding using our [UI customization tool](/implementation-options/prebuilt-ui/custom-branding).
## Integration steps
### Step 1 - Backend
Obtain a URL by [tracking an action](/implementation-options/prebuilt-ui/overview#1-backend-track-action) on your backend.
### Step 2 - Frontend
#### Redirect mode
Launch an enrollment or re-authentication flow by redirecting to the URL either server-side or client-side.
The following code snippet demonstrates how to launch the pre-built UI client-side using the [Authsignal Web SDK](/sdks/client/web/prebuilt-ui).
```javascript theme={null}
authsignal.launch(url);
```
The pre-built UI will be launched on your [custom
domain](/implementation-options/prebuilt-ui/custom-domains) if you have set one up in the
[Authsignal Portal](https://portal.authsignal.com/organisations/tenants/custom_domains). If you
don't have a domain setup, the domain will be mfa.authsignal.com.
After the user completes the challenge, Authsignal will redirect them to the URL provided in your track action call, appending a token as a query parameter. You can use this token to [determine the result of the challenge server-side](/implementation-options/prebuilt-ui/overview#3-backend-validate-challenge).
#### Popup mode
Launch an enrollment or re-authentication flow. The following code snippet demonstrates how to do this with the [Authsignal Web SDK](/sdks/client/web/prebuilt-ui).
```javascript theme={null}
const { token } = await authsignal.launch(url, { mode: "popup" });
```
Once the user has completed the challenge, the token returned from Authsignal's `launch` function can be used to [determine the result of the challenge server-side](/implementation-options/prebuilt-ui/overview#3-backend-validate-challenge).