> ## Documentation Index
> Fetch the complete documentation index at: https://docs.authsignal.com/llms.txt
> Use this file to discover all available pages before exploring further.
# Email OTP
> Send one-time verification codes via email for authentication and for verifying users' email addresses.
Authsignal SDKs can be used to implement email OTP challenges in two scenarios.
1. [Sign-in](#sign-in). Use our Server SDKs to authenticate users with email OTP as the 1st factor. This integration only requires an email address to initiate.
2. [Adaptive MFA](#adaptive-mfa). Use Server SDKs together with Client SDKs to authenticate users with email OTP as a secondary factor. This integration requires a user ID to initiate and assumes the user has already been authenticated with a primary factor.
## Email provider setup
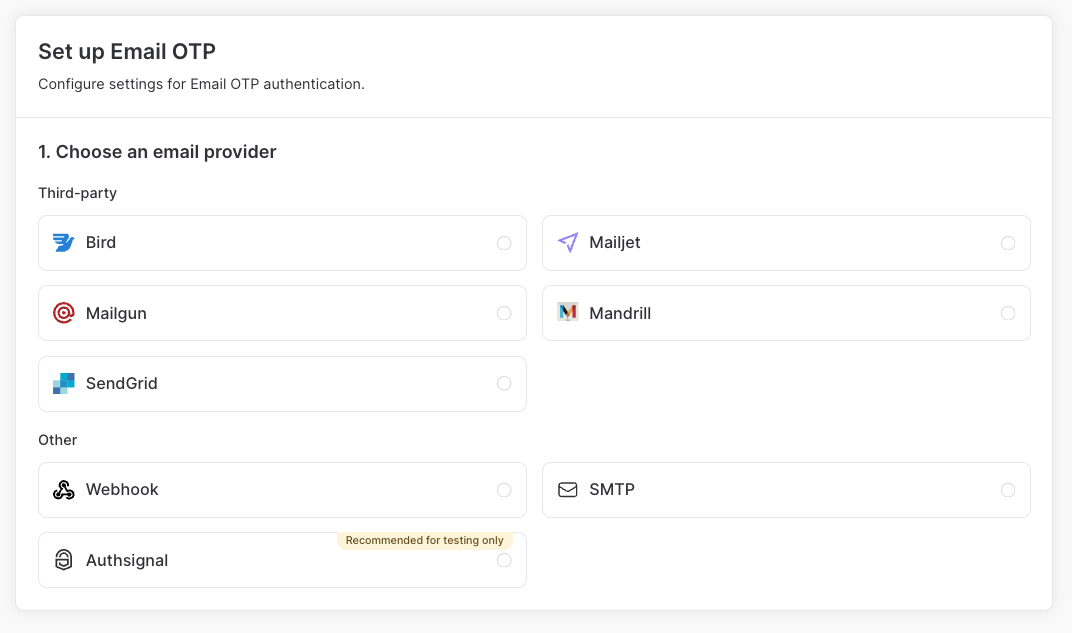
Navigate to [Authenticators](https://portal.authsignal.com/organisations/tenants/authenticators) in the Authsignal Portal, click on **Email OTP**, and choose an email provider.
 1. Log in to your [Bird account](https://bird.com/)
2. Get your **Access key** and **Workspace ID** from your Bird settings
3. Create or locate an email channel and note the **Channel ID**
4. Create an email template in Bird and note the **Project ID/Template ID**
5. Publish your template and note the **Published version ID**
6. In the Authsignal Portal, select **Bird** as your email provider
7. Enter your Bird access key, workspace ID, channel ID, project ID/template ID, published version ID, and select your default language
1. Log in to your [Mailjet account](https://app.mailjet.com/)
2. Navigate to **API > API Key Management** and get your **API key** and **Secret key**
3. Navigate to **Content > Email Templates** and get your **Template ID**
4. In the Authsignal Portal, select **Mailjet** as your email provider
5. Enter your Mailjet **API key**, **API secret key**, and **Template ID**
1. Log in to your [Mailgun account](https://app.mailgun.com/)
2. Click on your profile icon in the top-right corner and select **API Keys**
3. Click **Add New API Key** to generate a new API key
4. Note your **Sending domain** from the Mailgun dashboard
5. In the Authsignal Portal, select **Mailgun** as your email provider
6. Enter your Mailgun **API key**, **Sending domain**, **Template name** (optional), and select **API URL** for your region
1. Log in to your [Mailchimp account](https://mailchimp.com/)
2. Go to **Settings** and click on **API Keys**
3. Click **Create API Key** and give it a description. Copy the generated key
4. In the Authsignal Portal, select **Mandrill** as your email provider
5. Enter your Mandrill **API key** and **Template name**
1. Log in to your [SendGrid account](https://login.sendgrid.com/)
2. Go to **Settings** and click on **API Keys**
3. Click **Create New Key** and ensure either **Full Access** or **Custom Access** with the **Mail Send** permission is selected. Copy the generated key
4. Create a new [dynamic template](https://mc.sendgrid.com/dynamic-templates/new) in SendGrid and copy the **Template ID**
5. In the Authsignal Portal, select **SendGrid** as your email provider
6. Enter your SendGrid **API key**, **Template ID**, **From email**, and an optional **From name**
For detailed instructions on setting up a webhook for email delivery, see the [webhooks documentation](/advanced-usage/webhooks/introduction).
Authsignal supports sending with an SMTP server of your choosing.
1. In the Authsignal Portal, select **SMTP** as your email provider.
2. Enter your **SMTP Server Address**, **Port**, **Username**, **Password**, **From Address**, and an optional **From name**
You can use **Authsignal** as an email provider for development, but it's recommended to use an
alternative provider in production for more control over emails.
### Email template variables
The following template variables are available for use in your email template:
The verification code.
The action that the user is performing.
The ID of the user.
The user agent associated with the action.
The IP address associated with the action.
### Custom template variables
You can forward [custom data points](/actions-rules/rules/custom-data-points) to your email provider as additional template variables.
This is useful for personalizing emails with data specific to your application, such as a user's account ID or a transaction amount.
To configure this, navigate to your [email OTP settings](https://portal.authsignal.com/organisations/tenants/authenticators/email_otp) in the Authsignal Portal and select which custom data points to include under **Custom template variables**.
Custom data points are prefixed by model type:
* **User data points** are prefixed with `user_` (e.g. `user_accountId`)
* **Action data points** are prefixed with `action_` (e.g. `action_transactionAmount`)
Custom data points must be [registered in the Authsignal Portal](https://portal.authsignal.com/organisations/tenants/custom_data_points) before they can be selected.
Only registered data points with values set on the user or action will be included.
## SDK setup
### Server SDK
Initialize the SDK using your secret key from the [API keys page](https://portal.authsignal.com/organisations/tenants/api) and the [API URL](/sdks/server/setup#regions) for your region.
```ts Node.js theme={null}
import { Authsignal } from "@authsignal/node";
const authsignal = new Authsignal({
apiSecretKey: "YOUR_SECRET_KEY",
apiUrl: "YOUR_API_URL",
});
```
```csharp C# theme={null}
using Authsignal;
var authsignal = new AuthsignalClient(
apiSecretKey: "YOUR_SECRET_KEY",
apiUrl: "YOUR_API_URL"
);
```
```java Java theme={null}
import com.authsignal.AuthsignalClient;
AuthsignalClient authsignal = new AuthsignalClient(
"YOUR_SECRET_KEY",
"YOUR_API_URL"
);
```
```ruby Ruby theme={null}
require 'authsignal'
Authsignal.setup do |config|
config.api_secret_key = ENV["YOUR_SECRET_KEY"]
config.api_url = "YOUR_API_URL"
end
```
```python Python theme={null}
from authsignal.client import AuthsignalClient
authsignal = AuthsignalClient(
api_secret_key="YOUR_SECRET_KEY",
api_url="YOUR_API_URL"
)
```
```php PHP theme={null}
Authsignal::setApiSecretKey("YOUR_SECRET_KEY");
Authsignal::setApiUrl("YOUR_API_URL");
```
```go Go theme={null}
import "github.com/authsignal/authsignalgo/v2/client"
client := NewAuthsignalClient(
"YOUR_SECRET_KEY",
"YOUR_API_URL",
)
```
### Client SDK
Initialize the [Web SDK](/sdks/client/web/setup) or [Mobile SDK](/sdks/client/mobile/setup) using your tenant ID from the [API keys page](https://portal.authsignal.com/organisations/tenants/api) and your [API URL](/sdks/server/setup#regions).
```ts Web theme={null}
import { Authsignal } from "@authsignal/browser";
const authsignal = new Authsignal({
tenantId: "YOUR_TENANT_ID",
baseUrl: "YOUR_API_URL",
});
```
```swift iOS theme={null}
import Authsignal
let authsignal = Authsignal(
tenantID: "YOUR_TENANT_ID",
baseURL: "YOUR_API_URL"
)
```
```kotlin Android theme={null}
import com.authsignal.Authsignal
val authsignal = Authsignal(
tenantID = "YOUR_TENANT_ID",
baseURL = "YOUR_API_URL",
)
```
```ts React Native theme={null}
import { Authsignal } from "react-native-authsignal";
const authsignal = new Authsignal({
tenantID: "YOUR_TENANT_ID",
baseURL: "YOUR_API_URL",
});
```
```dart Flutter theme={null}
import 'package:authsignal_flutter/authsignal_flutter.dart';
final authsignal = Authsignal(
"YOUR_TENANT_ID",
baseURL: "YOUR_API_URL"
);
```
## Sign-in
**Scenario** - Let users sign-in with email OTP as the **1st factor**.
Our [Server SDKs](/sdks/server) include methods to initiate and verify an OTP challenge for a given email address.
These methods are well-suited for passwordless sign-in scenarios where you need to authenticate a user with email OTP as a primary factor.
### 1. Initiate challenge
Call [Initiate Challenge](/sdks/server/challenges#initiate-challenge) to send an OTP to an email address.
```ts Node.js theme={null}
const request = {
verificationMethod: "EMAIL_OTP",
action: "signInWithEmail",
email: "jane.smith@authsignal.com",
};
const response = await authsignal.challenge(request);
const challengeId = response.challengeId;
```
```csharp C# theme={null}
var request = new ChallengeRequest(
VerificationMethod: VerificationMethod.EMAIL_OTP,
Action: "signInWithEmail",
Email: "jane.smith@authsignal.com"
);
var response = await authsignal.challenge(request);
var challengeId = response.ChallengeId;
```
```java Java theme={null}
ChallengeRequest request = new ChallengeRequest();
request.verificationMethod = VerificationMethodType.EMAIL_OTP;
request.action = "signInWithEmail";
request.email = "jane.smith@authsignal.com";
ChallengeResponse response = authsignal.challenge(request).get();
String challengeId = response.challengeId;
```
```ruby Ruby theme={null}
response = Authsignal.challenge(
verification_method: "EMAIL_OTP",
action: "signInWithEmail",
email: "jane.smith@authsignal.com",
)
challenge_id = response[:challenge_id]
```
```go Go theme={null}
response, err := client.Challenge(
ChallengeRequest{
VerificationMethod: "EMAIL_OTP",
Action: "signInWithEmail",
Email: "jane.smith@authsignal.com",
},
)
challengeId := response.challengeId
```
You can choose a value for the [action](/actions-rules/actions/getting-started) here which best describes what the user is doing in your app (e.g. signing in with email).
It will be used to track user activity in the Authsignal Portal.
### 2. Verify challenge
Once the user inputs the OTP code, call [Verify Challenge](/sdks/server/challenges#verify-challenge) to verify it.
```ts Node.js theme={null}
const request = {
challengeId: "3a991a14-690c-492b-a5e5-02b9056a4b7d",
verificationCode: "123456",
};
const response = await authsignal.verify(request);
const isVerified = response.isVerified;
```
```csharp C# theme={null}
var request = new VerifyRequest(
ChallengeId: "3a991a14-690c-492b-a5e5-02b9056a4b7d",
VerificationCode: "123456"
);
var response = await authsignal.Verify(request);
var isVerified = response.IsVerified;
```
```java Java theme={null}
VerifyRequest request = new VerifyRequest();
request.challengeId = "3a991a14-690c-492b-a5e5-02b9056a4b7d";
request.verificationCode = "123456";
VerifyResponse response = authsignal.verify(request).get();
boolean isVerified = response.isVerified;
```
```ruby Ruby theme={null}
response = Authsignal.verify(
challenge_id: "3a991a14-690c-492b-a5e5-02b9056a4b7d",
verification_code: "123456",
)
is_verified = response[:is_verified]
```
```go Go theme={null}
response, err := client.Verify(
VerifyRequest{
ChallengeId: "3a991a14-690c-492b-a5e5-02b9056a4b7d",
VerificationCode: "123456",
},
)
isVerified := response.IsVerified
```
### 3. Claim challenge
Now that the challenge has been verified, you can lookup the user in your IdP or DB based on their email.
For passwordless flows with a combined sign-up and sign-in UX, you may need to create the user at this point if no account exists.
Then claim the challenge once you know the primary user ID associated with the email.
```ts Node.js theme={null}
const request = {
challengeId: "3a991a14-690c-492b-a5e5-02b9056a4b7d",
userId: "dc58c6dc-a1fd-4a4f-8e2f-846636dd4833",
};
const response = await authsignal.claimChallenge(request);
```
```csharp C# theme={null}
var request = new ClaimChallengeRequest(
ChallengeId: "3a991a14-690c-492b-a5e5-02b9056a4b7d",
UserId: "dc58c6dc-a1fd-4a4f-8e2f-846636dd4833"
);
var response = await authsignal.ClaimChallenge(request);
```
```java Java theme={null}
ClaimChallengeRequest request = new ClaimChallengeRequest();
request.challengeId = "3a991a14-690c-492b-a5e5-02b9056a4b7d";
request.userId = "dc58c6dc-a1fd-4a4f-8e2f-846636dd4833";
ClaimChallengeResponse response = authsignal.claimChallenge(request).get();
```
```ruby Ruby theme={null}
response = Authsignal.claim_challenge(
challenge_id: "3a991a14-690c-492b-a5e5-02b9056a4b7d",
user_id: "dc58c6dc-a1fd-4a4f-8e2f-846636dd4833",
)
```
```go Go theme={null}
response, err := client.ClaimChallenge(
ClaimChallengeRequest{
ChallengeId: "3a991a14-690c-492b-a5e5-02b9056a4b7d",
UserId: "dc58c6dc-a1fd-4a4f-8e2f-846636dd4833",
},
)
```
This final step is important because it **attributes activity to the correct user and ensures observability in the Authsignal Portal**.
## Adaptive MFA
**Scenario** - Challenge users with email OTP as a **2nd factor** and use rules to decide when and
where in your app to trigger the challenge.
The following steps demonstrate how to implement adaptive MFA with email OTP - either at sign-in or as step-up authentication when the user performs a sensitive action in your app (e.g. making a payment).
In this scenario we assume the user has already been identified by authenticating with another method (e.g. username and password) and is being prompted to complete an email OTP challenge as a 2nd factor.
### 1. Track action
Use a [Server SDK](/sdks/server) to track an action in your backend.
This step can apply [rules](/actions-rules/rules/getting-started) to determine if a challenge is required.
```ts Node.js theme={null}
const request = {
userId: "dc58c6dc-a1fd-4a4f-8e2f-846636dd4833",
action: "signIn",
attributes: {
email: "jane.smith@authsignal.com",
},
};
const response = await authsignal.track(request);
if (response.state === "CHALLENGE_REQUIRED") {
// Obtain token to present challenge
const token = response.token;
}
```
```csharp C# theme={null}
var request = new TrackRequest(
UserId: "dc58c6dc-a1fd-4a4f-8e2f-846636dd4833",
Action: "signIn",
Attributes: new TrackAttributes(
Email: "jane.smith@authsignal.com"
)
);
var response = await authsignal.Track(request);
if (response.State == UserActionState.CHALLENGE_REQUIRED)
{
// Obtain token to present challenge
var token = response.Token;
}
```
```java Java theme={null}
TrackRequest request = new TrackRequest();
request.userId = "dc58c6dc-a1fd-4a4f-8e2f-846636dd4833";
request.action = "signIn";
request.attributes = new TrackAttributes();
request.attributes.email = "jane.smith@authsignal.com";
TrackResponse response = authsignal.track(request).get();
if (response.state.equals(UserActionState.CHALLENGE_REQUIRED)) {
// Obtain token to present challenge
String token = response.token;
}
```
```ruby Ruby theme={null}
response = Authsignal.track({
user_id: 'dc58c6dc-a1fd-4a4f-8e2f-846636dd4833',
action: 'signIn',
attributes: {
email: 'jane.smith@authsignal.com'
}
})
case response[:state]
when "CHALLENGE_REQUIRED"
# Obtain token to present challenge
token = response[:token]
end
```
```python Python theme={null}
response = authsignal.track(
user_id="dc58c6dc-a1fd-4a4f-8e2f-846636dd4833",
action="signIn",
attributes={
"email": "jane.smith@authsignal.com"
}
)
if response["state"] == "CHALLENGE_REQUIRED":
# Obtain token to present challenge
token = response["token"]
```
```php PHP theme={null}
$response = $authsignal->track([
'userId' => 'dc58c6dc-a1fd-4a4f-8e2f-846636dd4833',
'action' => 'signIn',
'attributes' => [
'email' => 'jane.smith@authsignal.com'
]
]);
switch ($response['state']) {
case 'CHALLENGE_REQUIRED':
// Obtain token to present challenge
$token = $response['token'];
}
```
```go Go theme={null}
response, err := client.Track(
TrackRequest{
UserId: "dc58c6dc-a1fd-4a4f-8e2f-846636dd4833",
Action: "signIn",
Attributes: &TrackAttributes{
Email: "jane.smith@authsignal.com",
},
},
)
switch response.State {
case "CHALLENGE_REQUIRED":
// Obtain token to present challenge
token := response.Token
}
```
```ts Node.js theme={null}
const request = {
userId: "dc58c6dc-a1fd-4a4f-8e2f-846636dd4833",
action: "signIn",
attributes: {
email: "jane.smith@authsignal.com",
redirectUrl: "https://yourapp.com/callback",
},
};
const response = await authsignal.track(request);
if (response.state === "CHALLENGE_REQUIRED") {
// Return URL to your frontend to launch pre-built UI
const url = response.url;
}
```
```csharp C# theme={null}
var request = new TrackRequest(
UserId: "dc58c6dc-a1fd-4a4f-8e2f-846636dd4833",
Action: "signIn",
Attributes: new TrackAttributes(
Email: "jane.smith@authsignal.com",
RedirectUrl: "https://yourapp.com/callback",
)
);
var response = await authsignal.Track(request);
if (response.State == UserActionState.CHALLENGE_REQUIRED)
{
// Return URL to your frontend to launch pre-built UI
var url = response.Url;
}
```
```java Java theme={null}
TrackRequest request = new TrackRequest();
request.userId = "dc58c6dc-a1fd-4a4f-8e2f-846636dd4833";
request.action = "signIn";
request.attributes = new TrackAttributes();
request.attributes.email = "jane.smith@authsignal.com";
request.attributes.redirectUrl = "https://yourapp.com/callback";
TrackResponse response = authsignal.track(trackRequest).get();
if (response.state.equals(UserActionState.CHALLENGE_REQUIRED)) {
// Return URL to your frontend to launch pre-built UI
String url = response.url;
}
```
```ruby Ruby theme={null}
response = Authsignal.track({
user_id: 'dc58c6dc-a1fd-4a4f-8e2f-846636dd4833',
action: 'signIn',
attributes: {
email: 'jane.smith@authsignal.com',
redirect_url: "https://yourapp.com/callback"
}
})
case response[:state]
when "CHALLENGE_REQUIRED"
# Return URL to your frontend to launch pre-built UI
url = response[:url]
end
```
```python Python theme={null}
response = authsignal.track(
user_id="dc58c6dc-a1fd-4a4f-8e2f-846636dd4833",
action="signIn",
attributes={
"email": "jane.smith@authsignal.com",
"redirectUrl": "https://yourapp.com/callback"
}
)
if response["state"] == "CHALLENGE_REQUIRED":
# Return URL to your frontend to launch pre-built UI
url = response["url"]
```
```php PHP theme={null}
$response = $authsignal->track([
'userId' => 'dc58c6dc-a1fd-4a4f-8e2f-846636dd4833',
'action' => 'signIn',
'attributes' => [
'email' => 'jane.smith@authsignal.com'
'redirectUrl' => 'https://yourapp.com/callback'
]
]);
switch ($response['state']) {
case 'CHALLENGE_REQUIRED':
// Return URL to your frontend to launch pre-built UI
$url = $response['url'];
}
```
```go Go theme={null}
response, err := client.Track(
TrackRequest{
UserId: "dc58c6dc-a1fd-4a4f-8e2f-846636dd4833",
Action: "signIn",
Attributes: &TrackAttributes{
Email: "jane.smith@authsignal.com",
RedirectUrl: "https://yourapp.com/callback",
},
},
)
switch response.State {
case "CHALLENGE_REQUIRED":
// Return URL to your frontend to launch pre-built UI
url := response.Url
}
```
You can choose a value for the [action](/actions-rules/actions/getting-started) here which best describes what the user is doing in your app (e.g. `signIn` or `createPayment`).
Each action can have its own set of rules.
To learn more about using rules and handling different action states refer to our documentation on [actions](/actions-rules/actions/getting-started) and [rules](/actions-rules/rules/getting-started).
### 2. Present challenge
If the action state is `CHALLENGE_REQUIRED` then you can present an email OTP challenge using the [Web SDK](/sdks/client/web/setup) or [Mobile SDK](/sdks/client/mobile/setup).
```ts Web theme={null}
// Set token from the track response
authsignal.setToken("eyJhbGciOiJ...");
// Send the user an email OTP code
// You can call this multiple times via a 'resend' button
await authsignal.email.challenge();
// Verify the inputted code matches the original code
const response = await authsignal.email.verify({ code: "123456" });
// Obtain a new token
const token = response.token;
```
```swift iOS theme={null}
// Set token from the track response
authsignal.setToken("eyJhbGciOiJ...")
// Send the user an email OTP code
// You can call this multiple times via a 'resend' button
await authsignal.email.challenge()
// Verify the inputted code matches the original code
let response = await authsignal.email.verify(code: "123456")
// Obtain a new token
let token = response.token
```
```kotlin Android theme={null}
// Set token from the track response
authsignal.setToken("eyJhbGciOiJ...")
// Send the user an email OTP code
// You can call this multiple times via a 'resend' button
authsignal.email.challenge()
// Verify the inputted code matches the original code
val response = authsignal.email.verify(code = "123456")
// Obtain a new token
val token = response.token
```
```ts React Native theme={null}
// Set token from the track response
await authsignal.setToken("eyJhbGciOiJ...");
// Send the user an email OTP code
// You can call this multiple times via a 'resend' button
await authsignal.email.challenge();
// Verify the inputted code matches the original code
const response = await authsignal.email.verify({ code: "123456" });
// Obtain a new token
const token = response.token;
```
```dart Flutter theme={null}
// Set token from the track response
await authsignal.setToken("eyJhbGciOiJ...");
// Send the user an email OTP code
// You can call this multiple times via a 'resend' button
await authsignal.email.challenge();
// Verify the inputted code matches the original code
final response = await authsignal.email.verify(code: "123456");
// Obtain a new token
final token = response.token;
```
```js theme={null}
// Launch the pre-built UI with the URL from the track response
const result = await authsignal.launch(url, { mode: "popup" });
// Obtain a token to validate in the next step
if (result.token) {
const token = result.token;
}
```
### 3. Validate action
Use the new token obtained from the client SDK to validate the action on your backend.
```ts Node.js theme={null}
const response = await authsignal.validateChallenge({
action: "signIn",
token: "eyJhbGciOiJIUzI....",
});
if (response.state === "CHALLENGE_SUCCEEDED") {
// User completed challenge successfully
}
```
```csharp C# theme={null}
var request = new ValidateChallengeRequest(
Action: "signIn",
Token: "eyJhbGciOiJIUzI...."
);
var response = await authsignal.ValidateChallenge(request);
if (response.State == UserActionState.CHALLENGE_SUCCEEDED) {
// User completed challenge successfully
}
```
```java Java theme={null}
ValidateChallengeRequest request = new ValidateChallengeRequest();
request.action = "signIn";
request.token = "eyJhbGciOiJIUzI....";
ValidateChallengeResponse response = authsignal.validateChallenge(request).get();
if (response.state == UserActionState.CHALLENGE_SUCCEEDED) {
// User completed challenge successfully
}
```
```ruby Ruby theme={null}
response = Authsignal.validate_challenge(action: "signIn", token: "eyJhbGciOiJIUzI....")
if response[:state] == "CHALLENGE_SUCCEEDED"
# User completed challenge successfully
end
```
```python Python theme={null}
response = authsignal.validate_challenge(action="signIn", token="eyJhbGciOiJIUzI....")
if response["state"] == "CHALLENGE_SUCCEEDED":
# User completed challenge successfully
```
```php PHP theme={null}
$response = Authsignal::validateChallenge(action: "signIn", token: "eyJhbGciOiJIUzI....");
if ($response["state"] === "CHALLENGE_SUCCEEDED") {
# User completed challenge successfully
}
```
```go Go theme={null}
response, err := client.ValidateChallenge(
ValidateChallengeRequest{
Action: "signIn",
Token: "eyJhbGciOiJ...",
},
)
if response.State == "CHALLENGE_SUCCEEDED" {
// User completed challenge successfully
}
```
If the action state shows that the email OTP challenge was completed successfully, you can let the user proceed with the action.
## Enrollment
**Scenario** - Enroll users in email OTP while they’re authenticated so it can be used later as a
method for adaptive MFA.
To use email OTP for adaptive MFA, users must be **enrolled** with email OTP as an authentication method.
This means their email address has previously been verified and can be trusted.
The following steps demonstrate how to implement an enrollment flow using a [Server SDK](/sdks/server/overview).
### 1. Initiate challenge
Call [Initiate Challenge](/sdks/server/challenges#initiate-challenge) to send an OTP to an email address.
```ts Node.js theme={null}
const request = {
verificationMethod: "EMAIL_OTP",
action: "enrollEmail",
email: "jane.smith@authsignal.com",
userId: "dc58c6dc-a1fd-4a4f-8e2f-846636dd4833",
scope: "add:authenticators",
};
const response = await authsignal.challenge(request);
const challengeId = response.challengeId;
```
```csharp C# theme={null}
var request = new ChallengeRequest(
VerificationMethod: VerificationMethod.EMAIL_OTP,
Action: "enrollEmail",
Email: "jane.smith@authsignal.com",
UserId: "dc58c6dc-a1fd-4a4f-8e2f-846636dd4833",
Scope: "add:authenticators",
);
var response = await authsignal.challenge(request);
var challengeId = response.ChallengeId;
```
```java Java theme={null}
ChallengeRequest request = new ChallengeRequest();
request.verificationMethod = VerificationMethodType.EMAIL_OTP;
request.action = "enrollEmail";
request.email = "jane.smith@authsignal.com";
request.userId = "dc58c6dc-a1fd-4a4f-8e2f-846636dd4833";
request.scope = "add:authenticators";
ChallengeResponse response = authsignal.challenge(request).get();
String challengeId = response.challengeId;
```
```ruby Ruby theme={null}
response = Authsignal.challenge(
verification_method: "EMAIL_OTP",
action: "enrollEmail",
email: "jane.smith@authsignal.com",
user_id: "dc58c6dc-a1fd-4a4f-8e2f-846636dd4833",
scope: "add:authenticators",
)
challenge_id = response[:challenge_id]
```
```go Go theme={null}
response, err := client.Challenge(
ChallengeRequest{
VerificationMethod: "EMAIL_OTP",
Action: "enrollEmail",
Email: "jane.smith@authsignal.com",
UserId: "dc58c6dc-a1fd-4a4f-8e2f-846636dd4833",
Scope: "add:authenticators",
},
)
challengeId := response.challengeId
```
The **add:authenticators** scope is required to enroll a new email OTP authenticator for an existing user.
This scope should only be used **when the user is in an already authenticated state**.
For more information on using scopes safely refer to our documentation on [authenticator binding](/advanced-usage/authenticator-binding).
### 2. Verify challenge
Once the user inputs the OTP code, call [Verify Challenge](/sdks/server/challenges#verify-challenge) to verify it.
```ts Node.js theme={null}
const request = {
challengeId: "3a991a14-690c-492b-a5e5-02b9056a4b7d",
verificationCode: "123456",
};
const response = await authsignal.verify(request);
const isVerified = response.isVerified;
```
```csharp C# theme={null}
var request = new VerifyRequest(
ChallengeId: "3a991a14-690c-492b-a5e5-02b9056a4b7d",
VerificationCode: "123456"
);
var response = await authsignal.Verify(request);
var isVerified = response.IsVerified;
```
```java Java theme={null}
VerifyRequest request = new VerifyRequest();
request.challengeId = "3a991a14-690c-492b-a5e5-02b9056a4b7d";
request.verificationCode = "123456";
VerifyResponse response = authsignal.verify(request).get();
boolean isVerified = response.isVerified;
```
```ruby Ruby theme={null}
response = Authsignal.verify(
challenge_id: "3a991a14-690c-492b-a5e5-02b9056a4b7d",
verification_code: "123456",
)
is_verified = response[:is_verified]
```
```go Go theme={null}
response, err := client.Verify(
VerifyRequest{
ChallengeId: "3a991a14-690c-492b-a5e5-02b9056a4b7d",
VerificationCode: "123456",
},
)
isVerified := response.IsVerified
```
## Update email
**Scenario** - Let users update their email address while they’re authenticated, completing an OTP
challenge to verify the new email.
The following steps demonstrate how to implement an update email address flow using a [Server SDK](/sdks/server/overview).
### 1. Initiate challenge
Call [Initiate Challenge](/sdks/server/challenges#initiate-challenge) to send an OTP to the user's new email address.
```ts Node.js theme={null}
const request = {
verificationMethod: "EMAIL_OTP",
action: "updateEmail",
email: "jane.smith@authsignal.com",
userId: "dc58c6dc-a1fd-4a4f-8e2f-846636dd4833",
scope: "update:authenticators",
};
const response = await authsignal.challenge(request);
const challengeId = response.challengeId;
```
```csharp C# theme={null}
var request = new ChallengeRequest(
VerificationMethod: VerificationMethod.EMAIL_OTP,
Action: "updateEmail",
Email: "jane.smith@authsignal.com",
UserId: "dc58c6dc-a1fd-4a4f-8e2f-846636dd4833",
Scope: "update:authenticators",
);
var response = await authsignal.challenge(request);
var challengeId = response.ChallengeId;
```
```java Java theme={null}
ChallengeRequest request = new ChallengeRequest();
request.verificationMethod = VerificationMethodType.EMAIL_OTP;
request.action = "updateEmail";
request.email = "jane.smith@authsignal.com";
request.userId = "dc58c6dc-a1fd-4a4f-8e2f-846636dd4833";
request.scope = "update:authenticators";
ChallengeResponse response = authsignal.challenge(request).get();
String challengeId = response.challengeId;
```
```ruby Ruby theme={null}
response = Authsignal.challenge(
verification_method: "EMAIL_OTP",
action: "updateEmail",
email: "jane.smith@authsignal.com",
user_id: "dc58c6dc-a1fd-4a4f-8e2f-846636dd4833",
scope: "update:authenticators",
)
challenge_id = response[:challenge_id]
```
```go Go theme={null}
response, err := client.Challenge(
ChallengeRequest{
VerificationMethod: "EMAIL_OTP",
Action: "updateEmail",
Email: "jane.smith@authsignal.com",
UserId: "dc58c6dc-a1fd-4a4f-8e2f-846636dd4833",
Scope: "update:authenticators",
},
)
challengeId := response.challengeId
```
The **update:authenticators** scope is required to update a user's existing email OTP authenticator to change the email address.
This scope should only be used **when the user is in an already authenticated state**.
For more information on using scopes safely refer to our documentation on [authenticator binding](/advanced-usage/authenticator-binding).
### 2. Verify challenge
Once the user inputs the OTP code, call [Verify Challenge](/sdks/server/challenges#verify-challenge) to verify it.
```ts Node.js theme={null}
const request = {
challengeId: "3a991a14-690c-492b-a5e5-02b9056a4b7d",
verificationCode: "123456",
};
const response = await authsignal.verify(request);
const isVerified = response.isVerified;
```
```csharp C# theme={null}
var request = new VerifyRequest(
ChallengeId: "3a991a14-690c-492b-a5e5-02b9056a4b7d",
VerificationCode: "123456"
);
var response = await authsignal.Verify(request);
var isVerified = response.IsVerified;
```
```java Java theme={null}
VerifyRequest request = new VerifyRequest();
request.challengeId = "3a991a14-690c-492b-a5e5-02b9056a4b7d";
request.verificationCode = "123456";
VerifyResponse response = authsignal.verify(request).get();
boolean isVerified = response.isVerified;
```
```ruby Ruby theme={null}
response = Authsignal.verify(
challenge_id: "3a991a14-690c-492b-a5e5-02b9056a4b7d",
verification_code: "123456",
)
is_verified = response[:is_verified]
```
```go Go theme={null}
response, err := client.Verify(
VerifyRequest{
ChallengeId: "3a991a14-690c-492b-a5e5-02b9056a4b7d",
VerificationCode: "123456",
},
)
isVerified := response.IsVerified
```
## Verified emails
**Scenario** - Enroll or update an email OTP authenticator for a user when you've already verified
their email address in another system, so it can be used later as a method for adaptive MFA.
In some cases you may have already verified a user's email address using another system.
This means the user can be enrolled without having to complete an email OTP challenge.
```ts Node.js theme={null}
const request = {
userId: "dc58c6dc-a1fd-4a4f-8e2f-846636dd4833",
attributes: {
verificationMethod: "EMAIL_OTP",
email: "jane.smith@authsignal.com",
},
};
const response = authsignal.enrollVerifiedAuthenticator(request);
```
```csharp C# theme={null}
var request = new EnrollVerifiedAuthenticatorRequest(
UserId: "dc58c6dc-a1fd-4a4f-8e2f-846636dd4833",
Attributes: new EnrollVerifiedAuthenticatorAttributes(
VerificationMethod: VerificationMethod.EMAIL_OTP,
Email: "jane.smith@authsignal.com"
)
);
var response = await authsignal.EnrollVerifiedAuthenticator(request);
```
```java Java theme={null}
EnrollVerifiedAuthenticatorRequest request = new EnrollVerifiedAuthenticatorRequest();
request.userId = "dc58c6dc-a1fd-4a4f-8e2f-846636dd4833";
request.attributes = new EnrollVerifiedAuthenticatorAttributes();
request.attributes.verificationMethod = VerificationMethodType.EMAIL_OTP;
request.attributes.email = "jane.smith@authsignal.com";
authsignal.enrollVerifiedAuthenticator(request).get();
```
```ruby Ruby theme={null}
Authsignal.enroll_verified_authenticator(
user_id: "dc58c6dc-a1fd-4a4f-8e2f-846636dd4833",
attributes:{
verification_method: "EMAIL_OTP",
email: "jane.smith@authsignal.com"
}
)
```
```python Python theme={null}
response = authsignal.enroll_verified_authenticator(
user_id="dc58c6dc-a1fd-4a4f-8e2f-846636dd4833",
attributes={
"verificationMethod": "EMAIL_OTP",
"email": "jane.smith@authsignal.com"
}
)
```
```php PHP theme={null}
$response = Authsignal::enrollVerifiedAuthenticator([
'userId' => "dc58c6dc-a1fd-4a4f-8e2f-846636dd4833",
'attributes' => [
"verificationMethod" => "EMAIL_OTP",
"email" => "jane.smith@authsignal.com"
]
]);
```
```go Go theme={null}
response, err := client.EnrollVerifiedAuthenticator(
EnrollVerifiedAuthenticatorRequest{
UserId: "dc58c6dc-a1fd-4a4f-8e2f-846636dd4833",
Attributes: &EnrollVerifiedAuthenticatorAttributes{
VerificationMethod: "EMAIL_OTP",
Email: "jane.smith@authsignal.com",
},
},
)
```
This same call can also be used to **update** a verified email address to a new value which has also been verified externally.
## Next steps
* [Pre-built UI](/implementation-options/prebuilt-ui/overview) - Rapidly deploy email OTP challenges using our pre-built UI
* [Web SDK](/sdks/client/web/setup) - Implement email OTP challenges while building your own UI
* [Mobile SDK](/sdks/client/mobile/setup) - Implement email OTP challenges in native mobile apps
* [Adaptive MFA](/actions-rules/rules/adaptive-mfa) - Set up smart rules to trigger authentication based on risk
* [Passkeys](/authentication-methods/passkey/web-sdk) - Offer the most secure and user-friendly passwordless authentication
1. Log in to your [Bird account](https://bird.com/)
2. Get your **Access key** and **Workspace ID** from your Bird settings
3. Create or locate an email channel and note the **Channel ID**
4. Create an email template in Bird and note the **Project ID/Template ID**
5. Publish your template and note the **Published version ID**
6. In the Authsignal Portal, select **Bird** as your email provider
7. Enter your Bird access key, workspace ID, channel ID, project ID/template ID, published version ID, and select your default language
1. Log in to your [Mailjet account](https://app.mailjet.com/)
2. Navigate to **API > API Key Management** and get your **API key** and **Secret key**
3. Navigate to **Content > Email Templates** and get your **Template ID**
4. In the Authsignal Portal, select **Mailjet** as your email provider
5. Enter your Mailjet **API key**, **API secret key**, and **Template ID**
1. Log in to your [Mailgun account](https://app.mailgun.com/)
2. Click on your profile icon in the top-right corner and select **API Keys**
3. Click **Add New API Key** to generate a new API key
4. Note your **Sending domain** from the Mailgun dashboard
5. In the Authsignal Portal, select **Mailgun** as your email provider
6. Enter your Mailgun **API key**, **Sending domain**, **Template name** (optional), and select **API URL** for your region
1. Log in to your [Mailchimp account](https://mailchimp.com/)
2. Go to **Settings** and click on **API Keys**
3. Click **Create API Key** and give it a description. Copy the generated key
4. In the Authsignal Portal, select **Mandrill** as your email provider
5. Enter your Mandrill **API key** and **Template name**
1. Log in to your [SendGrid account](https://login.sendgrid.com/)
2. Go to **Settings** and click on **API Keys**
3. Click **Create New Key** and ensure either **Full Access** or **Custom Access** with the **Mail Send** permission is selected. Copy the generated key
4. Create a new [dynamic template](https://mc.sendgrid.com/dynamic-templates/new) in SendGrid and copy the **Template ID**
5. In the Authsignal Portal, select **SendGrid** as your email provider
6. Enter your SendGrid **API key**, **Template ID**, **From email**, and an optional **From name**
For detailed instructions on setting up a webhook for email delivery, see the [webhooks documentation](/advanced-usage/webhooks/introduction).
Authsignal supports sending with an SMTP server of your choosing.
1. In the Authsignal Portal, select **SMTP** as your email provider.
2. Enter your **SMTP Server Address**, **Port**, **Username**, **Password**, **From Address**, and an optional **From name**
You can use **Authsignal** as an email provider for development, but it's recommended to use an
alternative provider in production for more control over emails.
### Email template variables
The following template variables are available for use in your email template:
The verification code.
The action that the user is performing.
The ID of the user.
The user agent associated with the action.
The IP address associated with the action.
### Custom template variables
You can forward [custom data points](/actions-rules/rules/custom-data-points) to your email provider as additional template variables.
This is useful for personalizing emails with data specific to your application, such as a user's account ID or a transaction amount.
To configure this, navigate to your [email OTP settings](https://portal.authsignal.com/organisations/tenants/authenticators/email_otp) in the Authsignal Portal and select which custom data points to include under **Custom template variables**.
Custom data points are prefixed by model type:
* **User data points** are prefixed with `user_` (e.g. `user_accountId`)
* **Action data points** are prefixed with `action_` (e.g. `action_transactionAmount`)
Custom data points must be [registered in the Authsignal Portal](https://portal.authsignal.com/organisations/tenants/custom_data_points) before they can be selected.
Only registered data points with values set on the user or action will be included.
## SDK setup
### Server SDK
Initialize the SDK using your secret key from the [API keys page](https://portal.authsignal.com/organisations/tenants/api) and the [API URL](/sdks/server/setup#regions) for your region.
```ts Node.js theme={null}
import { Authsignal } from "@authsignal/node";
const authsignal = new Authsignal({
apiSecretKey: "YOUR_SECRET_KEY",
apiUrl: "YOUR_API_URL",
});
```
```csharp C# theme={null}
using Authsignal;
var authsignal = new AuthsignalClient(
apiSecretKey: "YOUR_SECRET_KEY",
apiUrl: "YOUR_API_URL"
);
```
```java Java theme={null}
import com.authsignal.AuthsignalClient;
AuthsignalClient authsignal = new AuthsignalClient(
"YOUR_SECRET_KEY",
"YOUR_API_URL"
);
```
```ruby Ruby theme={null}
require 'authsignal'
Authsignal.setup do |config|
config.api_secret_key = ENV["YOUR_SECRET_KEY"]
config.api_url = "YOUR_API_URL"
end
```
```python Python theme={null}
from authsignal.client import AuthsignalClient
authsignal = AuthsignalClient(
api_secret_key="YOUR_SECRET_KEY",
api_url="YOUR_API_URL"
)
```
```php PHP theme={null}
Authsignal::setApiSecretKey("YOUR_SECRET_KEY");
Authsignal::setApiUrl("YOUR_API_URL");
```
```go Go theme={null}
import "github.com/authsignal/authsignalgo/v2/client"
client := NewAuthsignalClient(
"YOUR_SECRET_KEY",
"YOUR_API_URL",
)
```
### Client SDK
Initialize the [Web SDK](/sdks/client/web/setup) or [Mobile SDK](/sdks/client/mobile/setup) using your tenant ID from the [API keys page](https://portal.authsignal.com/organisations/tenants/api) and your [API URL](/sdks/server/setup#regions).
```ts Web theme={null}
import { Authsignal } from "@authsignal/browser";
const authsignal = new Authsignal({
tenantId: "YOUR_TENANT_ID",
baseUrl: "YOUR_API_URL",
});
```
```swift iOS theme={null}
import Authsignal
let authsignal = Authsignal(
tenantID: "YOUR_TENANT_ID",
baseURL: "YOUR_API_URL"
)
```
```kotlin Android theme={null}
import com.authsignal.Authsignal
val authsignal = Authsignal(
tenantID = "YOUR_TENANT_ID",
baseURL = "YOUR_API_URL",
)
```
```ts React Native theme={null}
import { Authsignal } from "react-native-authsignal";
const authsignal = new Authsignal({
tenantID: "YOUR_TENANT_ID",
baseURL: "YOUR_API_URL",
});
```
```dart Flutter theme={null}
import 'package:authsignal_flutter/authsignal_flutter.dart';
final authsignal = Authsignal(
"YOUR_TENANT_ID",
baseURL: "YOUR_API_URL"
);
```
## Sign-in
**Scenario** - Let users sign-in with email OTP as the **1st factor**.
Our [Server SDKs](/sdks/server) include methods to initiate and verify an OTP challenge for a given email address.
These methods are well-suited for passwordless sign-in scenarios where you need to authenticate a user with email OTP as a primary factor.
### 1. Initiate challenge
Call [Initiate Challenge](/sdks/server/challenges#initiate-challenge) to send an OTP to an email address.
```ts Node.js theme={null}
const request = {
verificationMethod: "EMAIL_OTP",
action: "signInWithEmail",
email: "jane.smith@authsignal.com",
};
const response = await authsignal.challenge(request);
const challengeId = response.challengeId;
```
```csharp C# theme={null}
var request = new ChallengeRequest(
VerificationMethod: VerificationMethod.EMAIL_OTP,
Action: "signInWithEmail",
Email: "jane.smith@authsignal.com"
);
var response = await authsignal.challenge(request);
var challengeId = response.ChallengeId;
```
```java Java theme={null}
ChallengeRequest request = new ChallengeRequest();
request.verificationMethod = VerificationMethodType.EMAIL_OTP;
request.action = "signInWithEmail";
request.email = "jane.smith@authsignal.com";
ChallengeResponse response = authsignal.challenge(request).get();
String challengeId = response.challengeId;
```
```ruby Ruby theme={null}
response = Authsignal.challenge(
verification_method: "EMAIL_OTP",
action: "signInWithEmail",
email: "jane.smith@authsignal.com",
)
challenge_id = response[:challenge_id]
```
```go Go theme={null}
response, err := client.Challenge(
ChallengeRequest{
VerificationMethod: "EMAIL_OTP",
Action: "signInWithEmail",
Email: "jane.smith@authsignal.com",
},
)
challengeId := response.challengeId
```
You can choose a value for the [action](/actions-rules/actions/getting-started) here which best describes what the user is doing in your app (e.g. signing in with email).
It will be used to track user activity in the Authsignal Portal.
### 2. Verify challenge
Once the user inputs the OTP code, call [Verify Challenge](/sdks/server/challenges#verify-challenge) to verify it.
```ts Node.js theme={null}
const request = {
challengeId: "3a991a14-690c-492b-a5e5-02b9056a4b7d",
verificationCode: "123456",
};
const response = await authsignal.verify(request);
const isVerified = response.isVerified;
```
```csharp C# theme={null}
var request = new VerifyRequest(
ChallengeId: "3a991a14-690c-492b-a5e5-02b9056a4b7d",
VerificationCode: "123456"
);
var response = await authsignal.Verify(request);
var isVerified = response.IsVerified;
```
```java Java theme={null}
VerifyRequest request = new VerifyRequest();
request.challengeId = "3a991a14-690c-492b-a5e5-02b9056a4b7d";
request.verificationCode = "123456";
VerifyResponse response = authsignal.verify(request).get();
boolean isVerified = response.isVerified;
```
```ruby Ruby theme={null}
response = Authsignal.verify(
challenge_id: "3a991a14-690c-492b-a5e5-02b9056a4b7d",
verification_code: "123456",
)
is_verified = response[:is_verified]
```
```go Go theme={null}
response, err := client.Verify(
VerifyRequest{
ChallengeId: "3a991a14-690c-492b-a5e5-02b9056a4b7d",
VerificationCode: "123456",
},
)
isVerified := response.IsVerified
```
### 3. Claim challenge
Now that the challenge has been verified, you can lookup the user in your IdP or DB based on their email.
For passwordless flows with a combined sign-up and sign-in UX, you may need to create the user at this point if no account exists.
Then claim the challenge once you know the primary user ID associated with the email.
```ts Node.js theme={null}
const request = {
challengeId: "3a991a14-690c-492b-a5e5-02b9056a4b7d",
userId: "dc58c6dc-a1fd-4a4f-8e2f-846636dd4833",
};
const response = await authsignal.claimChallenge(request);
```
```csharp C# theme={null}
var request = new ClaimChallengeRequest(
ChallengeId: "3a991a14-690c-492b-a5e5-02b9056a4b7d",
UserId: "dc58c6dc-a1fd-4a4f-8e2f-846636dd4833"
);
var response = await authsignal.ClaimChallenge(request);
```
```java Java theme={null}
ClaimChallengeRequest request = new ClaimChallengeRequest();
request.challengeId = "3a991a14-690c-492b-a5e5-02b9056a4b7d";
request.userId = "dc58c6dc-a1fd-4a4f-8e2f-846636dd4833";
ClaimChallengeResponse response = authsignal.claimChallenge(request).get();
```
```ruby Ruby theme={null}
response = Authsignal.claim_challenge(
challenge_id: "3a991a14-690c-492b-a5e5-02b9056a4b7d",
user_id: "dc58c6dc-a1fd-4a4f-8e2f-846636dd4833",
)
```
```go Go theme={null}
response, err := client.ClaimChallenge(
ClaimChallengeRequest{
ChallengeId: "3a991a14-690c-492b-a5e5-02b9056a4b7d",
UserId: "dc58c6dc-a1fd-4a4f-8e2f-846636dd4833",
},
)
```
This final step is important because it **attributes activity to the correct user and ensures observability in the Authsignal Portal**.
## Adaptive MFA
**Scenario** - Challenge users with email OTP as a **2nd factor** and use rules to decide when and
where in your app to trigger the challenge.
The following steps demonstrate how to implement adaptive MFA with email OTP - either at sign-in or as step-up authentication when the user performs a sensitive action in your app (e.g. making a payment).
In this scenario we assume the user has already been identified by authenticating with another method (e.g. username and password) and is being prompted to complete an email OTP challenge as a 2nd factor.
### 1. Track action
Use a [Server SDK](/sdks/server) to track an action in your backend.
This step can apply [rules](/actions-rules/rules/getting-started) to determine if a challenge is required.
```ts Node.js theme={null}
const request = {
userId: "dc58c6dc-a1fd-4a4f-8e2f-846636dd4833",
action: "signIn",
attributes: {
email: "jane.smith@authsignal.com",
},
};
const response = await authsignal.track(request);
if (response.state === "CHALLENGE_REQUIRED") {
// Obtain token to present challenge
const token = response.token;
}
```
```csharp C# theme={null}
var request = new TrackRequest(
UserId: "dc58c6dc-a1fd-4a4f-8e2f-846636dd4833",
Action: "signIn",
Attributes: new TrackAttributes(
Email: "jane.smith@authsignal.com"
)
);
var response = await authsignal.Track(request);
if (response.State == UserActionState.CHALLENGE_REQUIRED)
{
// Obtain token to present challenge
var token = response.Token;
}
```
```java Java theme={null}
TrackRequest request = new TrackRequest();
request.userId = "dc58c6dc-a1fd-4a4f-8e2f-846636dd4833";
request.action = "signIn";
request.attributes = new TrackAttributes();
request.attributes.email = "jane.smith@authsignal.com";
TrackResponse response = authsignal.track(request).get();
if (response.state.equals(UserActionState.CHALLENGE_REQUIRED)) {
// Obtain token to present challenge
String token = response.token;
}
```
```ruby Ruby theme={null}
response = Authsignal.track({
user_id: 'dc58c6dc-a1fd-4a4f-8e2f-846636dd4833',
action: 'signIn',
attributes: {
email: 'jane.smith@authsignal.com'
}
})
case response[:state]
when "CHALLENGE_REQUIRED"
# Obtain token to present challenge
token = response[:token]
end
```
```python Python theme={null}
response = authsignal.track(
user_id="dc58c6dc-a1fd-4a4f-8e2f-846636dd4833",
action="signIn",
attributes={
"email": "jane.smith@authsignal.com"
}
)
if response["state"] == "CHALLENGE_REQUIRED":
# Obtain token to present challenge
token = response["token"]
```
```php PHP theme={null}
$response = $authsignal->track([
'userId' => 'dc58c6dc-a1fd-4a4f-8e2f-846636dd4833',
'action' => 'signIn',
'attributes' => [
'email' => 'jane.smith@authsignal.com'
]
]);
switch ($response['state']) {
case 'CHALLENGE_REQUIRED':
// Obtain token to present challenge
$token = $response['token'];
}
```
```go Go theme={null}
response, err := client.Track(
TrackRequest{
UserId: "dc58c6dc-a1fd-4a4f-8e2f-846636dd4833",
Action: "signIn",
Attributes: &TrackAttributes{
Email: "jane.smith@authsignal.com",
},
},
)
switch response.State {
case "CHALLENGE_REQUIRED":
// Obtain token to present challenge
token := response.Token
}
```
```ts Node.js theme={null}
const request = {
userId: "dc58c6dc-a1fd-4a4f-8e2f-846636dd4833",
action: "signIn",
attributes: {
email: "jane.smith@authsignal.com",
redirectUrl: "https://yourapp.com/callback",
},
};
const response = await authsignal.track(request);
if (response.state === "CHALLENGE_REQUIRED") {
// Return URL to your frontend to launch pre-built UI
const url = response.url;
}
```
```csharp C# theme={null}
var request = new TrackRequest(
UserId: "dc58c6dc-a1fd-4a4f-8e2f-846636dd4833",
Action: "signIn",
Attributes: new TrackAttributes(
Email: "jane.smith@authsignal.com",
RedirectUrl: "https://yourapp.com/callback",
)
);
var response = await authsignal.Track(request);
if (response.State == UserActionState.CHALLENGE_REQUIRED)
{
// Return URL to your frontend to launch pre-built UI
var url = response.Url;
}
```
```java Java theme={null}
TrackRequest request = new TrackRequest();
request.userId = "dc58c6dc-a1fd-4a4f-8e2f-846636dd4833";
request.action = "signIn";
request.attributes = new TrackAttributes();
request.attributes.email = "jane.smith@authsignal.com";
request.attributes.redirectUrl = "https://yourapp.com/callback";
TrackResponse response = authsignal.track(trackRequest).get();
if (response.state.equals(UserActionState.CHALLENGE_REQUIRED)) {
// Return URL to your frontend to launch pre-built UI
String url = response.url;
}
```
```ruby Ruby theme={null}
response = Authsignal.track({
user_id: 'dc58c6dc-a1fd-4a4f-8e2f-846636dd4833',
action: 'signIn',
attributes: {
email: 'jane.smith@authsignal.com',
redirect_url: "https://yourapp.com/callback"
}
})
case response[:state]
when "CHALLENGE_REQUIRED"
# Return URL to your frontend to launch pre-built UI
url = response[:url]
end
```
```python Python theme={null}
response = authsignal.track(
user_id="dc58c6dc-a1fd-4a4f-8e2f-846636dd4833",
action="signIn",
attributes={
"email": "jane.smith@authsignal.com",
"redirectUrl": "https://yourapp.com/callback"
}
)
if response["state"] == "CHALLENGE_REQUIRED":
# Return URL to your frontend to launch pre-built UI
url = response["url"]
```
```php PHP theme={null}
$response = $authsignal->track([
'userId' => 'dc58c6dc-a1fd-4a4f-8e2f-846636dd4833',
'action' => 'signIn',
'attributes' => [
'email' => 'jane.smith@authsignal.com'
'redirectUrl' => 'https://yourapp.com/callback'
]
]);
switch ($response['state']) {
case 'CHALLENGE_REQUIRED':
// Return URL to your frontend to launch pre-built UI
$url = $response['url'];
}
```
```go Go theme={null}
response, err := client.Track(
TrackRequest{
UserId: "dc58c6dc-a1fd-4a4f-8e2f-846636dd4833",
Action: "signIn",
Attributes: &TrackAttributes{
Email: "jane.smith@authsignal.com",
RedirectUrl: "https://yourapp.com/callback",
},
},
)
switch response.State {
case "CHALLENGE_REQUIRED":
// Return URL to your frontend to launch pre-built UI
url := response.Url
}
```
You can choose a value for the [action](/actions-rules/actions/getting-started) here which best describes what the user is doing in your app (e.g. `signIn` or `createPayment`).
Each action can have its own set of rules.
To learn more about using rules and handling different action states refer to our documentation on [actions](/actions-rules/actions/getting-started) and [rules](/actions-rules/rules/getting-started).
### 2. Present challenge
If the action state is `CHALLENGE_REQUIRED` then you can present an email OTP challenge using the [Web SDK](/sdks/client/web/setup) or [Mobile SDK](/sdks/client/mobile/setup).
```ts Web theme={null}
// Set token from the track response
authsignal.setToken("eyJhbGciOiJ...");
// Send the user an email OTP code
// You can call this multiple times via a 'resend' button
await authsignal.email.challenge();
// Verify the inputted code matches the original code
const response = await authsignal.email.verify({ code: "123456" });
// Obtain a new token
const token = response.token;
```
```swift iOS theme={null}
// Set token from the track response
authsignal.setToken("eyJhbGciOiJ...")
// Send the user an email OTP code
// You can call this multiple times via a 'resend' button
await authsignal.email.challenge()
// Verify the inputted code matches the original code
let response = await authsignal.email.verify(code: "123456")
// Obtain a new token
let token = response.token
```
```kotlin Android theme={null}
// Set token from the track response
authsignal.setToken("eyJhbGciOiJ...")
// Send the user an email OTP code
// You can call this multiple times via a 'resend' button
authsignal.email.challenge()
// Verify the inputted code matches the original code
val response = authsignal.email.verify(code = "123456")
// Obtain a new token
val token = response.token
```
```ts React Native theme={null}
// Set token from the track response
await authsignal.setToken("eyJhbGciOiJ...");
// Send the user an email OTP code
// You can call this multiple times via a 'resend' button
await authsignal.email.challenge();
// Verify the inputted code matches the original code
const response = await authsignal.email.verify({ code: "123456" });
// Obtain a new token
const token = response.token;
```
```dart Flutter theme={null}
// Set token from the track response
await authsignal.setToken("eyJhbGciOiJ...");
// Send the user an email OTP code
// You can call this multiple times via a 'resend' button
await authsignal.email.challenge();
// Verify the inputted code matches the original code
final response = await authsignal.email.verify(code: "123456");
// Obtain a new token
final token = response.token;
```
```js theme={null}
// Launch the pre-built UI with the URL from the track response
const result = await authsignal.launch(url, { mode: "popup" });
// Obtain a token to validate in the next step
if (result.token) {
const token = result.token;
}
```
### 3. Validate action
Use the new token obtained from the client SDK to validate the action on your backend.
```ts Node.js theme={null}
const response = await authsignal.validateChallenge({
action: "signIn",
token: "eyJhbGciOiJIUzI....",
});
if (response.state === "CHALLENGE_SUCCEEDED") {
// User completed challenge successfully
}
```
```csharp C# theme={null}
var request = new ValidateChallengeRequest(
Action: "signIn",
Token: "eyJhbGciOiJIUzI...."
);
var response = await authsignal.ValidateChallenge(request);
if (response.State == UserActionState.CHALLENGE_SUCCEEDED) {
// User completed challenge successfully
}
```
```java Java theme={null}
ValidateChallengeRequest request = new ValidateChallengeRequest();
request.action = "signIn";
request.token = "eyJhbGciOiJIUzI....";
ValidateChallengeResponse response = authsignal.validateChallenge(request).get();
if (response.state == UserActionState.CHALLENGE_SUCCEEDED) {
// User completed challenge successfully
}
```
```ruby Ruby theme={null}
response = Authsignal.validate_challenge(action: "signIn", token: "eyJhbGciOiJIUzI....")
if response[:state] == "CHALLENGE_SUCCEEDED"
# User completed challenge successfully
end
```
```python Python theme={null}
response = authsignal.validate_challenge(action="signIn", token="eyJhbGciOiJIUzI....")
if response["state"] == "CHALLENGE_SUCCEEDED":
# User completed challenge successfully
```
```php PHP theme={null}
$response = Authsignal::validateChallenge(action: "signIn", token: "eyJhbGciOiJIUzI....");
if ($response["state"] === "CHALLENGE_SUCCEEDED") {
# User completed challenge successfully
}
```
```go Go theme={null}
response, err := client.ValidateChallenge(
ValidateChallengeRequest{
Action: "signIn",
Token: "eyJhbGciOiJ...",
},
)
if response.State == "CHALLENGE_SUCCEEDED" {
// User completed challenge successfully
}
```
If the action state shows that the email OTP challenge was completed successfully, you can let the user proceed with the action.
## Enrollment
**Scenario** - Enroll users in email OTP while they’re authenticated so it can be used later as a
method for adaptive MFA.
To use email OTP for adaptive MFA, users must be **enrolled** with email OTP as an authentication method.
This means their email address has previously been verified and can be trusted.
The following steps demonstrate how to implement an enrollment flow using a [Server SDK](/sdks/server/overview).
### 1. Initiate challenge
Call [Initiate Challenge](/sdks/server/challenges#initiate-challenge) to send an OTP to an email address.
```ts Node.js theme={null}
const request = {
verificationMethod: "EMAIL_OTP",
action: "enrollEmail",
email: "jane.smith@authsignal.com",
userId: "dc58c6dc-a1fd-4a4f-8e2f-846636dd4833",
scope: "add:authenticators",
};
const response = await authsignal.challenge(request);
const challengeId = response.challengeId;
```
```csharp C# theme={null}
var request = new ChallengeRequest(
VerificationMethod: VerificationMethod.EMAIL_OTP,
Action: "enrollEmail",
Email: "jane.smith@authsignal.com",
UserId: "dc58c6dc-a1fd-4a4f-8e2f-846636dd4833",
Scope: "add:authenticators",
);
var response = await authsignal.challenge(request);
var challengeId = response.ChallengeId;
```
```java Java theme={null}
ChallengeRequest request = new ChallengeRequest();
request.verificationMethod = VerificationMethodType.EMAIL_OTP;
request.action = "enrollEmail";
request.email = "jane.smith@authsignal.com";
request.userId = "dc58c6dc-a1fd-4a4f-8e2f-846636dd4833";
request.scope = "add:authenticators";
ChallengeResponse response = authsignal.challenge(request).get();
String challengeId = response.challengeId;
```
```ruby Ruby theme={null}
response = Authsignal.challenge(
verification_method: "EMAIL_OTP",
action: "enrollEmail",
email: "jane.smith@authsignal.com",
user_id: "dc58c6dc-a1fd-4a4f-8e2f-846636dd4833",
scope: "add:authenticators",
)
challenge_id = response[:challenge_id]
```
```go Go theme={null}
response, err := client.Challenge(
ChallengeRequest{
VerificationMethod: "EMAIL_OTP",
Action: "enrollEmail",
Email: "jane.smith@authsignal.com",
UserId: "dc58c6dc-a1fd-4a4f-8e2f-846636dd4833",
Scope: "add:authenticators",
},
)
challengeId := response.challengeId
```
The **add:authenticators** scope is required to enroll a new email OTP authenticator for an existing user.
This scope should only be used **when the user is in an already authenticated state**.
For more information on using scopes safely refer to our documentation on [authenticator binding](/advanced-usage/authenticator-binding).
### 2. Verify challenge
Once the user inputs the OTP code, call [Verify Challenge](/sdks/server/challenges#verify-challenge) to verify it.
```ts Node.js theme={null}
const request = {
challengeId: "3a991a14-690c-492b-a5e5-02b9056a4b7d",
verificationCode: "123456",
};
const response = await authsignal.verify(request);
const isVerified = response.isVerified;
```
```csharp C# theme={null}
var request = new VerifyRequest(
ChallengeId: "3a991a14-690c-492b-a5e5-02b9056a4b7d",
VerificationCode: "123456"
);
var response = await authsignal.Verify(request);
var isVerified = response.IsVerified;
```
```java Java theme={null}
VerifyRequest request = new VerifyRequest();
request.challengeId = "3a991a14-690c-492b-a5e5-02b9056a4b7d";
request.verificationCode = "123456";
VerifyResponse response = authsignal.verify(request).get();
boolean isVerified = response.isVerified;
```
```ruby Ruby theme={null}
response = Authsignal.verify(
challenge_id: "3a991a14-690c-492b-a5e5-02b9056a4b7d",
verification_code: "123456",
)
is_verified = response[:is_verified]
```
```go Go theme={null}
response, err := client.Verify(
VerifyRequest{
ChallengeId: "3a991a14-690c-492b-a5e5-02b9056a4b7d",
VerificationCode: "123456",
},
)
isVerified := response.IsVerified
```
## Update email
**Scenario** - Let users update their email address while they’re authenticated, completing an OTP
challenge to verify the new email.
The following steps demonstrate how to implement an update email address flow using a [Server SDK](/sdks/server/overview).
### 1. Initiate challenge
Call [Initiate Challenge](/sdks/server/challenges#initiate-challenge) to send an OTP to the user's new email address.
```ts Node.js theme={null}
const request = {
verificationMethod: "EMAIL_OTP",
action: "updateEmail",
email: "jane.smith@authsignal.com",
userId: "dc58c6dc-a1fd-4a4f-8e2f-846636dd4833",
scope: "update:authenticators",
};
const response = await authsignal.challenge(request);
const challengeId = response.challengeId;
```
```csharp C# theme={null}
var request = new ChallengeRequest(
VerificationMethod: VerificationMethod.EMAIL_OTP,
Action: "updateEmail",
Email: "jane.smith@authsignal.com",
UserId: "dc58c6dc-a1fd-4a4f-8e2f-846636dd4833",
Scope: "update:authenticators",
);
var response = await authsignal.challenge(request);
var challengeId = response.ChallengeId;
```
```java Java theme={null}
ChallengeRequest request = new ChallengeRequest();
request.verificationMethod = VerificationMethodType.EMAIL_OTP;
request.action = "updateEmail";
request.email = "jane.smith@authsignal.com";
request.userId = "dc58c6dc-a1fd-4a4f-8e2f-846636dd4833";
request.scope = "update:authenticators";
ChallengeResponse response = authsignal.challenge(request).get();
String challengeId = response.challengeId;
```
```ruby Ruby theme={null}
response = Authsignal.challenge(
verification_method: "EMAIL_OTP",
action: "updateEmail",
email: "jane.smith@authsignal.com",
user_id: "dc58c6dc-a1fd-4a4f-8e2f-846636dd4833",
scope: "update:authenticators",
)
challenge_id = response[:challenge_id]
```
```go Go theme={null}
response, err := client.Challenge(
ChallengeRequest{
VerificationMethod: "EMAIL_OTP",
Action: "updateEmail",
Email: "jane.smith@authsignal.com",
UserId: "dc58c6dc-a1fd-4a4f-8e2f-846636dd4833",
Scope: "update:authenticators",
},
)
challengeId := response.challengeId
```
The **update:authenticators** scope is required to update a user's existing email OTP authenticator to change the email address.
This scope should only be used **when the user is in an already authenticated state**.
For more information on using scopes safely refer to our documentation on [authenticator binding](/advanced-usage/authenticator-binding).
### 2. Verify challenge
Once the user inputs the OTP code, call [Verify Challenge](/sdks/server/challenges#verify-challenge) to verify it.
```ts Node.js theme={null}
const request = {
challengeId: "3a991a14-690c-492b-a5e5-02b9056a4b7d",
verificationCode: "123456",
};
const response = await authsignal.verify(request);
const isVerified = response.isVerified;
```
```csharp C# theme={null}
var request = new VerifyRequest(
ChallengeId: "3a991a14-690c-492b-a5e5-02b9056a4b7d",
VerificationCode: "123456"
);
var response = await authsignal.Verify(request);
var isVerified = response.IsVerified;
```
```java Java theme={null}
VerifyRequest request = new VerifyRequest();
request.challengeId = "3a991a14-690c-492b-a5e5-02b9056a4b7d";
request.verificationCode = "123456";
VerifyResponse response = authsignal.verify(request).get();
boolean isVerified = response.isVerified;
```
```ruby Ruby theme={null}
response = Authsignal.verify(
challenge_id: "3a991a14-690c-492b-a5e5-02b9056a4b7d",
verification_code: "123456",
)
is_verified = response[:is_verified]
```
```go Go theme={null}
response, err := client.Verify(
VerifyRequest{
ChallengeId: "3a991a14-690c-492b-a5e5-02b9056a4b7d",
VerificationCode: "123456",
},
)
isVerified := response.IsVerified
```
## Verified emails
**Scenario** - Enroll or update an email OTP authenticator for a user when you've already verified
their email address in another system, so it can be used later as a method for adaptive MFA.
In some cases you may have already verified a user's email address using another system.
This means the user can be enrolled without having to complete an email OTP challenge.
```ts Node.js theme={null}
const request = {
userId: "dc58c6dc-a1fd-4a4f-8e2f-846636dd4833",
attributes: {
verificationMethod: "EMAIL_OTP",
email: "jane.smith@authsignal.com",
},
};
const response = authsignal.enrollVerifiedAuthenticator(request);
```
```csharp C# theme={null}
var request = new EnrollVerifiedAuthenticatorRequest(
UserId: "dc58c6dc-a1fd-4a4f-8e2f-846636dd4833",
Attributes: new EnrollVerifiedAuthenticatorAttributes(
VerificationMethod: VerificationMethod.EMAIL_OTP,
Email: "jane.smith@authsignal.com"
)
);
var response = await authsignal.EnrollVerifiedAuthenticator(request);
```
```java Java theme={null}
EnrollVerifiedAuthenticatorRequest request = new EnrollVerifiedAuthenticatorRequest();
request.userId = "dc58c6dc-a1fd-4a4f-8e2f-846636dd4833";
request.attributes = new EnrollVerifiedAuthenticatorAttributes();
request.attributes.verificationMethod = VerificationMethodType.EMAIL_OTP;
request.attributes.email = "jane.smith@authsignal.com";
authsignal.enrollVerifiedAuthenticator(request).get();
```
```ruby Ruby theme={null}
Authsignal.enroll_verified_authenticator(
user_id: "dc58c6dc-a1fd-4a4f-8e2f-846636dd4833",
attributes:{
verification_method: "EMAIL_OTP",
email: "jane.smith@authsignal.com"
}
)
```
```python Python theme={null}
response = authsignal.enroll_verified_authenticator(
user_id="dc58c6dc-a1fd-4a4f-8e2f-846636dd4833",
attributes={
"verificationMethod": "EMAIL_OTP",
"email": "jane.smith@authsignal.com"
}
)
```
```php PHP theme={null}
$response = Authsignal::enrollVerifiedAuthenticator([
'userId' => "dc58c6dc-a1fd-4a4f-8e2f-846636dd4833",
'attributes' => [
"verificationMethod" => "EMAIL_OTP",
"email" => "jane.smith@authsignal.com"
]
]);
```
```go Go theme={null}
response, err := client.EnrollVerifiedAuthenticator(
EnrollVerifiedAuthenticatorRequest{
UserId: "dc58c6dc-a1fd-4a4f-8e2f-846636dd4833",
Attributes: &EnrollVerifiedAuthenticatorAttributes{
VerificationMethod: "EMAIL_OTP",
Email: "jane.smith@authsignal.com",
},
},
)
```
This same call can also be used to **update** a verified email address to a new value which has also been verified externally.
## Next steps
* [Pre-built UI](/implementation-options/prebuilt-ui/overview) - Rapidly deploy email OTP challenges using our pre-built UI
* [Web SDK](/sdks/client/web/setup) - Implement email OTP challenges while building your own UI
* [Mobile SDK](/sdks/client/mobile/setup) - Implement email OTP challenges in native mobile apps
* [Adaptive MFA](/actions-rules/rules/adaptive-mfa) - Set up smart rules to trigger authentication based on risk
* [Passkeys](/authentication-methods/passkey/web-sdk) - Offer the most secure and user-friendly passwordless authentication