> ## Documentation Index
> Fetch the complete documentation index at: https://docs.authsignal.com/llms.txt
> Use this file to discover all available pages before exploring further.
# Email magic link
> Send magic links via email for authentication and for verifying users' email addresses.
## Email provider setup
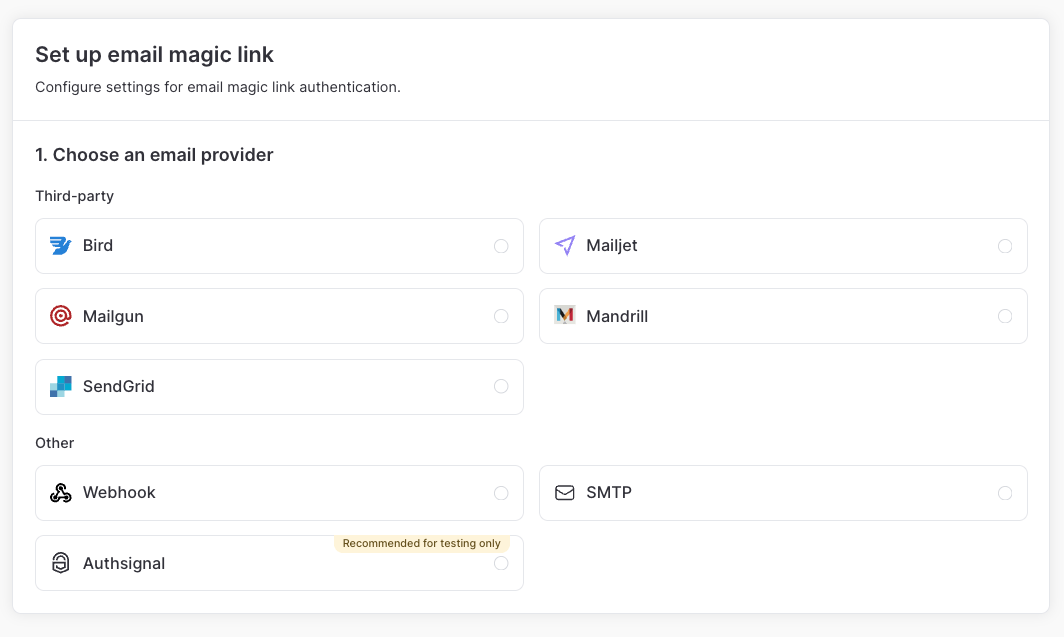
Navigate to [Authenticators](https://portal.authsignal.com/organisations/tenants/authenticators) in the Authsignal Portal, click on **Email magic link**, and choose an email provider.
 1. Log in to your [Bird account](https://bird.com/)
2. Get your **Access key** and **Workspace ID** from your Bird settings
3. Create or locate an email channel and note the **Channel ID**
4. Create an email template in Bird and note the **Project ID/Template ID**
5. Publish your template and note the **Published version ID**
6. In the Authsignal Portal, select **Bird** as your email provider
7. Enter your Bird access key, workspace ID, channel ID, project ID/template ID, published version ID, and select your default language
1. Log in to your [Mailjet account](https://app.mailjet.com/)
2. Navigate to **API > API Key Management** and get your **API key** and **Secret key**
3. Navigate to **Content > Email Templates** and get your **Template ID**
4. In the Authsignal Portal, select **Mailjet** as your email provider
5. Enter your Mailjet **API key**, **API secret key**, and **Template ID**
1. Log in to your [Mailgun account](https://app.mailgun.com/)
2. Click on your profile icon in the top-right corner and select **API Keys**
3. Click **Add New API Key** to generate a new API key
4. Note your **Sending domain** from the Mailgun dashboard
5. In the Authsignal Portal, select **Mailgun** as your email provider
6. Enter your Mailgun **API key**, **Sending domain**, **Template name** (optional), and select **API URL** for your region
1. Log in to your [Mailchimp account](https://mailchimp.com/)
2. Go to **Settings** and click on **API Keys**
3. Click **Create API Key** and give it a description. Copy the generated key
4. In the Authsignal Portal, select **Mandrill** as your email provider
5. Enter your Mandrill **API key** and **Template name**
1. Log in to your [SendGrid account](https://login.sendgrid.com/)
2. Go to **Settings** and click on **API Keys**
3. Click **Create New Key** and ensure either **Full Access** or **Custom Access** with the **Mail Send** permission is selected. Copy the generated key
4. Create a new [dynamic template](https://mc.sendgrid.com/dynamic-templates/new) in SendGrid and copy the **Template ID**
5. In the Authsignal Portal, select **SendGrid** as your email provider
6. Enter your SendGrid **API key**, **Template ID**, **From email**, and an optional **From name**
For detailed instructions on setting up a webhook for email delivery, see the [webhooks documentation](/advanced-usage/webhooks/introduction).
Authsignal supports sending with an SMTP server of your choosing.
1. In the Authsignal Portal, select **SMTP** as your email provider.
2. Enter your **SMTP Server Address**, **Port**, **Username**, **Password**, **From Address**, and an optional **From name**
You can use **Authsignal** as an email provider for development, but it's recommended to use an
alternative provider in production for more control over emails.
### Email template variables
The following template variables are available for use in your email template:
The magic link URL.
The action that the user is performing.
The ID of the user.
The user agent associated with the action.
The IP address associated with the action.
### Custom template variables
You can forward [custom data points](/actions-rules/rules/custom-data-points) to your email provider as additional template variables.
This is useful for personalizing emails with data specific to your application, such as a user's account ID or a transaction amount.
To configure this, navigate to your [email magic link settings](https://portal.authsignal.com/organisations/tenants/authenticators/magic_links) in the Authsignal Portal and select which custom data points to include under **Custom template variables**.
Custom data points are prefixed by model type:
* **User data points** are prefixed with `user_` (e.g. `user_accountId`)
* **Action data points** are prefixed with `action_` (e.g. `action_transactionAmount`)
Custom data points must be [registered in the Authsignal Portal](https://portal.authsignal.com/organisations/tenants/custom_data_points) before they can be selected.
Only registered data points with values set on the user or action will be included.
## SDK setup
### Server SDK
Initialize the SDK using your secret key from the [API keys page](https://portal.authsignal.com/organisations/tenants/api) and the [API URL](/sdks/server/setup#regions) for your region.
```ts Node.js theme={null}
import { Authsignal } from "@authsignal/node";
const authsignal = new Authsignal({
apiSecretKey: "YOUR_SECRET_KEY",
apiUrl: "YOUR_API_URL",
});
```
```csharp C# theme={null}
using Authsignal;
var authsignal = new AuthsignalClient(
apiSecretKey: "YOUR_SECRET_KEY",
apiUrl: "YOUR_API_URL"
);
```
```java Java theme={null}
import com.authsignal.AuthsignalClient;
AuthsignalClient authsignal = new AuthsignalClient(
"YOUR_SECRET_KEY",
"YOUR_API_URL"
);
```
```ruby Ruby theme={null}
require 'authsignal'
Authsignal.setup do |config|
config.api_secret_key = ENV["YOUR_SECRET_KEY"]
config.api_url = "YOUR_API_URL"
end
```
```python Python theme={null}
from authsignal.client import AuthsignalClient
authsignal = AuthsignalClient(
api_secret_key="YOUR_SECRET_KEY",
api_url="YOUR_API_URL"
)
```
```php PHP theme={null}
Authsignal::setApiSecretKey("YOUR_SECRET_KEY");
Authsignal::setApiUrl("YOUR_API_URL");
```
```go Go theme={null}
import "github.com/authsignal/authsignalgo/v2/client"
client := NewAuthsignalClient(
"YOUR_SECRET_KEY",
"YOUR_API_URL",
)
```
### Web SDK
Initialize the [Web SDK](/sdks/client/web/setup) using your tenant ID from the [API keys page](https://portal.authsignal.com/organisations/tenants/api) and your [API URL](/sdks/server/setup#regions).
```ts Web theme={null}
import { Authsignal } from "@authsignal/browser";
const authsignal = new Authsignal({
tenantId: "YOUR_TENANT_ID",
baseUrl: "YOUR_API_URL",
});
```
```swift iOS theme={null}
import Authsignal
let authsignal = Authsignal(
tenantID: "YOUR_TENANT_ID",
baseURL: "YOUR_API_URL"
)
```
```kotlin Android theme={null}
import com.authsignal.Authsignal
val authsignal = Authsignal(
tenantID = "YOUR_TENANT_ID",
baseURL = "YOUR_API_URL",
)
```
```ts React Native theme={null}
import { Authsignal } from "react-native-authsignal";
const authsignal = new Authsignal({
tenantID: "YOUR_TENANT_ID",
baseURL: "YOUR_API_URL",
});
```
```dart Flutter theme={null}
import 'package:authsignal_flutter/authsignal_flutter.dart';
final authsignal = Authsignal(
"YOUR_TENANT_ID",
baseURL: "YOUR_API_URL"
);
```
## Adaptive MFA
The following steps demonstrate how to implement **adaptive MFA** with email magic link - either at sign-in or as step-up authentication when the user performs a sensitive action in your app (e.g. making a payment).
### 1. Track action
Use a [Server SDK](/sdks/server) to track an action in your backend.
This step can apply [rules](/actions-rules/rules/getting-started) to determine if a challenge is required.
```ts Node.js theme={null}
const request = {
userId: "dc58c6dc-a1fd-4a4f-8e2f-846636dd4833",
action: "signIn",
attributes: {
email: "jane.smith@authsignal.com",
},
};
const response = await authsignal.track(request);
if (response.state === "CHALLENGE_REQUIRED") {
// Obtain token to present challenge
const token = response.token;
}
```
```csharp C# theme={null}
var request = new TrackRequest(
UserId: "dc58c6dc-a1fd-4a4f-8e2f-846636dd4833",
Action: "signIn",
Attributes: new TrackAttributes(
Email: "jane.smith@authsignal.com"
)
);
var response = await authsignal.Track(request);
if (response.State == UserActionState.CHALLENGE_REQUIRED)
{
// Obtain token to present challenge
var token = response.Token;
}
```
```java Java theme={null}
TrackRequest request = new TrackRequest();
request.userId = "dc58c6dc-a1fd-4a4f-8e2f-846636dd4833";
request.action = "signIn";
request.attributes = new TrackAttributes();
request.attributes.email = "jane.smith@authsignal.com";
TrackResponse response = authsignal.track(request).get();
if (response.state.equals(UserActionState.CHALLENGE_REQUIRED)) {
// Obtain token to present challenge
String token = response.token;
}
```
```ruby Ruby theme={null}
response = Authsignal.track({
user_id: 'dc58c6dc-a1fd-4a4f-8e2f-846636dd4833',
action: 'signIn',
attributes: {
email: 'jane.smith@authsignal.com'
}
})
case response[:state]
when "CHALLENGE_REQUIRED"
# Obtain token to present challenge
token = response[:token]
end
```
```python Python theme={null}
response = authsignal.track(
user_id="dc58c6dc-a1fd-4a4f-8e2f-846636dd4833",
action="signIn",
attributes={
"email": "jane.smith@authsignal.com"
}
)
if response["state"] == "CHALLENGE_REQUIRED":
# Obtain token to present challenge
token = response["token"]
```
```php PHP theme={null}
$response = $authsignal->track([
'userId' => 'dc58c6dc-a1fd-4a4f-8e2f-846636dd4833',
'action' => 'signIn',
'attributes' => [
'email' => 'jane.smith@authsignal.com'
]
]);
switch ($response['state']) {
case 'CHALLENGE_REQUIRED':
// Obtain token to present challenge
$token = $response['token'];
}
```
```go Go theme={null}
response, err := client.Track(
TrackRequest{
UserId: "dc58c6dc-a1fd-4a4f-8e2f-846636dd4833",
Action: "signIn",
Attributes: &TrackAttributes{
Email: "jane.smith@authsignal.com",
},
},
)
switch response.State {
case "CHALLENGE_REQUIRED":
// Obtain token to present challenge
token := response.Token
}
```
```ts Node.js theme={null}
const request = {
userId: "dc58c6dc-a1fd-4a4f-8e2f-846636dd4833",
action: "signIn",
attributes: {
email: "jane.smith@authsignal.com",
redirectUrl: "https://yourapp.com/callback",
},
};
const response = await authsignal.track(request);
if (response.state === "CHALLENGE_REQUIRED") {
// Return URL to your frontend to launch pre-built UI
const url = response.url;
}
```
```csharp C# theme={null}
var request = new TrackRequest(
UserId: "dc58c6dc-a1fd-4a4f-8e2f-846636dd4833",
Action: "signIn",
Attributes: new TrackAttributes(
Email: "jane.smith@authsignal.com",
RedirectUrl: "https://yourapp.com/callback",
)
);
var response = await authsignal.Track(request);
if (response.State == UserActionState.CHALLENGE_REQUIRED)
{
// Return URL to your frontend to launch pre-built UI
var url = response.Url;
}
```
```java Java theme={null}
TrackRequest request = new TrackRequest();
request.userId = "dc58c6dc-a1fd-4a4f-8e2f-846636dd4833";
request.action = "signIn";
request.attributes = new TrackAttributes();
request.attributes.email = "jane.smith@authsignal.com";
request.attributes.redirectUrl = "https://yourapp.com/callback";
TrackResponse response = authsignal.track(trackRequest).get();
if (response.state.equals(UserActionState.CHALLENGE_REQUIRED)) {
// Return URL to your frontend to launch pre-built UI
String url = response.url;
}
```
```ruby Ruby theme={null}
response = Authsignal.track({
user_id: 'dc58c6dc-a1fd-4a4f-8e2f-846636dd4833',
action: 'signIn',
attributes: {
email: 'jane.smith@authsignal.com',
redirect_url: "https://yourapp.com/callback"
}
})
case response[:state]
when "CHALLENGE_REQUIRED"
# Return URL to your frontend to launch pre-built UI
url = response[:url]
end
```
```python Python theme={null}
response = authsignal.track(
user_id="dc58c6dc-a1fd-4a4f-8e2f-846636dd4833",
action="signIn",
attributes={
"email": "jane.smith@authsignal.com",
"redirectUrl": "https://yourapp.com/callback"
}
)
if response["state"] == "CHALLENGE_REQUIRED":
# Return URL to your frontend to launch pre-built UI
url = response["url"]
```
```php PHP theme={null}
$response = $authsignal->track([
'userId' => 'dc58c6dc-a1fd-4a4f-8e2f-846636dd4833',
'action' => 'signIn',
'attributes' => [
'email' => 'jane.smith@authsignal.com'
'redirectUrl' => 'https://yourapp.com/callback'
]
]);
switch ($response['state']) {
case 'CHALLENGE_REQUIRED':
// Return URL to your frontend to launch pre-built UI
$url = $response['url'];
}
```
```go Go theme={null}
response, err := client.Track(
TrackRequest{
UserId: "dc58c6dc-a1fd-4a4f-8e2f-846636dd4833",
Action: "signIn",
Attributes: &TrackAttributes{
Email: "jane.smith@authsignal.com",
RedirectUrl: "https://yourapp.com/callback",
},
},
)
switch response.State {
case "CHALLENGE_REQUIRED":
// Return URL to your frontend to launch pre-built UI
url := response.Url
}
```
You can choose a value for the [action](/actions-rules/actions/getting-started) here which best describes what the user is doing in your app (e.g. `signIn` or `createPayment`).
Each action can have its own set of rules.
To learn more about using rules and handling different action states refer to our documentation on [actions](/actions-rules/actions/getting-started) and [rules](/actions-rules/rules/getting-started).
### 2. Present challenge
If the action state is `CHALLENGE_REQUIRED` then you can present an email magic link challenge using the [Web SDK](/sdks/client/web/setup).
```ts Web theme={null}
// Set token from the track response
authsignal.setToken("eyJhbGciOiJ...");
// Send the user an email magic link
// You can call this multiple times via a 'resend' button
await authsignal.emailML.challenge();
// Check verification status
// This will resolve when user clicks the magic link
const verifyResponse = await authsignal.emailML.checkVerificationStatus();
if (verifyResponse.data?.isVerified) {
// Obtain a new token
const token = verifyResponse.data.token;
}
```
```js theme={null}
// Launch the pre-built UI with the URL from the track response
const result = await authsignal.launch(url, { mode: "popup" });
// Obtain a token to validate in the next step
if (result.token) {
const token = result.token;
}
```
### 3. Validate action
Use the new token obtained from the client SDK to validate the action on your backend.
```ts Node.js theme={null}
const response = await authsignal.validateChallenge({
action: "signIn",
token: "eyJhbGciOiJIUzI....",
});
if (response.state === "CHALLENGE_SUCCEEDED") {
// User completed challenge successfully
}
```
```csharp C# theme={null}
var request = new ValidateChallengeRequest(
Action: "signIn",
Token: "eyJhbGciOiJIUzI...."
);
var response = await authsignal.ValidateChallenge(request);
if (response.State == UserActionState.CHALLENGE_SUCCEEDED) {
// User completed challenge successfully
}
```
```java Java theme={null}
ValidateChallengeRequest request = new ValidateChallengeRequest();
request.action = "signIn";
request.token = "eyJhbGciOiJIUzI....";
ValidateChallengeResponse response = authsignal.validateChallenge(request).get();
if (response.state == UserActionState.CHALLENGE_SUCCEEDED) {
// User completed challenge successfully
}
```
```ruby Ruby theme={null}
response = Authsignal.validate_challenge(action: "signIn", token: "eyJhbGciOiJIUzI....")
if response[:state] == "CHALLENGE_SUCCEEDED"
# User completed challenge successfully
end
```
```python Python theme={null}
response = authsignal.validate_challenge(action="signIn", token="eyJhbGciOiJIUzI....")
if response["state"] == "CHALLENGE_SUCCEEDED":
# User completed challenge successfully
```
```php PHP theme={null}
$response = Authsignal::validateChallenge(action: "signIn", token: "eyJhbGciOiJIUzI....");
if ($response["state"] === "CHALLENGE_SUCCEEDED") {
# User completed challenge successfully
}
```
```go Go theme={null}
response, err := client.ValidateChallenge(
ValidateChallengeRequest{
Action: "signIn",
Token: "eyJhbGciOiJ...",
},
)
if response.State == "CHALLENGE_SUCCEEDED" {
// User completed challenge successfully
}
```
If the action state shows that the email magic link challenge was completed successfully, you can let the user proceed with the action.
## Next steps
* [Adaptive MFA](/actions-rules/rules/adaptive-mfa) - Set up smart rules to trigger authentication based on risk
* [Passkeys](/authentication-methods/passkey/web-sdk) - Offer the most secure and user-friendly passwordless authentication
1. Log in to your [Bird account](https://bird.com/)
2. Get your **Access key** and **Workspace ID** from your Bird settings
3. Create or locate an email channel and note the **Channel ID**
4. Create an email template in Bird and note the **Project ID/Template ID**
5. Publish your template and note the **Published version ID**
6. In the Authsignal Portal, select **Bird** as your email provider
7. Enter your Bird access key, workspace ID, channel ID, project ID/template ID, published version ID, and select your default language
1. Log in to your [Mailjet account](https://app.mailjet.com/)
2. Navigate to **API > API Key Management** and get your **API key** and **Secret key**
3. Navigate to **Content > Email Templates** and get your **Template ID**
4. In the Authsignal Portal, select **Mailjet** as your email provider
5. Enter your Mailjet **API key**, **API secret key**, and **Template ID**
1. Log in to your [Mailgun account](https://app.mailgun.com/)
2. Click on your profile icon in the top-right corner and select **API Keys**
3. Click **Add New API Key** to generate a new API key
4. Note your **Sending domain** from the Mailgun dashboard
5. In the Authsignal Portal, select **Mailgun** as your email provider
6. Enter your Mailgun **API key**, **Sending domain**, **Template name** (optional), and select **API URL** for your region
1. Log in to your [Mailchimp account](https://mailchimp.com/)
2. Go to **Settings** and click on **API Keys**
3. Click **Create API Key** and give it a description. Copy the generated key
4. In the Authsignal Portal, select **Mandrill** as your email provider
5. Enter your Mandrill **API key** and **Template name**
1. Log in to your [SendGrid account](https://login.sendgrid.com/)
2. Go to **Settings** and click on **API Keys**
3. Click **Create New Key** and ensure either **Full Access** or **Custom Access** with the **Mail Send** permission is selected. Copy the generated key
4. Create a new [dynamic template](https://mc.sendgrid.com/dynamic-templates/new) in SendGrid and copy the **Template ID**
5. In the Authsignal Portal, select **SendGrid** as your email provider
6. Enter your SendGrid **API key**, **Template ID**, **From email**, and an optional **From name**
For detailed instructions on setting up a webhook for email delivery, see the [webhooks documentation](/advanced-usage/webhooks/introduction).
Authsignal supports sending with an SMTP server of your choosing.
1. In the Authsignal Portal, select **SMTP** as your email provider.
2. Enter your **SMTP Server Address**, **Port**, **Username**, **Password**, **From Address**, and an optional **From name**
You can use **Authsignal** as an email provider for development, but it's recommended to use an
alternative provider in production for more control over emails.
### Email template variables
The following template variables are available for use in your email template:
The magic link URL.
The action that the user is performing.
The ID of the user.
The user agent associated with the action.
The IP address associated with the action.
### Custom template variables
You can forward [custom data points](/actions-rules/rules/custom-data-points) to your email provider as additional template variables.
This is useful for personalizing emails with data specific to your application, such as a user's account ID or a transaction amount.
To configure this, navigate to your [email magic link settings](https://portal.authsignal.com/organisations/tenants/authenticators/magic_links) in the Authsignal Portal and select which custom data points to include under **Custom template variables**.
Custom data points are prefixed by model type:
* **User data points** are prefixed with `user_` (e.g. `user_accountId`)
* **Action data points** are prefixed with `action_` (e.g. `action_transactionAmount`)
Custom data points must be [registered in the Authsignal Portal](https://portal.authsignal.com/organisations/tenants/custom_data_points) before they can be selected.
Only registered data points with values set on the user or action will be included.
## SDK setup
### Server SDK
Initialize the SDK using your secret key from the [API keys page](https://portal.authsignal.com/organisations/tenants/api) and the [API URL](/sdks/server/setup#regions) for your region.
```ts Node.js theme={null}
import { Authsignal } from "@authsignal/node";
const authsignal = new Authsignal({
apiSecretKey: "YOUR_SECRET_KEY",
apiUrl: "YOUR_API_URL",
});
```
```csharp C# theme={null}
using Authsignal;
var authsignal = new AuthsignalClient(
apiSecretKey: "YOUR_SECRET_KEY",
apiUrl: "YOUR_API_URL"
);
```
```java Java theme={null}
import com.authsignal.AuthsignalClient;
AuthsignalClient authsignal = new AuthsignalClient(
"YOUR_SECRET_KEY",
"YOUR_API_URL"
);
```
```ruby Ruby theme={null}
require 'authsignal'
Authsignal.setup do |config|
config.api_secret_key = ENV["YOUR_SECRET_KEY"]
config.api_url = "YOUR_API_URL"
end
```
```python Python theme={null}
from authsignal.client import AuthsignalClient
authsignal = AuthsignalClient(
api_secret_key="YOUR_SECRET_KEY",
api_url="YOUR_API_URL"
)
```
```php PHP theme={null}
Authsignal::setApiSecretKey("YOUR_SECRET_KEY");
Authsignal::setApiUrl("YOUR_API_URL");
```
```go Go theme={null}
import "github.com/authsignal/authsignalgo/v2/client"
client := NewAuthsignalClient(
"YOUR_SECRET_KEY",
"YOUR_API_URL",
)
```
### Web SDK
Initialize the [Web SDK](/sdks/client/web/setup) using your tenant ID from the [API keys page](https://portal.authsignal.com/organisations/tenants/api) and your [API URL](/sdks/server/setup#regions).
```ts Web theme={null}
import { Authsignal } from "@authsignal/browser";
const authsignal = new Authsignal({
tenantId: "YOUR_TENANT_ID",
baseUrl: "YOUR_API_URL",
});
```
```swift iOS theme={null}
import Authsignal
let authsignal = Authsignal(
tenantID: "YOUR_TENANT_ID",
baseURL: "YOUR_API_URL"
)
```
```kotlin Android theme={null}
import com.authsignal.Authsignal
val authsignal = Authsignal(
tenantID = "YOUR_TENANT_ID",
baseURL = "YOUR_API_URL",
)
```
```ts React Native theme={null}
import { Authsignal } from "react-native-authsignal";
const authsignal = new Authsignal({
tenantID: "YOUR_TENANT_ID",
baseURL: "YOUR_API_URL",
});
```
```dart Flutter theme={null}
import 'package:authsignal_flutter/authsignal_flutter.dart';
final authsignal = Authsignal(
"YOUR_TENANT_ID",
baseURL: "YOUR_API_URL"
);
```
## Adaptive MFA
The following steps demonstrate how to implement **adaptive MFA** with email magic link - either at sign-in or as step-up authentication when the user performs a sensitive action in your app (e.g. making a payment).
### 1. Track action
Use a [Server SDK](/sdks/server) to track an action in your backend.
This step can apply [rules](/actions-rules/rules/getting-started) to determine if a challenge is required.
```ts Node.js theme={null}
const request = {
userId: "dc58c6dc-a1fd-4a4f-8e2f-846636dd4833",
action: "signIn",
attributes: {
email: "jane.smith@authsignal.com",
},
};
const response = await authsignal.track(request);
if (response.state === "CHALLENGE_REQUIRED") {
// Obtain token to present challenge
const token = response.token;
}
```
```csharp C# theme={null}
var request = new TrackRequest(
UserId: "dc58c6dc-a1fd-4a4f-8e2f-846636dd4833",
Action: "signIn",
Attributes: new TrackAttributes(
Email: "jane.smith@authsignal.com"
)
);
var response = await authsignal.Track(request);
if (response.State == UserActionState.CHALLENGE_REQUIRED)
{
// Obtain token to present challenge
var token = response.Token;
}
```
```java Java theme={null}
TrackRequest request = new TrackRequest();
request.userId = "dc58c6dc-a1fd-4a4f-8e2f-846636dd4833";
request.action = "signIn";
request.attributes = new TrackAttributes();
request.attributes.email = "jane.smith@authsignal.com";
TrackResponse response = authsignal.track(request).get();
if (response.state.equals(UserActionState.CHALLENGE_REQUIRED)) {
// Obtain token to present challenge
String token = response.token;
}
```
```ruby Ruby theme={null}
response = Authsignal.track({
user_id: 'dc58c6dc-a1fd-4a4f-8e2f-846636dd4833',
action: 'signIn',
attributes: {
email: 'jane.smith@authsignal.com'
}
})
case response[:state]
when "CHALLENGE_REQUIRED"
# Obtain token to present challenge
token = response[:token]
end
```
```python Python theme={null}
response = authsignal.track(
user_id="dc58c6dc-a1fd-4a4f-8e2f-846636dd4833",
action="signIn",
attributes={
"email": "jane.smith@authsignal.com"
}
)
if response["state"] == "CHALLENGE_REQUIRED":
# Obtain token to present challenge
token = response["token"]
```
```php PHP theme={null}
$response = $authsignal->track([
'userId' => 'dc58c6dc-a1fd-4a4f-8e2f-846636dd4833',
'action' => 'signIn',
'attributes' => [
'email' => 'jane.smith@authsignal.com'
]
]);
switch ($response['state']) {
case 'CHALLENGE_REQUIRED':
// Obtain token to present challenge
$token = $response['token'];
}
```
```go Go theme={null}
response, err := client.Track(
TrackRequest{
UserId: "dc58c6dc-a1fd-4a4f-8e2f-846636dd4833",
Action: "signIn",
Attributes: &TrackAttributes{
Email: "jane.smith@authsignal.com",
},
},
)
switch response.State {
case "CHALLENGE_REQUIRED":
// Obtain token to present challenge
token := response.Token
}
```
```ts Node.js theme={null}
const request = {
userId: "dc58c6dc-a1fd-4a4f-8e2f-846636dd4833",
action: "signIn",
attributes: {
email: "jane.smith@authsignal.com",
redirectUrl: "https://yourapp.com/callback",
},
};
const response = await authsignal.track(request);
if (response.state === "CHALLENGE_REQUIRED") {
// Return URL to your frontend to launch pre-built UI
const url = response.url;
}
```
```csharp C# theme={null}
var request = new TrackRequest(
UserId: "dc58c6dc-a1fd-4a4f-8e2f-846636dd4833",
Action: "signIn",
Attributes: new TrackAttributes(
Email: "jane.smith@authsignal.com",
RedirectUrl: "https://yourapp.com/callback",
)
);
var response = await authsignal.Track(request);
if (response.State == UserActionState.CHALLENGE_REQUIRED)
{
// Return URL to your frontend to launch pre-built UI
var url = response.Url;
}
```
```java Java theme={null}
TrackRequest request = new TrackRequest();
request.userId = "dc58c6dc-a1fd-4a4f-8e2f-846636dd4833";
request.action = "signIn";
request.attributes = new TrackAttributes();
request.attributes.email = "jane.smith@authsignal.com";
request.attributes.redirectUrl = "https://yourapp.com/callback";
TrackResponse response = authsignal.track(trackRequest).get();
if (response.state.equals(UserActionState.CHALLENGE_REQUIRED)) {
// Return URL to your frontend to launch pre-built UI
String url = response.url;
}
```
```ruby Ruby theme={null}
response = Authsignal.track({
user_id: 'dc58c6dc-a1fd-4a4f-8e2f-846636dd4833',
action: 'signIn',
attributes: {
email: 'jane.smith@authsignal.com',
redirect_url: "https://yourapp.com/callback"
}
})
case response[:state]
when "CHALLENGE_REQUIRED"
# Return URL to your frontend to launch pre-built UI
url = response[:url]
end
```
```python Python theme={null}
response = authsignal.track(
user_id="dc58c6dc-a1fd-4a4f-8e2f-846636dd4833",
action="signIn",
attributes={
"email": "jane.smith@authsignal.com",
"redirectUrl": "https://yourapp.com/callback"
}
)
if response["state"] == "CHALLENGE_REQUIRED":
# Return URL to your frontend to launch pre-built UI
url = response["url"]
```
```php PHP theme={null}
$response = $authsignal->track([
'userId' => 'dc58c6dc-a1fd-4a4f-8e2f-846636dd4833',
'action' => 'signIn',
'attributes' => [
'email' => 'jane.smith@authsignal.com'
'redirectUrl' => 'https://yourapp.com/callback'
]
]);
switch ($response['state']) {
case 'CHALLENGE_REQUIRED':
// Return URL to your frontend to launch pre-built UI
$url = $response['url'];
}
```
```go Go theme={null}
response, err := client.Track(
TrackRequest{
UserId: "dc58c6dc-a1fd-4a4f-8e2f-846636dd4833",
Action: "signIn",
Attributes: &TrackAttributes{
Email: "jane.smith@authsignal.com",
RedirectUrl: "https://yourapp.com/callback",
},
},
)
switch response.State {
case "CHALLENGE_REQUIRED":
// Return URL to your frontend to launch pre-built UI
url := response.Url
}
```
You can choose a value for the [action](/actions-rules/actions/getting-started) here which best describes what the user is doing in your app (e.g. `signIn` or `createPayment`).
Each action can have its own set of rules.
To learn more about using rules and handling different action states refer to our documentation on [actions](/actions-rules/actions/getting-started) and [rules](/actions-rules/rules/getting-started).
### 2. Present challenge
If the action state is `CHALLENGE_REQUIRED` then you can present an email magic link challenge using the [Web SDK](/sdks/client/web/setup).
```ts Web theme={null}
// Set token from the track response
authsignal.setToken("eyJhbGciOiJ...");
// Send the user an email magic link
// You can call this multiple times via a 'resend' button
await authsignal.emailML.challenge();
// Check verification status
// This will resolve when user clicks the magic link
const verifyResponse = await authsignal.emailML.checkVerificationStatus();
if (verifyResponse.data?.isVerified) {
// Obtain a new token
const token = verifyResponse.data.token;
}
```
```js theme={null}
// Launch the pre-built UI with the URL from the track response
const result = await authsignal.launch(url, { mode: "popup" });
// Obtain a token to validate in the next step
if (result.token) {
const token = result.token;
}
```
### 3. Validate action
Use the new token obtained from the client SDK to validate the action on your backend.
```ts Node.js theme={null}
const response = await authsignal.validateChallenge({
action: "signIn",
token: "eyJhbGciOiJIUzI....",
});
if (response.state === "CHALLENGE_SUCCEEDED") {
// User completed challenge successfully
}
```
```csharp C# theme={null}
var request = new ValidateChallengeRequest(
Action: "signIn",
Token: "eyJhbGciOiJIUzI...."
);
var response = await authsignal.ValidateChallenge(request);
if (response.State == UserActionState.CHALLENGE_SUCCEEDED) {
// User completed challenge successfully
}
```
```java Java theme={null}
ValidateChallengeRequest request = new ValidateChallengeRequest();
request.action = "signIn";
request.token = "eyJhbGciOiJIUzI....";
ValidateChallengeResponse response = authsignal.validateChallenge(request).get();
if (response.state == UserActionState.CHALLENGE_SUCCEEDED) {
// User completed challenge successfully
}
```
```ruby Ruby theme={null}
response = Authsignal.validate_challenge(action: "signIn", token: "eyJhbGciOiJIUzI....")
if response[:state] == "CHALLENGE_SUCCEEDED"
# User completed challenge successfully
end
```
```python Python theme={null}
response = authsignal.validate_challenge(action="signIn", token="eyJhbGciOiJIUzI....")
if response["state"] == "CHALLENGE_SUCCEEDED":
# User completed challenge successfully
```
```php PHP theme={null}
$response = Authsignal::validateChallenge(action: "signIn", token: "eyJhbGciOiJIUzI....");
if ($response["state"] === "CHALLENGE_SUCCEEDED") {
# User completed challenge successfully
}
```
```go Go theme={null}
response, err := client.ValidateChallenge(
ValidateChallengeRequest{
Action: "signIn",
Token: "eyJhbGciOiJ...",
},
)
if response.State == "CHALLENGE_SUCCEEDED" {
// User completed challenge successfully
}
```
If the action state shows that the email magic link challenge was completed successfully, you can let the user proceed with the action.
## Next steps
* [Adaptive MFA](/actions-rules/rules/adaptive-mfa) - Set up smart rules to trigger authentication based on risk
* [Passkeys](/authentication-methods/passkey/web-sdk) - Offer the most secure and user-friendly passwordless authentication