> ## Documentation Index
> Fetch the complete documentation index at: https://docs.authsignal.com/llms.txt
> Use this file to discover all available pages before exploring further.
# Configuring push notifications
> Let Authsignal deliver push notifications for you by connecting your APNs and FCM credentials, instead of running your own webhook.
By default, push verification relies on a [webhook](/authentication-methods/app-verification/push#portal-setup): when a challenge starts, Authsignal calls your endpoint and you are responsible for sending the push notification to the user's device.
Instead, you can have Authsignal send the notification for you. You connect your Apple Push Notification service (APNs) and/or Firebase Cloud Messaging (FCM) credentials in the portal, and Authsignal delivers the notification directly to Apple's and Google's push services. There is no webhook to build or host.
Push delivery is **best-effort**. A challenge can always be completed from inside your app without a
notification - the notification is only a prompt to open the app. If a send fails, the challenge is
not failed; the failure is recorded as a timeline event so you can monitor delivery.
## Choosing a provider
When you enable push verification you choose a push notification provider. The managed options are **Default** and **Firebase**. (The **Webhook** and **Airship** options keep the existing self-hosted delivery behavior - see [Push verification](/authentication-methods/app-verification/push).)
| Provider | How it delivers | When to use it |
| ------------ | --------------------------------------------------------------------------------- | ----------------------------------------------------------------------------------------------------------- |
| **Default** | Authsignal connects directly to APNs for iOS devices and FCM for Android devices. | You want Authsignal to talk to Apple and Google directly. Configure APNs for iOS, FCM for Android, or both. |
| **Firebase** | Authsignal sends every notification through Firebase Cloud Messaging only. | You already use FCM as a cross-platform solution (including for iOS). |
With the **Default** provider, the device platform decides the route: iOS devices are sent via APNs and all other devices via FCM. You only need to configure credentials for the platforms you target - APNs-only and FCM-only configurations are both valid.
## Portal setup
Enable [push verification](https://portal.authsignal.com/organisations/tenants/authenticators/push) for your tenant, then choose a push notification provider.
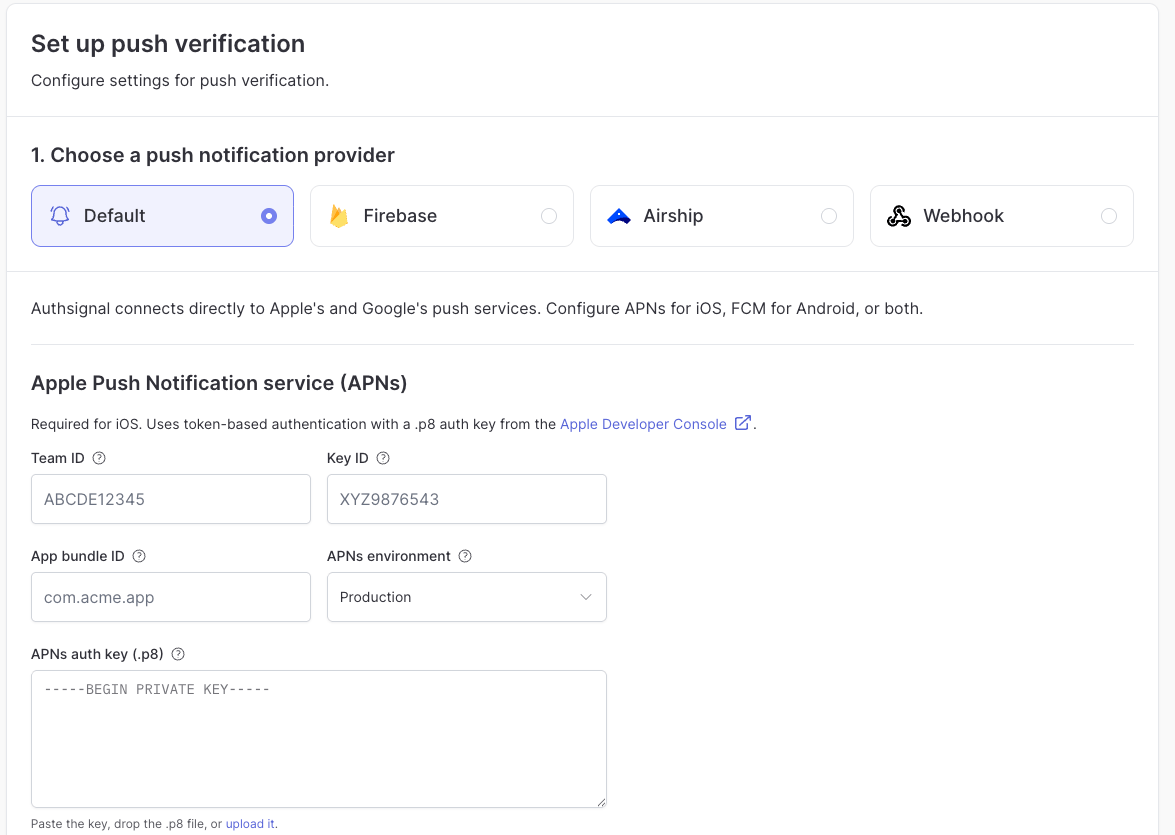 ### Default provider
Select **Default** to have Authsignal connect directly to Apple's and Google's push services. Configure the credentials for the platforms you support.
#### Apple Push Notification service (APNs)
Required for iOS. Authsignal uses token-based authentication with a `.p8` auth key downloaded from the [Apple Developer Console](https://developer.apple.com/account/resources/authkeys/list).
| Field | Description |
| ----------------------- | -------------------------------------------------------------------------------------------------- |
| **Team ID** | Your Apple Developer Team ID. |
| **Key ID** | The Key ID of the `.p8` auth key. |
| **App bundle ID** | The bundle identifier of your app (for example `com.acme.app`). Used as the APNs topic. |
| **APNs environment** | `Production` or `Sandbox`. Sandbox routes to Apple's sandbox push endpoint for development builds. |
| **APNs auth key (.p8)** | The contents of your `.p8` private key. Paste the key, drop the file, or upload it. |
To create the key, open the [Apple Developer Console](https://developer.apple.com/account/resources/authkeys/list) and go to **Certificates, Identifiers & Profiles > Keys**, then register a new key with **Apple Push Notifications service (APNs)** enabled. Download the `.p8` file when prompted, and note the **Key ID** shown alongside the key.
Apple lets you download the `.p8` file only once. Store it securely, you cannot retrieve it again later.
#### Firebase Cloud Messaging (FCM)
Required for Android. Authsignal uses the FCM HTTP v1 API with a service account JSON downloaded from the [Firebase Console](https://console.firebase.google.com/).
| Field | Description |
| ------------------------ | --------------------------------------------------------------------------- |
| **Service account JSON** | The full service account JSON. Paste the JSON, drop the file, or upload it. |
To get the JSON, open your project in the [Firebase Console](https://console.firebase.google.com/) and go to **Project settings > Service accounts**, then click **Generate new private key**.
### Firebase provider
Select **Firebase** if you use FCM as a cross-platform solution. Authsignal sends every notification - including to iOS devices - through Firebase Cloud Messaging.
### Default provider
Select **Default** to have Authsignal connect directly to Apple's and Google's push services. Configure the credentials for the platforms you support.
#### Apple Push Notification service (APNs)
Required for iOS. Authsignal uses token-based authentication with a `.p8` auth key downloaded from the [Apple Developer Console](https://developer.apple.com/account/resources/authkeys/list).
| Field | Description |
| ----------------------- | -------------------------------------------------------------------------------------------------- |
| **Team ID** | Your Apple Developer Team ID. |
| **Key ID** | The Key ID of the `.p8` auth key. |
| **App bundle ID** | The bundle identifier of your app (for example `com.acme.app`). Used as the APNs topic. |
| **APNs environment** | `Production` or `Sandbox`. Sandbox routes to Apple's sandbox push endpoint for development builds. |
| **APNs auth key (.p8)** | The contents of your `.p8` private key. Paste the key, drop the file, or upload it. |
To create the key, open the [Apple Developer Console](https://developer.apple.com/account/resources/authkeys/list) and go to **Certificates, Identifiers & Profiles > Keys**, then register a new key with **Apple Push Notifications service (APNs)** enabled. Download the `.p8` file when prompted, and note the **Key ID** shown alongside the key.
Apple lets you download the `.p8` file only once. Store it securely, you cannot retrieve it again later.
#### Firebase Cloud Messaging (FCM)
Required for Android. Authsignal uses the FCM HTTP v1 API with a service account JSON downloaded from the [Firebase Console](https://console.firebase.google.com/).
| Field | Description |
| ------------------------ | --------------------------------------------------------------------------- |
| **Service account JSON** | The full service account JSON. Paste the JSON, drop the file, or upload it. |
To get the JSON, open your project in the [Firebase Console](https://console.firebase.google.com/) and go to **Project settings > Service accounts**, then click **Generate new private key**.
### Firebase provider
Select **Firebase** if you use FCM as a cross-platform solution. Authsignal sends every notification - including to iOS devices - through Firebase Cloud Messaging.
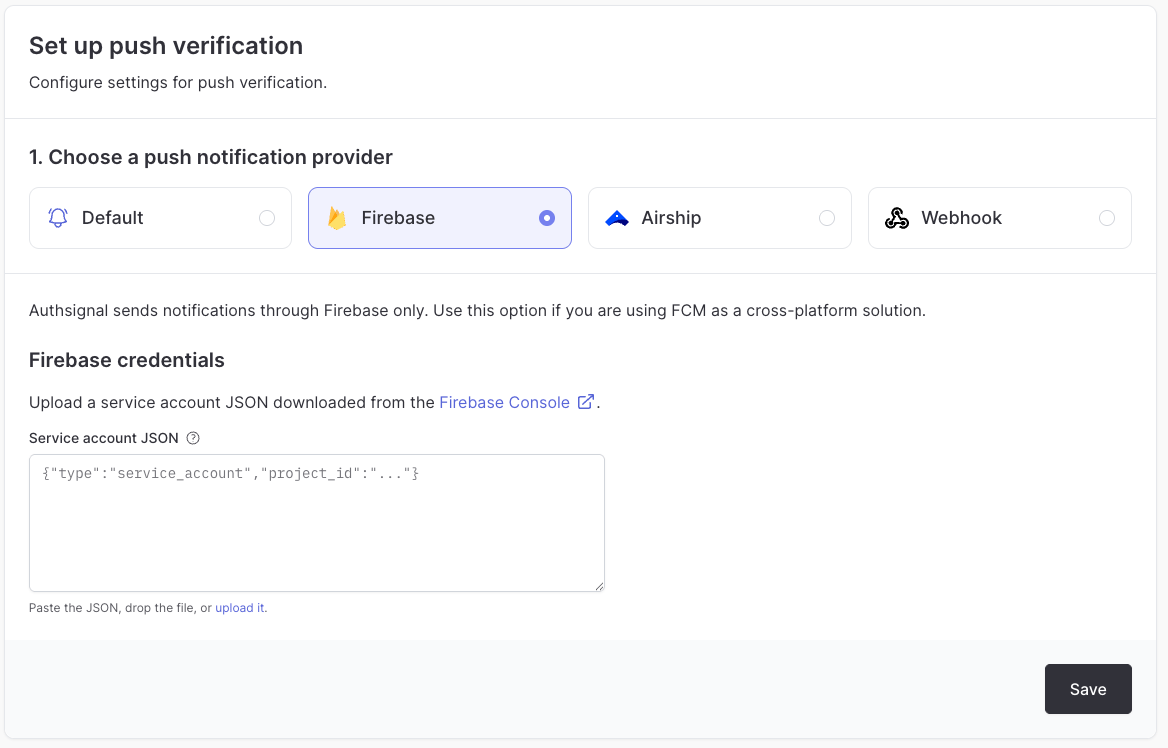 Upload a service account JSON downloaded from the [Firebase Console](https://console.firebase.google.com/). This is the only credential required. Go to **Project settings > Service accounts** and click **Generate new private key** to download it.
## Registering push tokens
For Authsignal to deliver a notification, each enrolled device must have a push token registered against its credential. When you enroll a device for push verification with the [Mobile SDK](/sdks/client/mobile/push-verification#adding-a-credential), pass the device's push token to `addCredential`. Authsignal stores the token with the credential and uses it, along with the device platform, to route the notification to the correct service.
### Which token to register
The token you register must match the provider configured for your tenant:
* **Default provider** - register the raw device push token. On iOS this is a raw APNs token, on Android it is an FCM token. Authsignal sends to APNs directly on iOS and FCM on Android.
* **Firebase provider** - register an FCM registration token on both platforms, including iOS.
Your app obtains the token from the OS push APIs:
```swift iOS theme={null}
// Default provider: the raw APNs device token, delivered to your AppDelegate
// after registering for remote notifications.
func application(
_ application: UIApplication,
didRegisterForRemoteNotificationsWithDeviceToken deviceToken: Data
) {
let pushToken = deviceToken.map { String(format: "%02x", $0) }.joined()
}
// Firebase provider: the FCM registration token.
Messaging.messaging().token { token, error in
let pushToken = token
}
```
```kotlin Android theme={null}
// Default and Firebase providers both use the FCM registration token on Android.
FirebaseMessaging.getInstance().token.addOnCompleteListener { task ->
if (task.isSuccessful) {
val pushToken = task.result
}
}
```
```ts React Native theme={null}
import * as Notifications from "expo-notifications";
import messaging from "@react-native-firebase/messaging";
// Default provider: raw APNs token (iOS) / FCM token (Android).
const { data: pushToken } = await Notifications.getDevicePushTokenAsync();
// Firebase provider: FCM registration token (both platforms).
const pushToken = await messaging().getToken();
```
```dart Flutter theme={null}
import 'dart:io' show Platform;
import 'package:firebase_messaging/firebase_messaging.dart';
// Default provider: raw APNs token (iOS) / FCM token (Android).
final pushToken = Platform.isIOS
? await FirebaseMessaging.instance.getAPNSToken()
: await FirebaseMessaging.instance.getToken();
// Firebase provider: FCM registration token (both platforms).
final pushToken = await FirebaseMessaging.instance.getToken();
```
### Passing the token to the SDK
Pass the token you obtained to `addCredential`:
```swift iOS theme={null}
await authsignal.push.addCredential(
token: "eyJhbGciOiJ...",
pushToken: ""
)
```
```kotlin Android theme={null}
authsignal.push.addCredential(
token = "eyJhbGciOiJ...",
pushToken = ""
)
```
```ts React Native theme={null}
await authsignal.push.addCredential({
token: "eyJhbGciOiJ...",
pushToken: "",
});
```
```dart Flutter theme={null}
await authsignal.push.addCredential(
token: "eyJhbGciOiJ...",
pushToken: "",
);
```
If a credential has no push token, the notification is skipped for that device. The challenge can still be completed by opening the app, because delivery is best-effort.
Passing the push token is supported on the iOS SDK from `v2.7.1`, the Android SDK from `v3.8.1`, the React Native SDK from `v2.12.0`, and the Flutter SDK from `v2.6.0`.
### Keeping the token current
Push tokens rotate over time - on reinstall, restore, or expiry - and a notification sent to a stale token is silently dropped. Both [Apple](https://developer.apple.com/documentation/usernotifications/registering-your-app-with-apns) and [Google](https://firebase.google.com/docs/cloud-messaging/manage-tokens) recommend registering the new token with your server as soon as the OS hands it to you. With Authsignal, register it (typically from a token-refresh callback and on app launch) using the SDK's [Update credential](/sdks/client/mobile/push-verification#updating-a-credential) method, which refreshes the token on the existing credential without re-enrolling the device.
Updating a credential's push token requires the iOS SDK `v2.11.0`, the Android SDK `v4.1.0`, or the React Native SDK `v3.1.0` (or later).
## What gets sent
The notification payload is intentionally minimal. It carries a generic alert and the `challengeId` of the pending challenge:
* **APNs** - an `alert` notification with a default sound, plus the `challengeId` in the payload.
* **FCM** - a notification with the title `Authentication request`, plus the `challengeId` in the message data.
Your app uses the `challengeId` to fetch the pending challenge with the Mobile SDK's [Get Challenge](/sdks/client/mobile/push-verification#getting-a-challenge) method, then presents the approve/reject prompt as described in [Push verification](/authentication-methods/app-verification/push#3-check-for-pending-challenge-in-mobile-app).
## Monitoring delivery
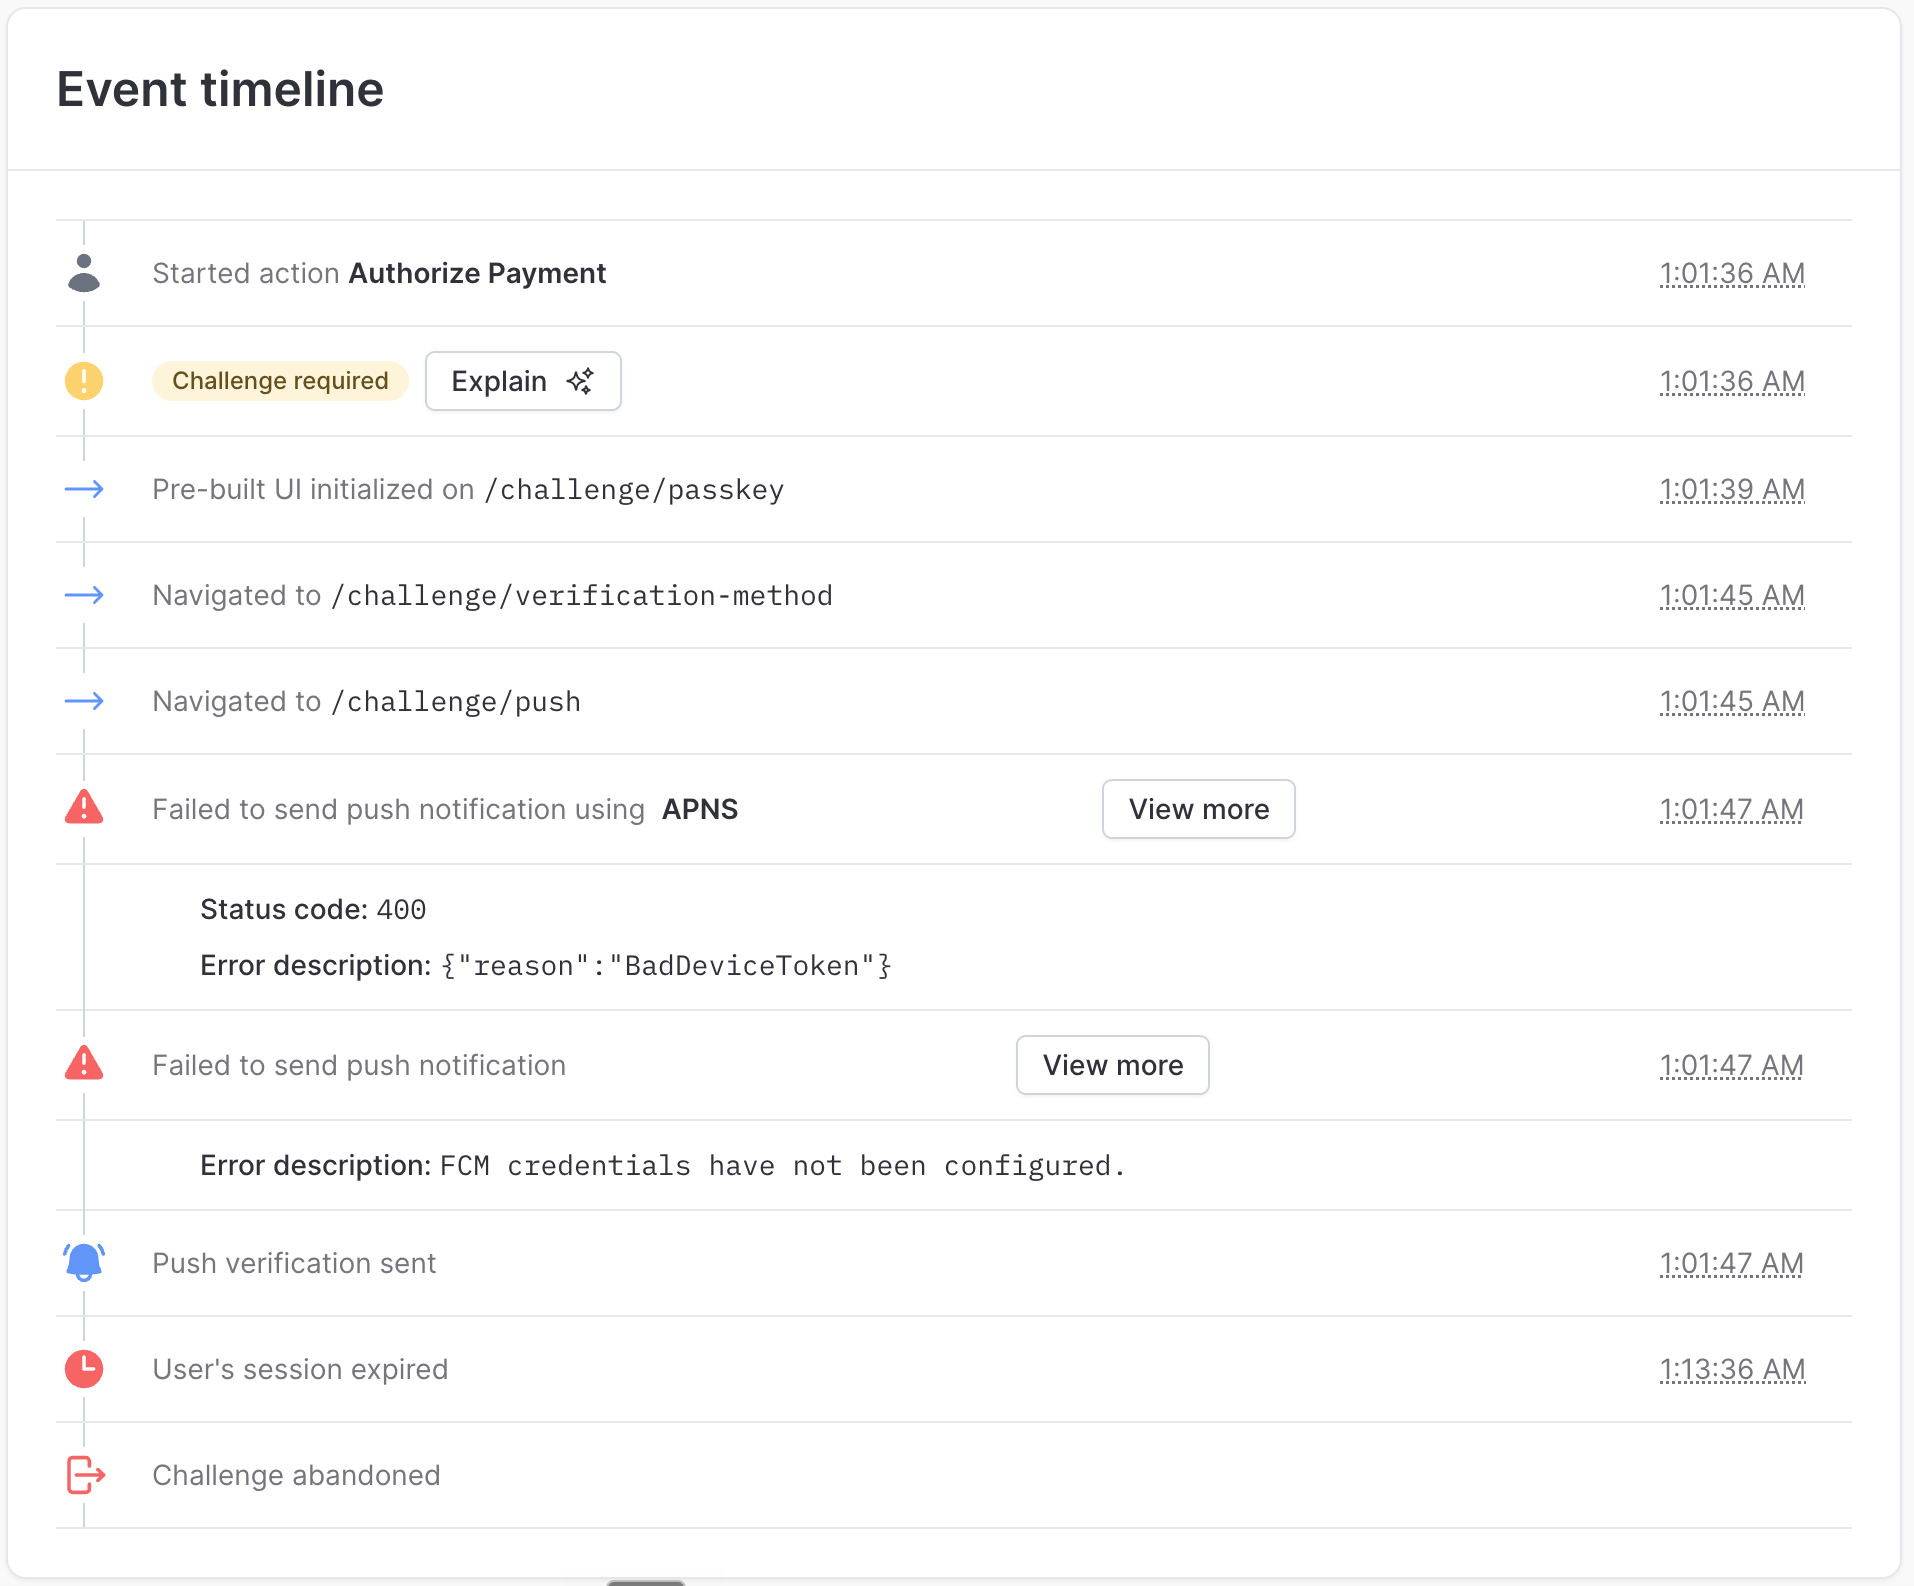
Because delivery is best-effort, failed sends never fail a challenge. Instead, Authsignal records a timeline event when a send fails - including the downstream provider name, status code, and an error description from APNs or FCM - so you can monitor and debug delivery issues. A successful send is also recorded as a `PUSH_SENT` event.
You can see these events on the user's [event timeline](/knowledge-base/administration/view-user-activity) in the portal. Expand **View more** on a failed send to see the provider, status code, and error description returned by APNs or FCM.
Upload a service account JSON downloaded from the [Firebase Console](https://console.firebase.google.com/). This is the only credential required. Go to **Project settings > Service accounts** and click **Generate new private key** to download it.
## Registering push tokens
For Authsignal to deliver a notification, each enrolled device must have a push token registered against its credential. When you enroll a device for push verification with the [Mobile SDK](/sdks/client/mobile/push-verification#adding-a-credential), pass the device's push token to `addCredential`. Authsignal stores the token with the credential and uses it, along with the device platform, to route the notification to the correct service.
### Which token to register
The token you register must match the provider configured for your tenant:
* **Default provider** - register the raw device push token. On iOS this is a raw APNs token, on Android it is an FCM token. Authsignal sends to APNs directly on iOS and FCM on Android.
* **Firebase provider** - register an FCM registration token on both platforms, including iOS.
Your app obtains the token from the OS push APIs:
```swift iOS theme={null}
// Default provider: the raw APNs device token, delivered to your AppDelegate
// after registering for remote notifications.
func application(
_ application: UIApplication,
didRegisterForRemoteNotificationsWithDeviceToken deviceToken: Data
) {
let pushToken = deviceToken.map { String(format: "%02x", $0) }.joined()
}
// Firebase provider: the FCM registration token.
Messaging.messaging().token { token, error in
let pushToken = token
}
```
```kotlin Android theme={null}
// Default and Firebase providers both use the FCM registration token on Android.
FirebaseMessaging.getInstance().token.addOnCompleteListener { task ->
if (task.isSuccessful) {
val pushToken = task.result
}
}
```
```ts React Native theme={null}
import * as Notifications from "expo-notifications";
import messaging from "@react-native-firebase/messaging";
// Default provider: raw APNs token (iOS) / FCM token (Android).
const { data: pushToken } = await Notifications.getDevicePushTokenAsync();
// Firebase provider: FCM registration token (both platforms).
const pushToken = await messaging().getToken();
```
```dart Flutter theme={null}
import 'dart:io' show Platform;
import 'package:firebase_messaging/firebase_messaging.dart';
// Default provider: raw APNs token (iOS) / FCM token (Android).
final pushToken = Platform.isIOS
? await FirebaseMessaging.instance.getAPNSToken()
: await FirebaseMessaging.instance.getToken();
// Firebase provider: FCM registration token (both platforms).
final pushToken = await FirebaseMessaging.instance.getToken();
```
### Passing the token to the SDK
Pass the token you obtained to `addCredential`:
```swift iOS theme={null}
await authsignal.push.addCredential(
token: "eyJhbGciOiJ...",
pushToken: ""
)
```
```kotlin Android theme={null}
authsignal.push.addCredential(
token = "eyJhbGciOiJ...",
pushToken = ""
)
```
```ts React Native theme={null}
await authsignal.push.addCredential({
token: "eyJhbGciOiJ...",
pushToken: "",
});
```
```dart Flutter theme={null}
await authsignal.push.addCredential(
token: "eyJhbGciOiJ...",
pushToken: "",
);
```
If a credential has no push token, the notification is skipped for that device. The challenge can still be completed by opening the app, because delivery is best-effort.
Passing the push token is supported on the iOS SDK from `v2.7.1`, the Android SDK from `v3.8.1`, the React Native SDK from `v2.12.0`, and the Flutter SDK from `v2.6.0`.
### Keeping the token current
Push tokens rotate over time - on reinstall, restore, or expiry - and a notification sent to a stale token is silently dropped. Both [Apple](https://developer.apple.com/documentation/usernotifications/registering-your-app-with-apns) and [Google](https://firebase.google.com/docs/cloud-messaging/manage-tokens) recommend registering the new token with your server as soon as the OS hands it to you. With Authsignal, register it (typically from a token-refresh callback and on app launch) using the SDK's [Update credential](/sdks/client/mobile/push-verification#updating-a-credential) method, which refreshes the token on the existing credential without re-enrolling the device.
Updating a credential's push token requires the iOS SDK `v2.11.0`, the Android SDK `v4.1.0`, or the React Native SDK `v3.1.0` (or later).
## What gets sent
The notification payload is intentionally minimal. It carries a generic alert and the `challengeId` of the pending challenge:
* **APNs** - an `alert` notification with a default sound, plus the `challengeId` in the payload.
* **FCM** - a notification with the title `Authentication request`, plus the `challengeId` in the message data.
Your app uses the `challengeId` to fetch the pending challenge with the Mobile SDK's [Get Challenge](/sdks/client/mobile/push-verification#getting-a-challenge) method, then presents the approve/reject prompt as described in [Push verification](/authentication-methods/app-verification/push#3-check-for-pending-challenge-in-mobile-app).
## Monitoring delivery
Because delivery is best-effort, failed sends never fail a challenge. Instead, Authsignal records a timeline event when a send fails - including the downstream provider name, status code, and an error description from APNs or FCM - so you can monitor and debug delivery issues. A successful send is also recorded as a `PUSH_SENT` event.
You can see these events on the user's [event timeline](/knowledge-base/administration/view-user-activity) in the portal. Expand **View more** on a failed send to see the provider, status code, and error description returned by APNs or FCM.
 ## Next steps
* **[Push verification](/authentication-methods/app-verification/push)** - The full push verification flow, including enrollment and adaptive MFA
* **[Enrollment lifecycle](/authentication-methods/app-verification/enrollment-lifecycle)** - When to add credentials and register push tokens in your app
* **[Adaptive MFA](/actions-rules/rules/adaptive-mfa)** - Trigger push verification based on risk
## Next steps
* **[Push verification](/authentication-methods/app-verification/push)** - The full push verification flow, including enrollment and adaptive MFA
* **[Enrollment lifecycle](/authentication-methods/app-verification/enrollment-lifecycle)** - When to add credentials and register push tokens in your app
* **[Adaptive MFA](/actions-rules/rules/adaptive-mfa)** - Trigger push verification based on risk