> ## Documentation Index
> Fetch the complete documentation index at: https://docs.authsignal.com/llms.txt
> Use this file to discover all available pages before exploring further.
# Configuration as code with Terraform
> Use Authsignal's Terraform provider to manage your actions, rules, and pre-built UI configuration as code.
Authsignal's [Terraform provider](https://registry.terraform.io/providers/authsignal/authsignal/latest) lets you manage your tenant's configuration as code instead of editing it by hand in the Authsignal Portal. Use it to:
* Keep your action configurations, rules, themes, and message overrides in version control.
* Review configuration changes through pull requests before applying them.
* Promote configuration changes between environments, for example from a staging tenant to production.
If this is your first time using Terraform, we recommend reading [the official introduction](https://developer.hashicorp.com/terraform/intro) to learn the fundamentals.
## Get started
The provider authenticates using a Management API secret key, which you can generate in [the Authsignal Portal](https://portal.authsignal.com/organisations/tenants/api).
The provider needs the following 3 values, all shown on the portal page linked above. You can write them directly into your Terraform files, but we recommend supplying them as environment variables, especially for production environments.
```hcl theme={null}
terraform {
required_providers {
authsignal = {
source = "authsignal/authsignal"
version = "1.0.0"
}
}
}
provider "authsignal" {
host = "https://api.authsignal.com/v1/management" # AUTHSIGNAL_HOST
tenant_id = "aaaa-bbbb-cccc-dddd" # AUTHSIGNAL_TENANT_ID
api_secret = "" # AUTHSIGNAL_API_SECRET
}
```
The `host` value is your API host URL with `/v1/management` appended.
Run `terraform init` to validate the configuration. From here you can start declaring resources. See [Working with resources](#working-with-resources) below for examples, and [the Terraform registry](https://registry.terraform.io/providers/authsignal/authsignal/latest/docs) for the full list of available resources.
## Adopt Terraform on an existing tenant
If your tenant already has configuration you created in the portal, you don't need to delete it and recreate it in Terraform. Two techniques make adoption easier:
* **Export rule JSON from the portal.** Rules are easier to build in the portal's editor than to write by hand, so configure them there first and export the result.
* **Import existing resources.** Use [`terraform import`](https://developer.hashicorp.com/terraform/cli/commands/import) to bring resources that already exist in your tenant under Terraform management. Write the corresponding Terraform for the resource, then import it using the address syntax shown under each resource's documentation on [the Terraform registry](https://registry.terraform.io/providers/authsignal/authsignal/latest/docs). Import commands for each resource type are shown in [Working with resources](#working-with-resources) below.
### Exporting rule JSON from the portal
After configuring a rule in the portal, you can export the rule's JSON:
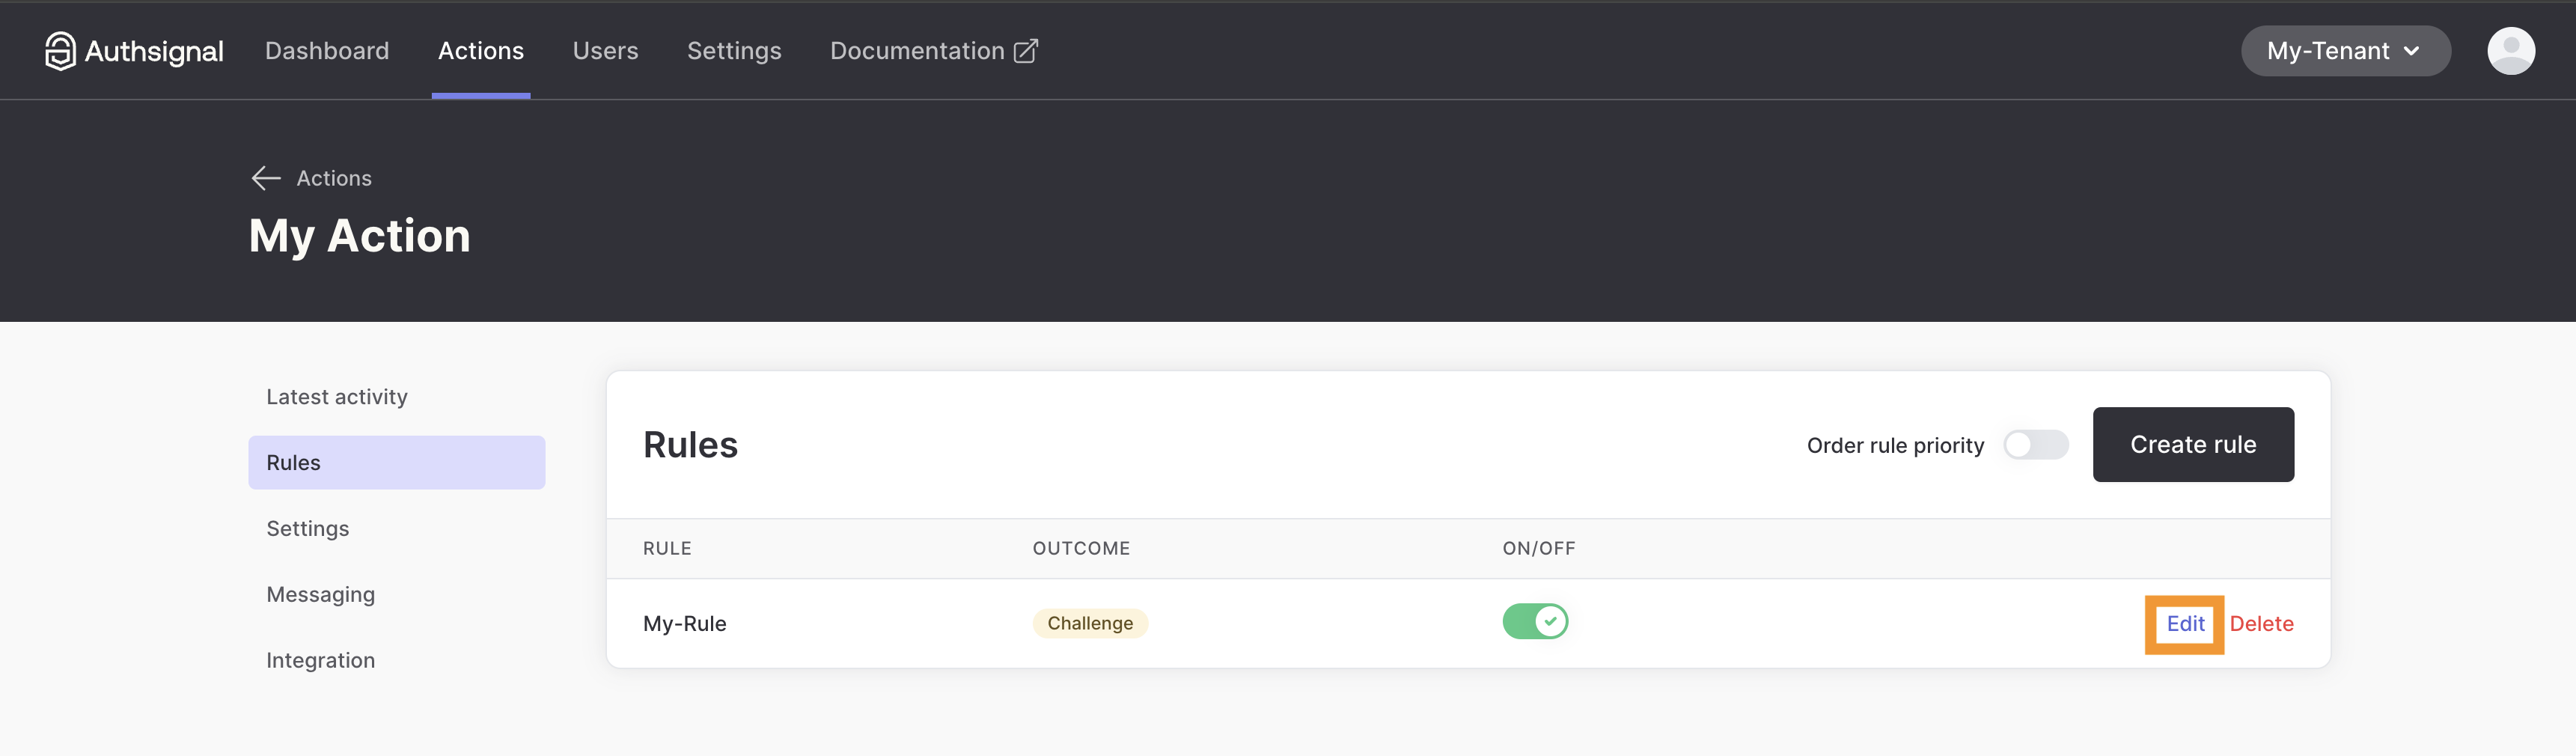
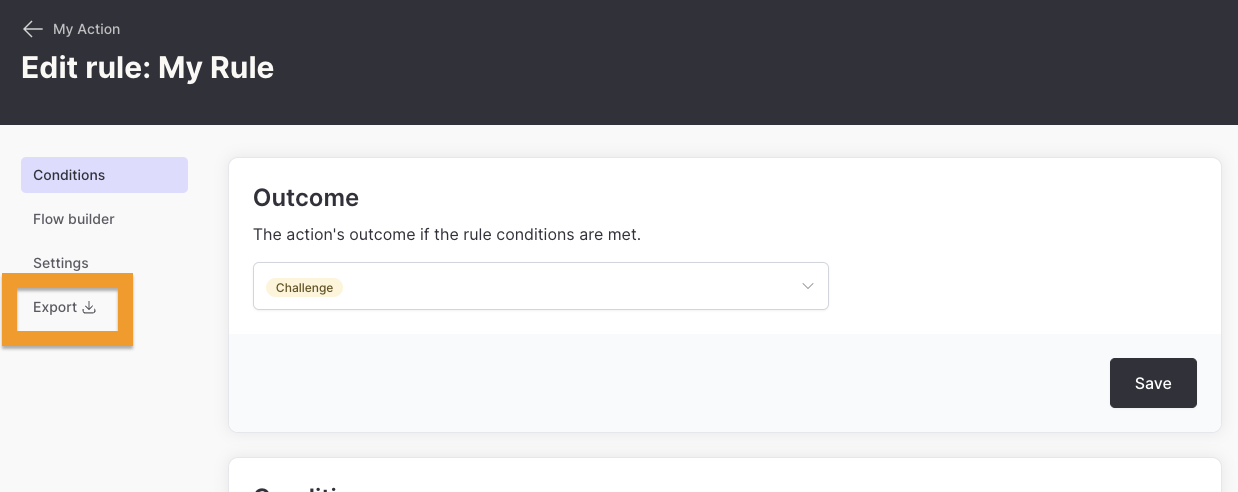 You will need to edit the exported JSON slightly to conform to valid Terraform syntax. See [the rule resource docs](https://registry.terraform.io/providers/authsignal/authsignal/latest/docs/resources/rule) for the correct structure and field names.
## Working with resources
The sections below cover the most common resources. [The Terraform registry](https://registry.terraform.io/providers/authsignal/authsignal/latest/docs) is the source of truth for the full list of resources and their attributes.
### Action configurations
```hcl theme={null}
resource "authsignal_action_configuration" "my_action" {
action_code = "My-Action"
default_user_action_result = "ALLOW"
}
```
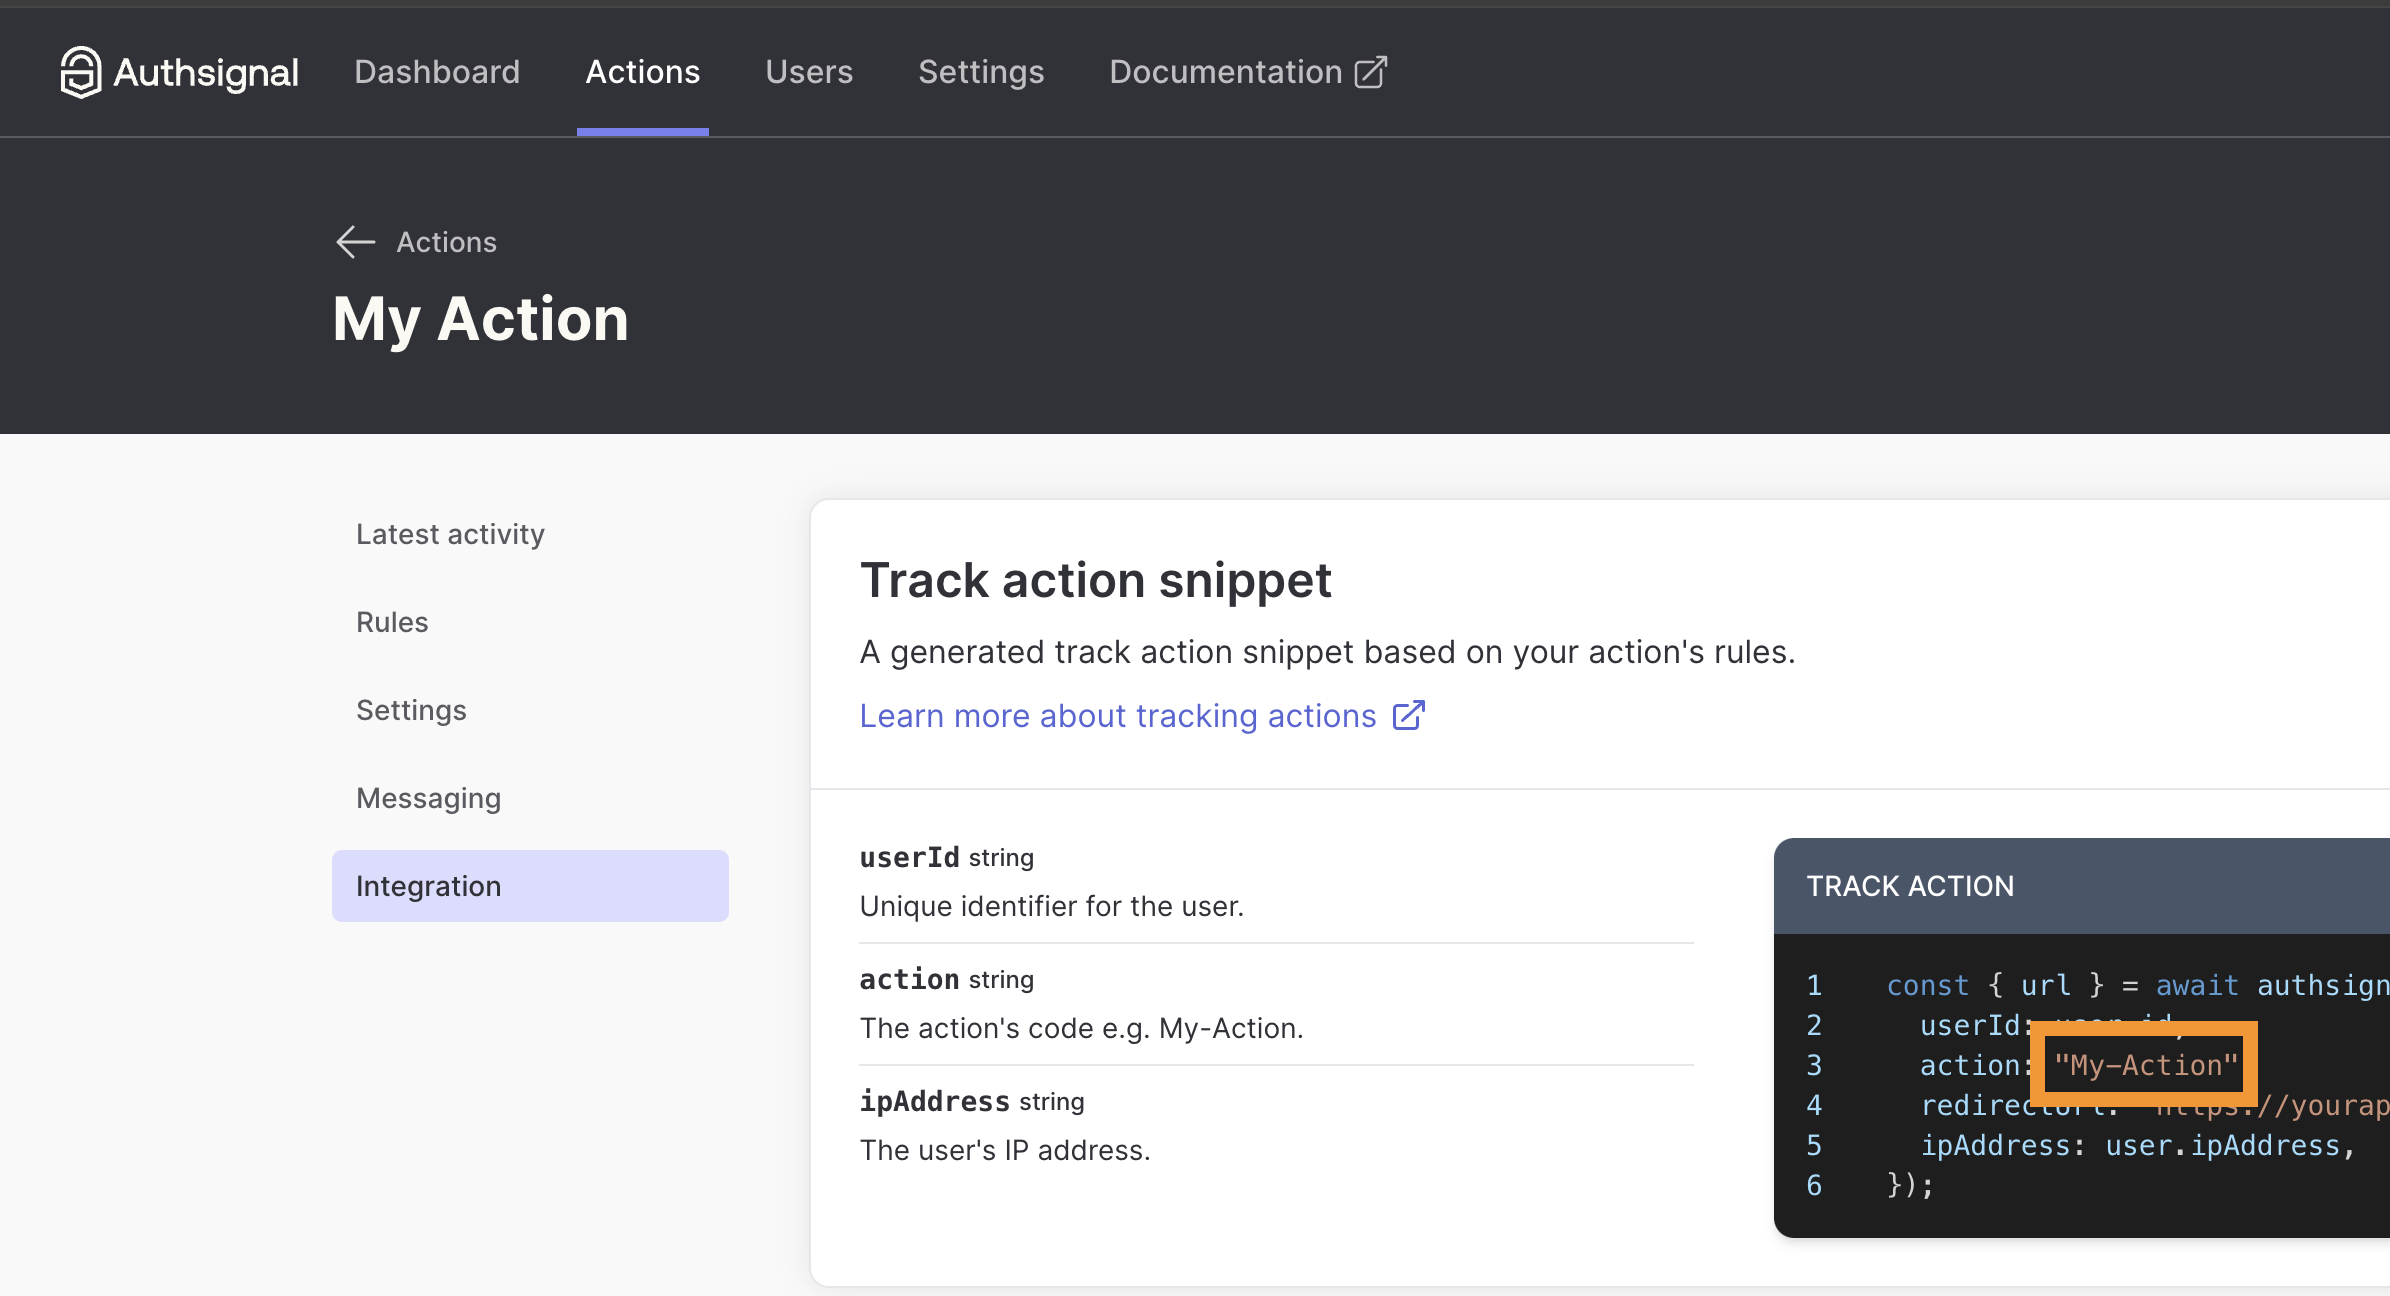
To import an existing action configuration, you will need your action code, which you can find in the portal:
You will need to edit the exported JSON slightly to conform to valid Terraform syntax. See [the rule resource docs](https://registry.terraform.io/providers/authsignal/authsignal/latest/docs/resources/rule) for the correct structure and field names.
## Working with resources
The sections below cover the most common resources. [The Terraform registry](https://registry.terraform.io/providers/authsignal/authsignal/latest/docs) is the source of truth for the full list of resources and their attributes.
### Action configurations
```hcl theme={null}
resource "authsignal_action_configuration" "my_action" {
action_code = "My-Action"
default_user_action_result = "ALLOW"
}
```
To import an existing action configuration, you will need your action code, which you can find in the portal:
 ```bash theme={null}
terraform import authsignal_action_configuration.my_action My-Action
```
### Rules
```hcl theme={null}
resource "authsignal_rule" "my_rule" {
action_code = authsignal_action_configuration.my_action.action_code
name = "My-Rule"
is_active = true
priority = 0
type = "CHALLENGE"
conditions = jsonencode({
"and" : [
{
"==" : [
{
"var" : "ip.isAnonymous"
},
true
]
}
]
})
}
```
To import an existing rule, you will need its unique identifier, which you can find in the URL when editing the rule in the portal:
```bash theme={null}
terraform import authsignal_action_configuration.my_action My-Action
```
### Rules
```hcl theme={null}
resource "authsignal_rule" "my_rule" {
action_code = authsignal_action_configuration.my_action.action_code
name = "My-Rule"
is_active = true
priority = 0
type = "CHALLENGE"
conditions = jsonencode({
"and" : [
{
"==" : [
{
"var" : "ip.isAnonymous"
},
true
]
}
]
})
}
```
To import an existing rule, you will need its unique identifier, which you can find in the URL when editing the rule in the portal:
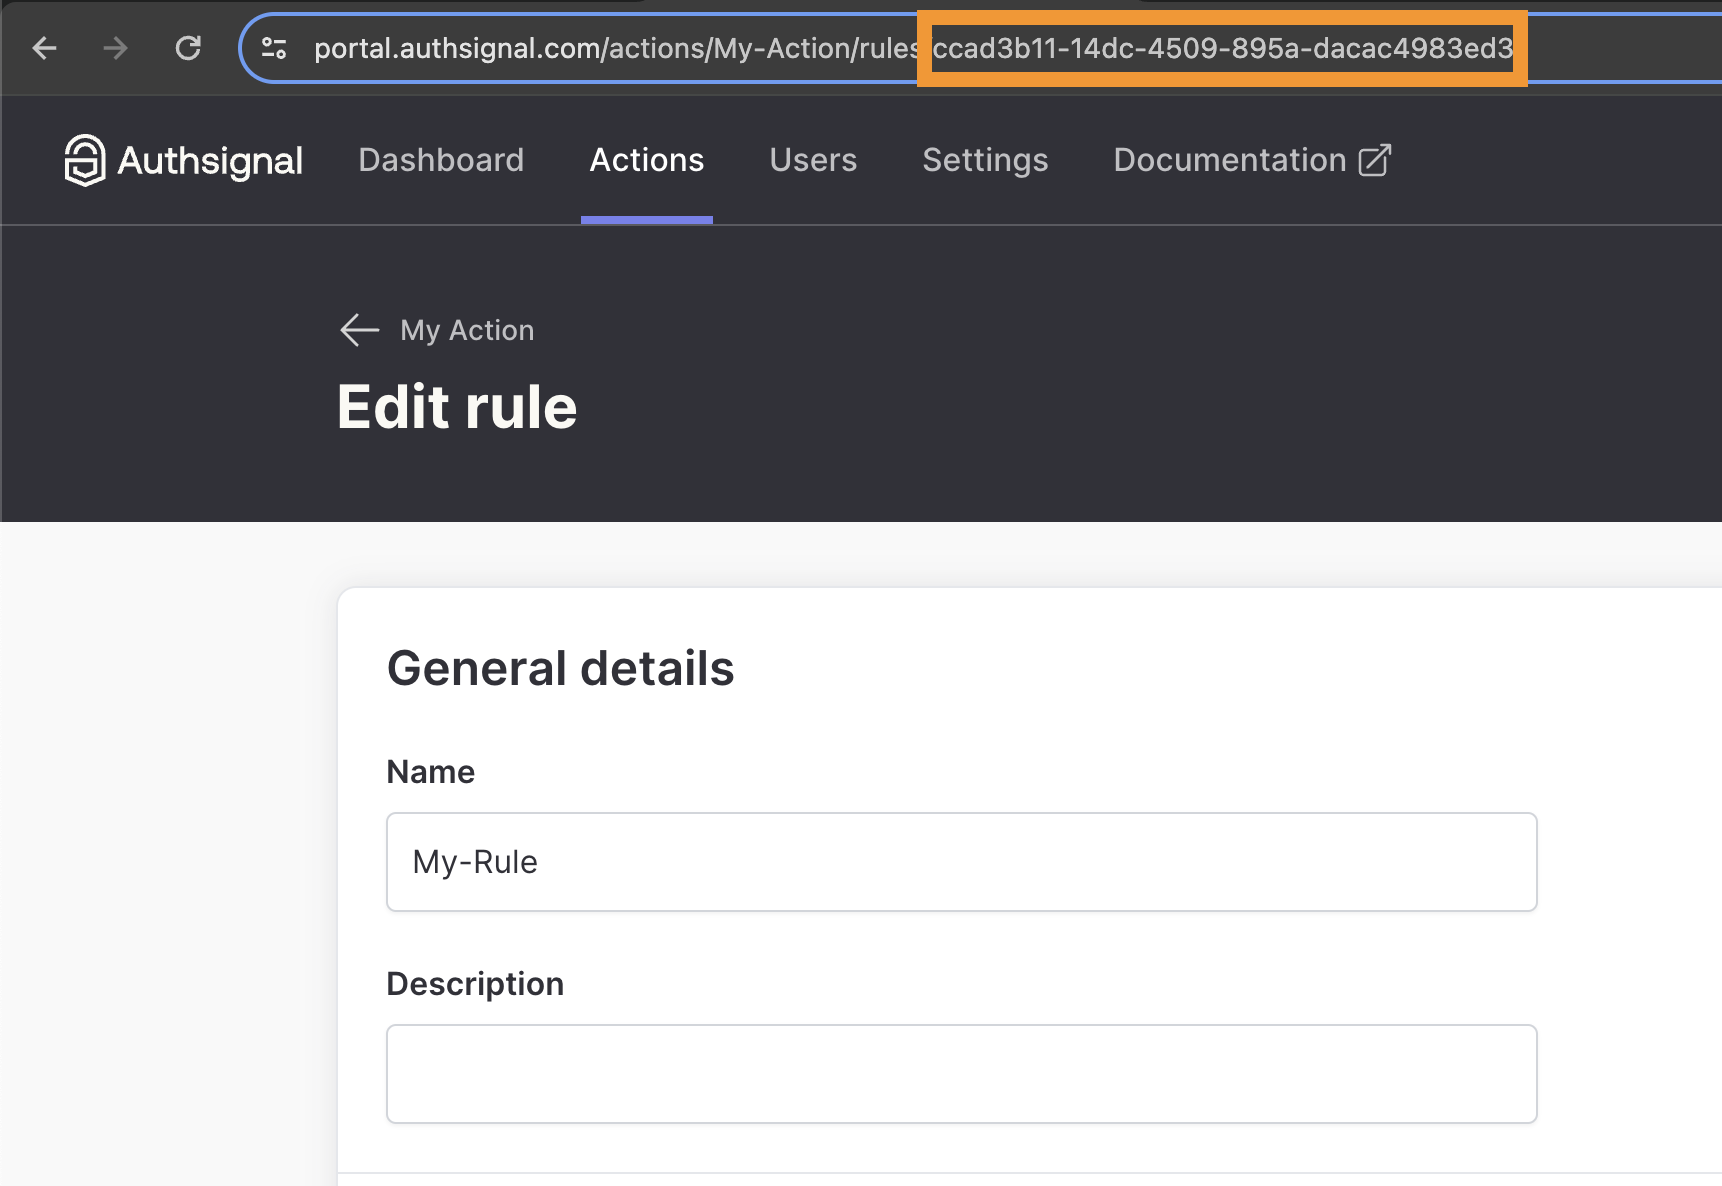 The import ID combines the action code and the rule's identifier:
```bash theme={null}
terraform import authsignal_rule.my_rule "My-Action/ccad3b11-14dc-4509-895a-dacac4983ed3"
```
### Themes
Themes control the branding of the [pre-built UI](/implementation-options/prebuilt-ui/custom-branding). A tenant has a single theme, and every tenant starts with default theme settings, so import the existing theme before managing it with Terraform.
```hcl theme={null}
resource "authsignal_theme" "my_theme" {
name = "My Tenant"
logo_url = ""
favicon_url = ""
watermark_url = ""
primary_color = "#ABCD12"
borders = {
button_border_radius = 1
card_border_radius = 3
input_border_radius = 5
}
colors = {
card_background = "#ABCD12"
container_background = "#ABCD12"
body_text = "#ABCD12"
}
}
```
This example shows a subset of the available attributes. See [the theme resource docs](https://registry.terraform.io/providers/authsignal/authsignal/latest/docs/resources/theme) for the full schema, including colors, borders, page background, and container layout settings.
Because the theme is a tenant-wide singleton, import it using an empty string as the resource ID:
```bash theme={null}
terraform import authsignal_theme.my_theme ""
```
### Message overrides
[Message overrides](/implementation-options/prebuilt-ui/message-overrides) let you replace the default copy shown in the pre-built UI, per locale. If the tenant doesn't have any overrides yet, you can declare the resource and apply it directly. If overrides already exist (for example, configured in the portal), import them first so the plan shows what will change. Otherwise the apply is rejected to avoid silently overwriting them.
The `overrides` attribute is a map keyed by locale, then by message override ID (e.g. `sms-code-entry.heading`). Applying is a full replacement: any override not present is removed, and omitting `overrides` clears them all.
```hcl theme={null}
resource "authsignal_message_overrides" "my_message_overrides" {
overrides = {
en = {
"sms-code-entry.heading" = "Enter your code"
}
"pt-br" = {
"sms-code-entry.heading" = "Insira seu código"
}
}
}
```
To discover the valid override IDs, locales, and default copy, use the `authsignal_message_overrides_catalog` data source:
```hcl theme={null}
data "authsignal_message_overrides_catalog" "catalog" {}
```
To read the tenant's currently configured overrides, use the `authsignal_message_overrides` data source:
```hcl theme={null}
data "authsignal_message_overrides" "current" {}
```
Message overrides are a tenant-wide singleton, imported from the `""` ID:
```bash theme={null}
terraform import authsignal_message_overrides.my_message_overrides ""
```
The import ID combines the action code and the rule's identifier:
```bash theme={null}
terraform import authsignal_rule.my_rule "My-Action/ccad3b11-14dc-4509-895a-dacac4983ed3"
```
### Themes
Themes control the branding of the [pre-built UI](/implementation-options/prebuilt-ui/custom-branding). A tenant has a single theme, and every tenant starts with default theme settings, so import the existing theme before managing it with Terraform.
```hcl theme={null}
resource "authsignal_theme" "my_theme" {
name = "My Tenant"
logo_url = ""
favicon_url = ""
watermark_url = ""
primary_color = "#ABCD12"
borders = {
button_border_radius = 1
card_border_radius = 3
input_border_radius = 5
}
colors = {
card_background = "#ABCD12"
container_background = "#ABCD12"
body_text = "#ABCD12"
}
}
```
This example shows a subset of the available attributes. See [the theme resource docs](https://registry.terraform.io/providers/authsignal/authsignal/latest/docs/resources/theme) for the full schema, including colors, borders, page background, and container layout settings.
Because the theme is a tenant-wide singleton, import it using an empty string as the resource ID:
```bash theme={null}
terraform import authsignal_theme.my_theme ""
```
### Message overrides
[Message overrides](/implementation-options/prebuilt-ui/message-overrides) let you replace the default copy shown in the pre-built UI, per locale. If the tenant doesn't have any overrides yet, you can declare the resource and apply it directly. If overrides already exist (for example, configured in the portal), import them first so the plan shows what will change. Otherwise the apply is rejected to avoid silently overwriting them.
The `overrides` attribute is a map keyed by locale, then by message override ID (e.g. `sms-code-entry.heading`). Applying is a full replacement: any override not present is removed, and omitting `overrides` clears them all.
```hcl theme={null}
resource "authsignal_message_overrides" "my_message_overrides" {
overrides = {
en = {
"sms-code-entry.heading" = "Enter your code"
}
"pt-br" = {
"sms-code-entry.heading" = "Insira seu código"
}
}
}
```
To discover the valid override IDs, locales, and default copy, use the `authsignal_message_overrides_catalog` data source:
```hcl theme={null}
data "authsignal_message_overrides_catalog" "catalog" {}
```
To read the tenant's currently configured overrides, use the `authsignal_message_overrides` data source:
```hcl theme={null}
data "authsignal_message_overrides" "current" {}
```
Message overrides are a tenant-wide singleton, imported from the `""` ID:
```bash theme={null}
terraform import authsignal_message_overrides.my_message_overrides ""
```