> ## Documentation Index
> Fetch the complete documentation index at: https://docs.authsignal.com/llms.txt
> Use this file to discover all available pages before exploring further.
# Customizing rules with custom data points
> Learn how to create custom data points and integrate them into Authsignal rules to create intelligent, policy-driven authentication flows that respond to your unique security requirements
While Authsignal provides a powerful set of predefined data points to create rules with, you may find yourself wanting to create rules based on your own data.
In this guide we will explore how you can create your own custom data points within the rules builder.
Let's create a rule that will challenge a user when they attempt to withdraw funds over a certain amount.
## 1. Create the `withdrawFunds` action
* Create the `withdrawFunds` action
* Head to the **Rules** section and create a new rule called `Challenge large withdrawals`
* Set the **Outcome** to `CHALLENGE`
## 2. Create a custom data point
* In the **Conditions** section, click **Add feature**
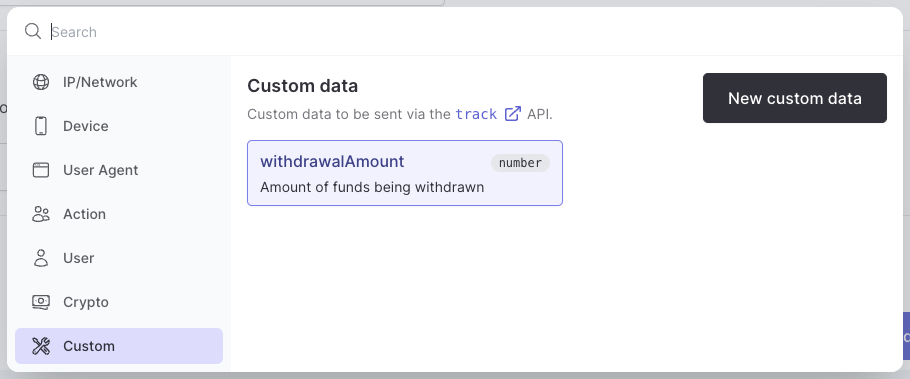
* Click **Select feature**, then head to the **Custom** tab
* Click **Create data point** and choose **Action**.
* Fill in the **Name** and **Description** for the data point and choose **Type** as `Number`.
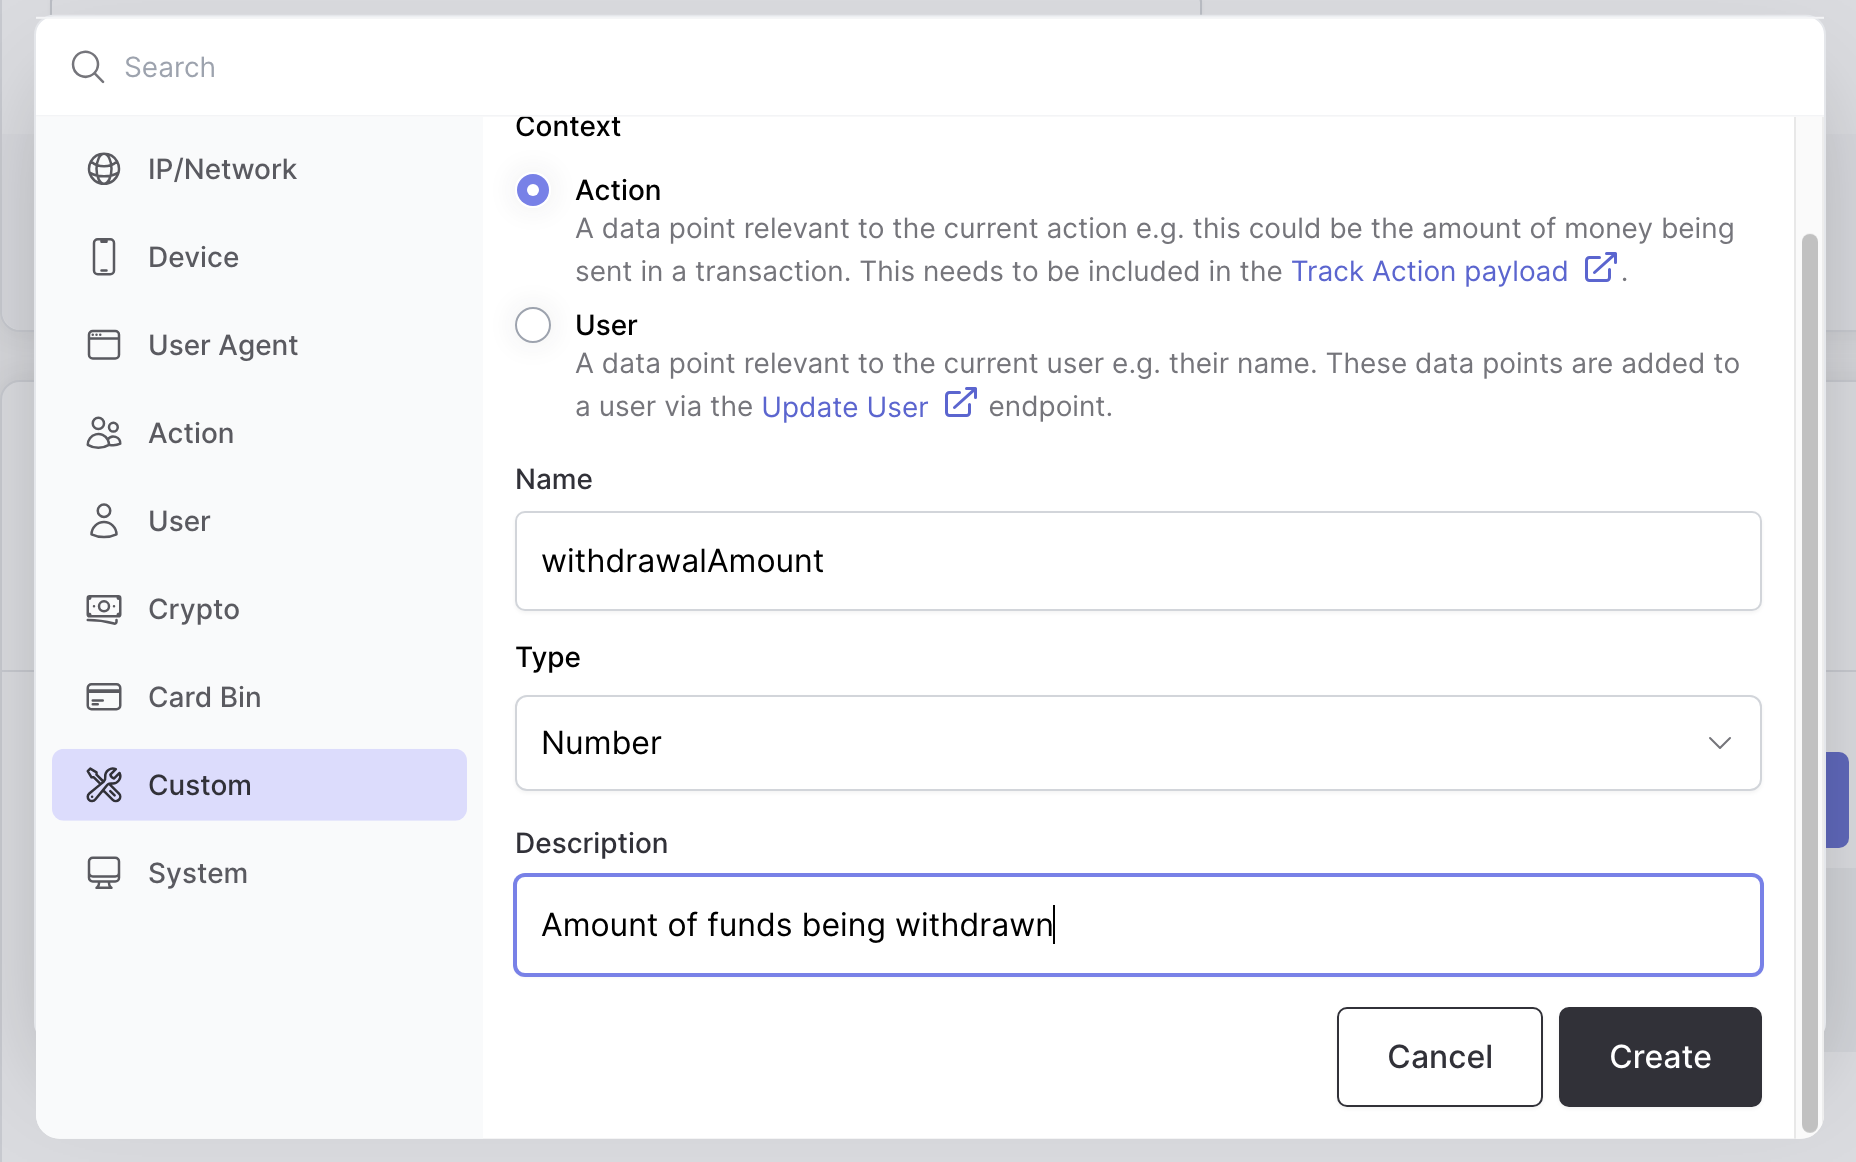 The value you provide to the **Name** field dictates how it must be sent in the track action
payload.
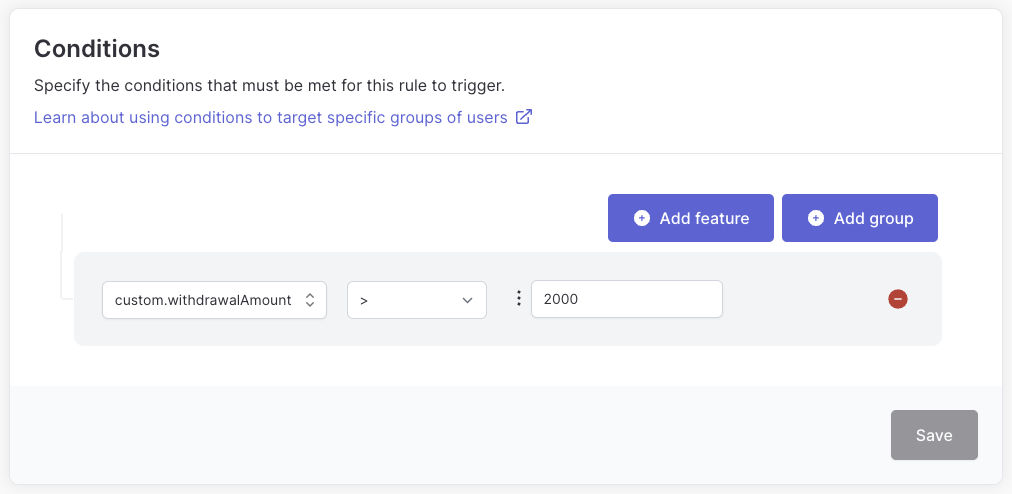
* You should now see a new condition added to your rule. Now, change the operation from `==` to `>` and set the value to `2000`.
The value you provide to the **Name** field dictates how it must be sent in the track action
payload.
* You should now see a new condition added to your rule. Now, change the operation from `==` to `>` and set the value to `2000`.
 Any custom data point you create will be saved in the **Custom** section and available
tenant-wide, i.e. you can use it in any of your actions and rules.
Any custom data point you create will be saved in the **Custom** section and available
tenant-wide, i.e. you can use it in any of your actions and rules.
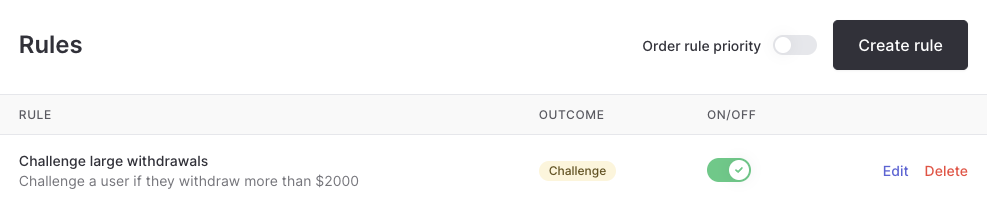
 * Finally, click the **Save** button and return to the **Rules** page for your `withdrawFunds` action. You should see your new rule listed.
 ## 3. Send the custom data in your code
Now that the rule is created, you need to send the `withdrawalAmount` custom data point in the track action payload. When tracking actions, Authsignal allows you to send a `custom` object that contains your custom data points. For our `withdrawFunds` action this will look like:
```ts Node.js {9-11} theme={null}
const request = {
userId: "dc58c6dc-a1fd-4a4f-8e2f-846636dd4833",
action: "withdrawFunds",
attributes: {
deviceId: "555c17e1-3837-4f13-81bb-131e5597e168",
userAgent: "Mozilla/5.0 (Windows NT 10.0; Win64; x64) AppleWebKit/537.36",
ipAddress: "203.0.113.42",
redirectUrl: "https://yourapp.com/callback",
custom: {
withdrawalAmount: 2001,
},
},
};
const response = await authsignal.track(request);
```
```csharp C# {9} theme={null}
var request = new TrackRequest(
UserId: user.Id,
Action: "withdrawFunds",
Attributes: new TrackAttributes(
DeviceId: "555c17e1-3837-4f13-81bb-131e5597e168",
UserAgent: "Mozilla/5.0 (Windows NT 10.0; Win64; x64) AppleWebKit/537.36",
IpAddress: "203.0.113.42",
RedirectUrl: "https://yourapp.com/callback",
Custom: new Dictionary { { "withdrawalAmount", 2001 } }
)
);
var response = await authsignal.Track(request);
```
```java Java {9-11} theme={null}
TrackRequest request = new TrackRequest();
request.userId = "dc58c6dc-a1fd-4a4f-8e2f-846636dd4833";
request.action = "withdrawFunds";
request.attributes = new TrackAttributes();
request.attributes.deviceId = "555c17e1-3837-4f13-81bb-131e5597e168";
request.attributes.userAgent = "Mozilla/5.0 (Windows NT 10.0; Win64; x64) AppleWebKit/537.36";
request.attributes.ipAddress = "203.0.113.42";
request.attributes.redirectUrl = "https://yourapp.com/callback";
request.attributes.custom = new HashMap() {{
put("withdrawalAmount", 2001);
}};
TrackResponse response = authsignal.track(request).get();
```
```ruby Ruby {9-11} theme={null}
response = Authsignal.track({
user_id: "dc58c6dc-a1fd-4a4f-8e2f-846636dd4833",
action: "withdrawFunds",
attributes: {
device_id: "555c17e1-3837-4f13-81bb-131e5597e168",
user_agent: "Mozilla/5.0 (Windows NT 10.0; Win64; x64) AppleWebKit/537.36",
ip_address: "203.0.113.42",
redirect_url: "https://yourapp.com/callback",
custom: {
withdrawalAmount: 2001,
},
}
})
```
```python Python {9-11} theme={null}
response = authsignal.track(
user_id="dc58c6dc-a1fd-4a4f-8e2f-846636dd4833",
action="withdrawFunds",
attributes={
"device_id": "555c17e1-3837-4f13-81bb-131e5597e168",
"user_agent": "Mozilla/5.0 (Windows NT 10.0; Win64; x64) AppleWebKit/537.36",
"ip_address": "203.0.113.42",
"redirect_url": "https://yourapp.com/callback",
"custom": {
"withdrawalAmount": 2001,
},
}
)
```
```php PHP {9-11} theme={null}
$response = Authsignal::track([
'userId' => "dc58c6dc-a1fd-4a4f-8e2f-846636dd4833",
'action' => "withdrawFunds",
'attributes' => [
'device_id' => "555c17e1-3837-4f13-81bb-131e5597e168",
'user_agent' => "Mozilla/5.0 (Windows NT 10.0; Win64; x64) AppleWebKit/537.36",
'ip_address' => "203.0.113.42",
'redirect_url' => "https://yourapp.com/callback",
'custom' => [
'withdrawalAmount' => 2001,
],
]
]);
```
```go Go {10-12} theme={null}
response := client.Track(
TrackRequest{
UserId: "dc58c6dc-a1fd-4a4f-8e2f-846636dd4833",
Action: "withdrawFunds",
Attributes: &TrackAttributes{
DeviceId: "555c17e1-3837-4f13-81bb-131e5597e168",
UserAgent: "Mozilla/5.0 (Windows NT 10.0; Win64; x64) AppleWebKit/537.36",
IpAddress: "203.0.113.42",
RedirectUrl: "https://yourapp.com/callback",
Custom: map[string]interface{}{
"withdrawalAmount": 2001,
},
},
},
)
```
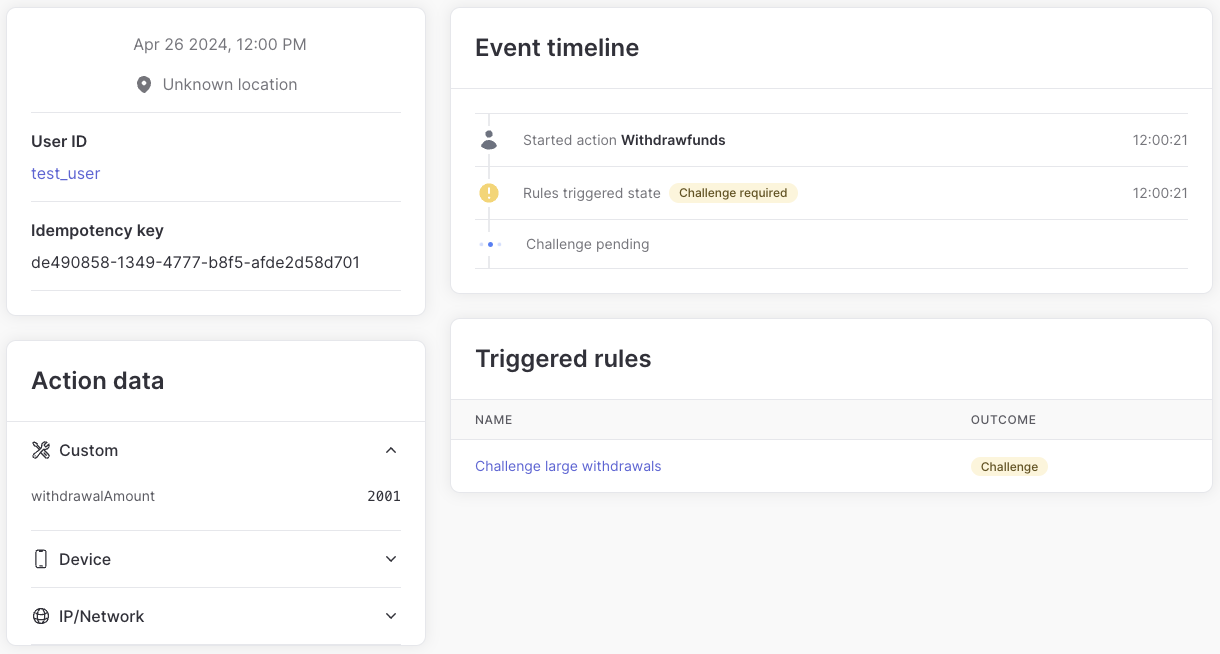
That' it! Now when someone tries to withdraw more than \$2000, they'll be challenged. You can verify this worked by checking the Latest activity table in your dashboard.
## 3. Send the custom data in your code
Now that the rule is created, you need to send the `withdrawalAmount` custom data point in the track action payload. When tracking actions, Authsignal allows you to send a `custom` object that contains your custom data points. For our `withdrawFunds` action this will look like:
```ts Node.js {9-11} theme={null}
const request = {
userId: "dc58c6dc-a1fd-4a4f-8e2f-846636dd4833",
action: "withdrawFunds",
attributes: {
deviceId: "555c17e1-3837-4f13-81bb-131e5597e168",
userAgent: "Mozilla/5.0 (Windows NT 10.0; Win64; x64) AppleWebKit/537.36",
ipAddress: "203.0.113.42",
redirectUrl: "https://yourapp.com/callback",
custom: {
withdrawalAmount: 2001,
},
},
};
const response = await authsignal.track(request);
```
```csharp C# {9} theme={null}
var request = new TrackRequest(
UserId: user.Id,
Action: "withdrawFunds",
Attributes: new TrackAttributes(
DeviceId: "555c17e1-3837-4f13-81bb-131e5597e168",
UserAgent: "Mozilla/5.0 (Windows NT 10.0; Win64; x64) AppleWebKit/537.36",
IpAddress: "203.0.113.42",
RedirectUrl: "https://yourapp.com/callback",
Custom: new Dictionary { { "withdrawalAmount", 2001 } }
)
);
var response = await authsignal.Track(request);
```
```java Java {9-11} theme={null}
TrackRequest request = new TrackRequest();
request.userId = "dc58c6dc-a1fd-4a4f-8e2f-846636dd4833";
request.action = "withdrawFunds";
request.attributes = new TrackAttributes();
request.attributes.deviceId = "555c17e1-3837-4f13-81bb-131e5597e168";
request.attributes.userAgent = "Mozilla/5.0 (Windows NT 10.0; Win64; x64) AppleWebKit/537.36";
request.attributes.ipAddress = "203.0.113.42";
request.attributes.redirectUrl = "https://yourapp.com/callback";
request.attributes.custom = new HashMap() {{
put("withdrawalAmount", 2001);
}};
TrackResponse response = authsignal.track(request).get();
```
```ruby Ruby {9-11} theme={null}
response = Authsignal.track({
user_id: "dc58c6dc-a1fd-4a4f-8e2f-846636dd4833",
action: "withdrawFunds",
attributes: {
device_id: "555c17e1-3837-4f13-81bb-131e5597e168",
user_agent: "Mozilla/5.0 (Windows NT 10.0; Win64; x64) AppleWebKit/537.36",
ip_address: "203.0.113.42",
redirect_url: "https://yourapp.com/callback",
custom: {
withdrawalAmount: 2001,
},
}
})
```
```python Python {9-11} theme={null}
response = authsignal.track(
user_id="dc58c6dc-a1fd-4a4f-8e2f-846636dd4833",
action="withdrawFunds",
attributes={
"device_id": "555c17e1-3837-4f13-81bb-131e5597e168",
"user_agent": "Mozilla/5.0 (Windows NT 10.0; Win64; x64) AppleWebKit/537.36",
"ip_address": "203.0.113.42",
"redirect_url": "https://yourapp.com/callback",
"custom": {
"withdrawalAmount": 2001,
},
}
)
```
```php PHP {9-11} theme={null}
$response = Authsignal::track([
'userId' => "dc58c6dc-a1fd-4a4f-8e2f-846636dd4833",
'action' => "withdrawFunds",
'attributes' => [
'device_id' => "555c17e1-3837-4f13-81bb-131e5597e168",
'user_agent' => "Mozilla/5.0 (Windows NT 10.0; Win64; x64) AppleWebKit/537.36",
'ip_address' => "203.0.113.42",
'redirect_url' => "https://yourapp.com/callback",
'custom' => [
'withdrawalAmount' => 2001,
],
]
]);
```
```go Go {10-12} theme={null}
response := client.Track(
TrackRequest{
UserId: "dc58c6dc-a1fd-4a4f-8e2f-846636dd4833",
Action: "withdrawFunds",
Attributes: &TrackAttributes{
DeviceId: "555c17e1-3837-4f13-81bb-131e5597e168",
UserAgent: "Mozilla/5.0 (Windows NT 10.0; Win64; x64) AppleWebKit/537.36",
IpAddress: "203.0.113.42",
RedirectUrl: "https://yourapp.com/callback",
Custom: map[string]interface{}{
"withdrawalAmount": 2001,
},
},
},
)
```
That' it! Now when someone tries to withdraw more than \$2000, they'll be challenged. You can verify this worked by checking the Latest activity table in your dashboard.
 You can manage all your custom data points in one place at [Settings > Rules > Custom data points](https://portal.authsignal.com/organisations/tenants/custom_data_points) in the Authsignal Portal.
## Public custom data points
For app verification methods like [push](/authentication-methods/app-verification/push) and [QR code](/authentication-methods/app-verification/qr-code), you often want the verifying device to display transaction context, such as the amount of a payment, so the user can make an informed decision before they approve or reject a challenge.
To surface a value on the device, mark its custom data point as public. This will make the value available on [getting push challenges](/authentication-methods/app-verification/push#getting-challenges) and [claiming QR code challenges](/authentication-methods/app-verification/qr-code#claiming-challenges).
You can manage all your custom data points in one place at [Settings > Rules > Custom data points](https://portal.authsignal.com/organisations/tenants/custom_data_points) in the Authsignal Portal.
## Public custom data points
For app verification methods like [push](/authentication-methods/app-verification/push) and [QR code](/authentication-methods/app-verification/qr-code), you often want the verifying device to display transaction context, such as the amount of a payment, so the user can make an informed decision before they approve or reject a challenge.
To surface a value on the device, mark its custom data point as public. This will make the value available on [getting push challenges](/authentication-methods/app-verification/push#getting-challenges) and [claiming QR code challenges](/authentication-methods/app-verification/qr-code#claiming-challenges).
